


285 589 01 21 00
NTKL Adaption
210 589 00 91 00
Test cap
285 589 02 21 00
Electric vacuum pump
285 589 00 21 00
Cooler vacuum filling device
Engine 133, 139, 157, 274, 276.8, 278, 279
Engine 157, 176, 279
Engine 176, 177, 178
Engine 608 in model 177
Engine 642 in model 164, 166, 204, 207, 211, 212, 213, 218, 222, 238, 251, 253, 292
Engine 651
Also repeat the ventilation process for the low-temperature circuit.
Only ventilate the engine cooling system for a cold engine.
Empty drainage container for NTKL adaptation (13) before beginning work.
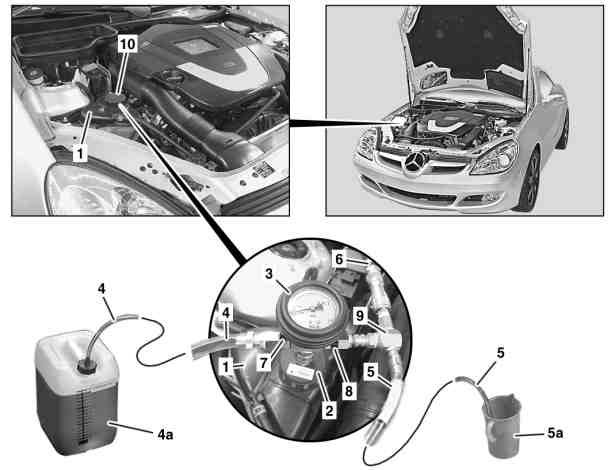
Shown on engine cooling system main circuit in model 171 |
P20.00-2250-06
1 | Bring coolant reservoir(4a) of the vacuum-type cooling system filler to the same height as the coolant expansion reservoir(1). |
2 | Unscrew the cooling system closure cap (10) and screw on tester cap (2) at coolant expansion reservoir (1). |
3 | Attach the control unit (3) to the tester cap (2) . |
4 | Attach Venturi nozzle(9) to control unit(3). |
5 | Close drain valve (8) and feed valve (7). |
6 | Place feed hose (4) of the coolant on the coolant reservoir (4). |
In order to avoid suctioning up of air in coolant reservoir (4a) and for completeness of the filling capacity of the engine cooling system in the vehicle, always completely fill up the coolant reservoir (4a). |
7 | Guide waste air hose (5) into an empty container (5a). |
8 | Connect compressed-air hose(6) to Venturi nozzle(9) and apply pressure. |
The overpressure in the compressed-air supply system must be at least approximately 8 bar so that sufficient vacuum can be generated by the Venturi nozzle (9). |
9 | Open the drain valve (8). |
A vacuum is created in the engine cooling system. |
10 | Open feed valve (7) until feed hose (4) has filled with coolant and then close feed valve (7) again. |
11 | Close drain valve (8) if display of the control unit (3) is in the green area. |
12 | Remove compressed-air hose(6) from Venturi nozzle (9) and monitor whether vacuum remains stable for 30 seconds. |
If this is not the case. |
|
Check hoses and connections for damage, repair if necessary and again create a vacuum. |
13 | Close feed valve (7) and drain valve (8). |
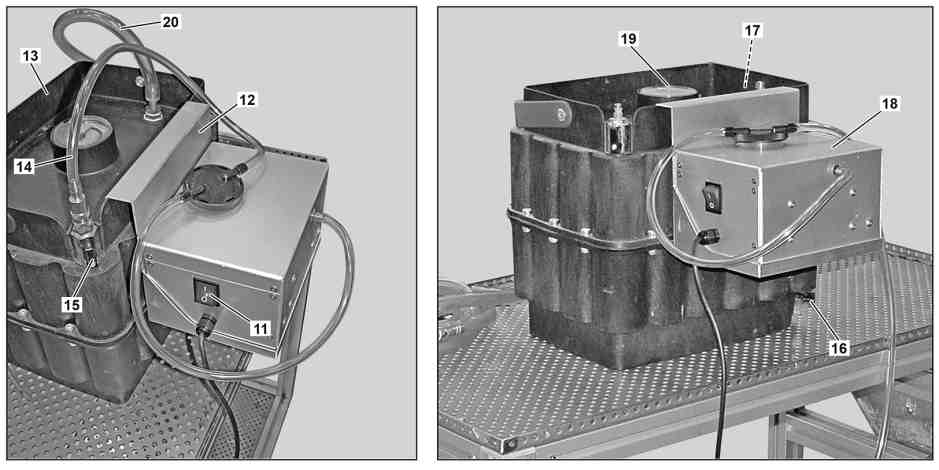
P20.00-2497-09
14 | Move switch (11) of electric vacuum pump (18) to 0 position. |
15 | Connect positive and negative terminals of electric vacuum pump (18) to a suitable 12 V voltage source. |
Observe polarity of positive and negative terminals of electric vacuum pump (18). |
16 | Hook bracket(12) into NTKL adaptation(13). |
17 | Connect hose (14) to NTKL adaptation (13). |
18 | Close off shutoff valves (15, 16, 17). |
19 | Connect hose (20) to the NTKL adaptation (13). |
20 | Decouple venturi nozzle (9) and replace by a hose (20). |
21 | Switch in electrical vacuum pump (18) and open shutoff valve (15). |
The vacuum indicator (19) must indicate at least -0.9 bar. |
22 | Open the drain valve (8). |
The feed valve (7) must remain closed. |
Evacuate entire engine cooling system for 5 min. The indicator for the vacuum indicator (19) must be above the -0.9 bar marking. |
23 | Close drain valve (8). |
24 | Switch off electrical vacuum pump (18). |
Move switch (11) of electric vacuum pump (18) to 0 position. |
25 | Take off hose (14) and reduce vacuum in NTKL adaptation (13) until vacuum indicator (19) shows 0.0 bar. |
26 | Check entire engine cooling system for leak tightness by performing a visual check for 30 s. |

Shown on engine cooling system main circuit in model 231 |
P20.00-2498-11
27 | Open feed valve (7). |
The engine cooling system is filled. |
0.0 bar. |
28 | Open drain valve (8) if coolant is no longer suctioned. |
29 | Remove control unit (3) along with all connections and tester cap (2). |
30 | Correct coolant level in coolant expansion reservoir (1). |
31 | Screw cooling system cap (10) onto coolant expansion reservoir (1). |