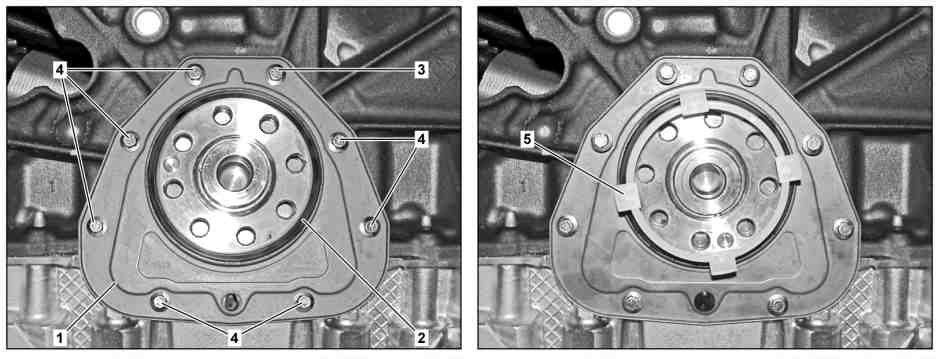
S01.40-4519-08
1 | Cover | 3 | Screw | 5 | Assembly aid | ||
2 | Radial shaft sealing ring | 4 | Bolts |
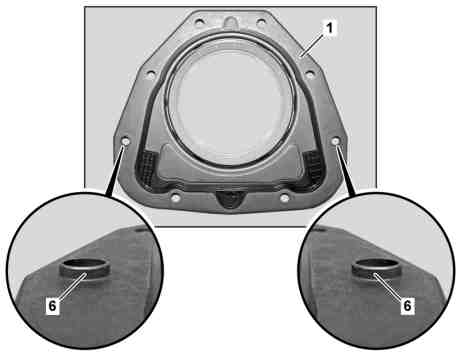
1 | Cover |
6 | Guides |
S01.40-4520-11
Caution | Risk of injury to skin and eyes due to handling of engine oil. Risk of poisoning caused by swallowing engine oil | Wear protective gloves, protective clothing and safety glasses. | |
Topical note | Notes on self-locking nuts and bolts | ||
| Remove | ||
1.1 | Remove drive plate | Model 470, 471 with engine 699 with transmission 700.770 | |
1.2 | Remove flywheel | Model 470, 471 with engine 699 with transmission 700.780 | |
| Clean | ||
2 | Clean crankcase and oil pan top section in the area of the cap (1) | Assembly cleaner | |
| Remove | ||
3 | Remove bolts (3, 4) | ||
4 | Remove cap (1) with radial shaft sealing ring (2) | The cap (1) and radial shaft sealing ring (2) cannot be replaced separately. | |
| Clean | ||
5 | Clean sealing surfaces | Loctite 7063 (400 ml) cleaning spray | |
| Install | ||
6 | Place new cap (1) with assembly aid (5) on crankshaft | The assembly aid (5) positions the radial shaft sealing ring (2) to the crankshaft. | |
7 | Push new cap (1) up to end stop onto crankcase | The guides (6) specify the position of the cap (1) relative to the crankcase. | |
8 | Screw in screws (3, 4) | Replace screws (3, 4). | |
Bolt, bottom half of crankcase to oil pan top section and crankcase | |||
9 | Remove assembly aid (5) | ||
10.1 | Install drive plate | Model 470, 471 with engine 699 with transmission 700.770 | |
10.2 | Install flywheel | Model 470, 471 with engine 699 with transmission 700.780 | |
| Check | ||
11 | Check engine oil level | ||
| Low SPAsh multigrade service engine oils (specification 229.31) | ||
| Low SPAsh multigrade service engine oils (specification 228.51) | ||
| |||
Depending on findings | |||
| |||
Correct engine oil level. | |||
Warning | Risk of accident from vehicle starting off by itself when engine running. Risk of injury (bruises and burns) resulting from working on the engine while it is being started or when it is running. | Secure vehicle to prevent it from starting off by itself. Wear closed and snug-fitting work clothes. Do not touch hot or rotating parts. | |
12 | Check for leak tightness with engine running | Visual inspection only. |