
6 | Leak oil line |
22 | Fuel injector |
A | Leak oil line connection not locked |
B | Leak oil line connection locked |
P07.16-4136-04

P07.16-4135-07
1 | Electrical connector | 4 | Sealing ring | |
2 | Screw | 22 | Fuel injector | |
3 | Clamping claw |
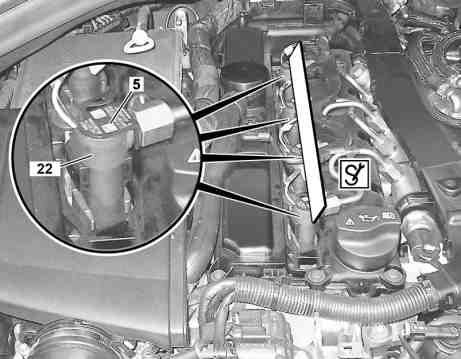
5 | Identification plate |
22 | Fuel injector |
P07.16-4137-11
Danger | Risk of explosion caused by fuel igniting. Risk of injury to skin and eyes caused by fuel spraying out at high pressure | Keep all ignition sources out of hazard area. | |
Danger | Risk of explosion caused by fuel igniting, risk of poisoning caused by inhaling and swallowing fuel as well as risk of injury to eyes and skin caused by contactwith fuel. | No fires, sparks, open flames or smoking. Pour fuels into suitable and appropriately marked containers only. | |
Topical note | Notes on injectors | ||
Topical note | Notes on avoiding damage through contamination and foreign objects | ||
| Remove/install | ||
1 | Remove upper engine cover | ||
2 | Unlock locks for leak oil line connections and detach leak oil line (6) at fuel injectors (22) | Observe lock for leak oil line connections: in the locked condition a white marking (arrow) is visible is visible (picture B). The white marking (arrow) is not visible (picture A) in a not locked condition . | |
Installation: Wet the sealing rings for the leak oil line connections with lubricant. | |||
Catch escaping fuel with a clean, lint-free dry cloth. | |||
Installation: Check sealing rings for the leak oil line connections for damage. | |||
Special lubricant | |||
If damage is present: | |||
| |||
Replace leak oil line (6). | |||
3 | Release and disconnect electrical connection (1) at fuel injectors (22) | Press safety catch with needle nose pliers together. | |
Installation: Replace sealing rings and housing cover on the electrical connections. | |||
4 | Remove injection lines between rail and fuel injectors (22) | ||
5 | Remove screw/bolts (2) | Installation: Replace screw/bolts (2) and tighten in stages. | |
Installation: Determine the difference in height using a straight edge through simultaneous placing on of the identification plate (5) for all fuel injectors (22). In this way one can ensure that the fuel injectors (22) are installed correctly. For differences in height of the fuel injectors (22) a sealing ring (4) is missing or there is one sealing ring (4) too many installed. | |||
Screw/bolt, clamping claw to injector | |||
Straightedge | |||
6 | Remove clamping claw (3) | ||
7 | Mark fuel injectors (22) relative to the cylinders appropriately using a colored pencil | Mark fuel injectors (22) in order to assign the fuel injectors (22) to the respective cylinders during installation. | |
8 | Remove fuel injectors (22) | Installation: Replace seals (4). Coat stem of the fuel injectors (22) with special grease. | |
Special grease | |||
If the fuel injectors (22) are jammed in place: | |||
| |||
Remove jammed fuel injectors. | |||
Impact extractor | |||
Bei Delphi-Injektoren | |||
Bei Bosch-Injektoren | |||
9 | Close off connections at fuel injectors (22) with a suitable grommet | Grommets are available as an replacement part of the fuel injection system; see EPC Group 07. Repeated usage of stop plugs is not allowed. Ensure scrupulous cleanliness! | |
10 | Check the threaded bushing | Check for damage to the thread and jamming. | |
Threaded insert for bolt, clamping claw to cylinder head | |||
Mounting adhesive, Loctite 648 | |||
Loctite 7063 (400 ml) cleaning spray | |||
For a loosened threaded bush or damaged thread | |||
| |||
Remove threaded bushing and blow out thread in cylinder head and clean. Replace the threaded bush. | |||
Installation: Apply adhesive thinly and apply evenly to the new threaded bushing. Screw the threaded bushing into the collar in the cylinder head and caulk with a center punch mark. | |||
Installation: Allow adhesive material to cure for at least 6 h. Only install injection nozzle (22) after curing the adhesive. | |||
| Clean | ||
11.1 | Clean fuel injectors (22) and fuel injector shafts with a round wire brush | In case of light carbonization | |
| |||
Round brush | |||
11.2 | Clean fuel injectors (22) and fuel injector wells using a round and cylinder brush | In a case strong carbonization | |
| |||
Round brush | |||
Cylinder brush | |||
12 | Install in the reverse order | ||
13 | Connect diagnostic system, read out fault memory and perform a control unit adaptation | For replacement of one or more fuel injectors (22) | |
| |||
For installation of new fuel injectors (22), a control unit adaptation must take place in order to store the "IMA coding" in the CDI control unit. Make adhesive label with respective "IQC coding" illegible on the vehicle. | |||
Warning | Risk of accident from vehicle starting off by itself when engine running. Risk of injury (bruises and burns) resulting from working on the engine while it is being started or when it is running. | Secure vehicle to prevent it from starting off by itself. Wear closed and snug-fitting work clothes. Do not touch hot or rotating parts. | |
14 | Carry out an engine test run and check fuel injection systems for leaktightness |


668 589 00 68 00
Cylinder brush
452 589 01 99 24
Straightedge
651 589 01 68 00
Round brush
642 589 01 33 00
Threaded adapter


602 589 00 33 00
Impact extractor
611 589 00 68 00
Round brush
651 589 00 33 00
Extraction claw
Referenced documents
- ad0000p200004b Connect STAR DIAGNOSIS and read out fault memory
- ah0000p500001a Notes on avoiding damage through contamination and foreign objects
- ah0716p100001a Notes on injectors
- ar0716p100003cd Remove jammed fuel injectors
- ar0716p1080olf Remove/install injection lines of common rail direct injection
- as0000z000501a Risk of accident from vehicle starting off by itself when engine running. Risk of injury (bruises and burns) resulting from working on the engine while it is being started or when it is running.
- as0716z000101a Risk of explosion caused by fuel igniting. Risk of injury to skin and eyes caused by fuel spraying out at high pressure
- as4700z000101a Risk of explosion caused by fuel igniting, risk of poisoning caused by inhaling and swallowing fuel as well as risk of injury to eyes and skin caused by contactwith fuel.