
Shown on right front door (2) |
1 | Side window(s) |
2 | Front door |
a | Assembly position dimension |
S72.10-4656-11

S72.10-4669-07
Shown on right front door (2) |
2 | Front door | 4 | Screw | 6 | Screw | ||
3 | Window guide seal | 5 | Front guide rail | 7 | Rear guide rail |
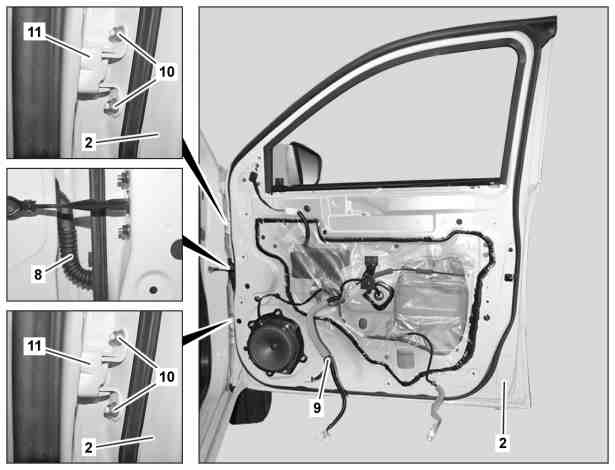
Shown on right front door (2) |
2 | Front door |
8 | Grommet |
9 | Electrical door wiring harness |
10 | Nuts |
11 | Hinge |
S72.10-4670-06
Warning | Risk of injury caused by fingers being jammed or pinched when removing, installing or aligning hoods, doors, trunk lid/rear-end door or sliding roof. | No parts of the body or limbs should be within the operating area when the components are moving. | |
Topical note | Notes on carrying out repair work in the vehicle interior | ||
| Disassemble/assemble | ||
1 | Lower side window (1) with window lifter until assembly position dimension (a) is reached | Assembly position dimension (a): 100 mm. | |
2 | Detach ground line of on-board electrical system battery | ||
3 | Remove door trim of front door (2) | ||
4 | Remove adhesive foil from inner door panel of front door (2) | ||
5 | Remove side window (1) of front door (2) | ||
6 | Remove window lifter of front door (2) | ||
7 | Remove outside mirror | ||
8 | Remove outer sealing rail | ||
9 | Remove window guide seal (3) of front door (2) | ||
10 | Remove speaker in the front door (2) | ||
11 | Remove side deployment pressure sensor | ||
12 | Remove door handle bearing bracket of front door (2) | ||
13 | Remove screw (4) and remove front guide rail (5) from the front door (2) | ||
14 | Remove screw (6) and remove rear guide rail (7) from the front door (2) | ||
15 | Remove door lock of front door (2) | ||
16 | Remove sealing frame of front door (2) | ||
17 | Remove decorative foil on window frame of front door (2) | If required. | |
18 | Remove grommet (8) on front door (2) | ||
19 | Remove electrical door wiring harness (9) from inner door panel and pull out of front door (2) | ||
20 | Remove door holder | ||
21 | Install lifting device on front door (2) | ||
| 000 588 04 80 00 Lifting device | ||
22 | Unscrew nuts (10) and remove front door (2) from the hinges (11) | Assembly: Tighten nuts (10) so that the front door (2) is fixed to the hinges (11). | |
23 | Remove all remaining fasteners and self-adhesive covers from the front door (2) | If required. | |
24 | Remove front door (2) from lifting device | ||
| 000 588 04 80 00 Lifting device | ||
Helper required. | |||
25 | Assemble in the reverse order | ||
Adjust | |||
26 | Adjust front door (2) | ||
| Check | ||
27 | Perform function test of all component parts installed on or in the front door (2) |