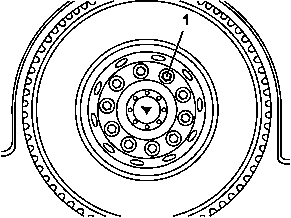
1 | Wheel nut |
T40.10-0002-01
| Remove | ||
1 | Secure vehicle to prevent it from moving by itself | ||
2 | Remove wheel trim | Push the wheel trim spring fixing ring off inwards with a screwdriver at a fixing lug and pull the wheel trim off at this point. | |
3 | Loosen wheel nuts (1) | ||
4 | Raise and jack up vehicle at front and rear axle | See owner's manual. Raise the vehicle until the wheels are free. Secure the vehicle at suitable locations using jack stands to prevent it from falling down. | |
5 | Unscrew wheel nuts (1) | Unscrew all wheel nuts with the exception of three equally spaced wheel nuts on each wheel. Only unscrew the last three wheel nuts when you have made sure that the wheel is sitting loose on the wheel bolts. | |
6 | Remove wheels | When removing the wheels, do not damage the wheel studs; use suitable assembly sleeves if necessary. | |
| Check | ||
7 | Check tires and rims for damage and wear | Damaged or worn tires and rims must be replaced subject to a separate repair order. | |
8 | Check wheel studs and wheel nuts (1) for damage | | |
Damaged wheel nuts and wheel studs must be replaced immediately. | |||
| Clean | ||
9 | Clean contact surfaces on rims and wheel hubs and, if necessary, remove any rust | Grind off any excess paint. | |
| Install | ||
10 | Lightly oil friction surfaces between pressure plate disks and wheel nuts (1) | Only in the case of wheel nuts with pressure plate disks. | |
11 | Install wheels | The threads of the wheel studs and wheel nuts (1) must be free of oil and grease. | |
On disk wheels with center centering screw on all wheel nuts until they are flush with the disk wheels. | |||
On disk wheels with bolt centering first screw on two to three wheel nuts opposite one another until they are flush with the disk wheels. Then screw on the remaining wheel nuts. With twin tires check whether all spherical spring washers are seated correctly before putting on the inner wheel. | |||
12 | Lower the vehicle | ||
13 | Tighten wheel nuts (1) | With disk wheels, tighten the wheel nuts in a diagonally opposite sequence. Only tighten wheel nuts slightly using the impact wrench/driver and tighten to the specified tightening torque using the torque wrench. | |
Nut for disk wheel | |||
14 | Attach hubcaps | ||
15 | Retighten wheel nuts (1) to the correct tightening torque after 50 to 100 km | ||
| Retighten wheel bolts or nuts | ||
When using new or newly painted rims in addition retighten the wheel nuts (1) to the correct tightening torque after 1000 to 5000 km. |