S68.30-4548-09
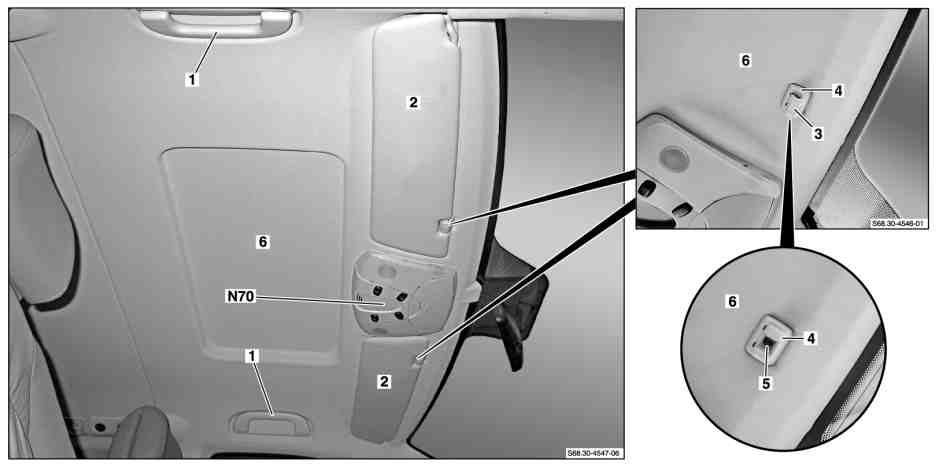
Shown with code LD0 (overhead control panel with two reading spotlamps) |
1 | Grab handle | 5 | Screw | |
2 | Sun visor | 6 | Front roof lining | |
3 | Cap | N70 | Overhead control panel control unit | |
4 | Sun visor mount |
| Remove/install | ||
Danger | Risk of death when working on component parts and systems with U >= 30 V alternating voltage (AC) or U >= 60 V direct voltage (DC) | Do not touch damaged or defective live component parts and lines or non-insulated electrical connections and lines. | |
Topical note | General information on handling vehicles with high-voltage on-board electrical system and/or lithium-ion battery and/or gaseous-fuel drive system | ||
Topical note | Notes on carrying out repair work in the vehicle interior | ||
1 | Switch off the ignition and remove the transmitter key from the EIS control unit | Only with model 639.603/703 with engine 780.994 with code MA0 (E-CELL 60 kW) | |
| |||
2.1 | Remove front dome lamp | Only with model 636.7, 639.6/7 except code LD0 (overhead control panel with two reading spotlamps), for driver and front passenger | |
2.2 | Remove stowage box above windshield | Only with model 639.6/7 with code L00 (dome lamp on driver and passenger side) | |
2.3 | Remove overhead control panel control unit (N70) | Only with code LD0 (overhead control panel with two reading spotlamps), for driver and front passenger | |
3 | Remove upper paneling from pop-up roof cutout |
| |
4 | Remove grab of handles (1) | ||
Remove only the front grab handles (1). | |||
5 | Remove sun visors (2) | ||
6 | Remove the lights for the vanity mirror |
| |
7 | Remove the holder for the sun visor (4) | To do so, fold up the cover (3) and unscrew the screw (5). | |
8 | Remove trim from left and right A-pillar | ||
9 | Remove the upper trim on the left and right B-pillar | ||
Installation: Make sure that the upper trims for the B-pillar are correctly seated. | |||
10 | Loosen front roof paneling (6) and remove toward front | | |
Installation: Make sure that the front headliner (6) is seated correctly. | |||
11 | Fit the new front headliner (6) | Only when replacing front headliner (6). Depending on the equipment variant or accessories, the new front headliner (6) must be equipped with additional cutouts. | |
| Check | ||
12 | Make sure that the mounting strips on the front headliner (6) and the Velcro fasteners on the mounting strips are seated correctly | ||
13 | Install in the reverse order | ||
| Check | ||
14 | Check electrical components for proper function |
Referenced documents
- ah0000z030001a General information on vehicles with high-voltage on-board electrical system and/or lithium-ion battery and/or gaseous-fuel drive system as well as personal protective equipment
- ah6800n000101s Notes on carrying out repair work in the vehicle interior
- ar6830s4050s Remove/install paneling on A-pillar
- ar6830s4330s Remove/install handle on roof
- ar6830s4700s Remove/install paneling on B-pillar
- ar6830s5578s Remove/install stowage space above windshield
- ar6860s5480s Remove/install sun visor
- ar7770s0020s Remove, install front pop-up roof cutout paneling
- ar8220s0110s Remove/install front dome lamp
- ar8220s1100s Remove/install front overhead control panel
- ar8220s5582s Remove/install lamp for vanity mirror
- as0000z003501a Risk of death when working on component parts and systems with U >= 30 V alternating voltage (AC) or U >= 60 V direct voltage (DC)