AR08.50-D-0017-01TE | Pour in coolant and bleed cooling circuit | ||
Danger | Risk of death when working on component parts and systems with U >= 30 V alternating voltage (AC) or U >= 60 V direct voltage (DC) | Do not touch damaged or defective live component parts and lines or non-insulated electrical connections and lines. | |
Warning | Risk of injury to skin and eyes suffering scalding from contact with hot coolantspray. Risk of poisoning from swallowing coolant. | Do not open cooling system unless coolant temperature is below 90 °C. Open cap slowly and release the pressure. Do not pour coolant into beverage containers. | |
Topical note | Notes on avoiding damage through contamination and foreign objects | ||
Topical note | Notes on battery | ||
Topical note | General information on vehicles with high-voltage on-board electrical system and/or lithium-ion battery and/or gaseous-fuel drive system as well as personal protective equipment | ||
Topical note | Notes on coolant | ||
Notes on coolant level |
Cooling system |
Number | Designation | Engine 780.703 in model 910 | ||
BF08.50-N-1001-01TE | Filling capacity for cooling system | Main circuit | l | 4,8 |
Auxiliary circuit with 3 high-voltage batteries | l | 9,6 | ||
Auxiliary circuit with 4 high-voltage batteries | l | 10,4 | ||
Main circuit and auxiliary circuit with 3 high-voltage batteries in repair case | l | 14,4 | ||
Main circuit and auxiliary circuit with 4 high-voltage batteries in repair case | l | 15,2 | ||
Mixing ratio for antifreeze/water (to -37 °C) | % | 50/50 | ||
Coolant specifications | ||||
Specification | ||||


285 589 01 21 00
NTKL Adaption
210 589 00 91 00
Test cap
124 589 24 21 00
Pressure pump
285 589 02 21 00
Electric vacuum pump

285 589 00 21 00
Cooler vacuum filling device

Do not add any sealant to the coolant.
Cooler sealant can clog cooling ducts.
The vacuum-type cooling system filler consists of a control unit (2), venturi nozzle (3), feed hose (6), coolant reservoir (7), and waste air hose (8).
Work procedure for preparatory activities, evacuating, checking and filling shown on auxiliary circuit. Similarly perform main circuit preparatory activities; evacuating, checking and filling.
D08.50-A012-06
Preparatory tasks
1 | It must Pour coolant into the coolant reservoir (7). |
Fill level in coolant reservoir (7) must exceed the max. filling capacity of the respective cooling circuit by approx. 30%. |
2 | Note down fill level of coolant reservoir (7). |
Position coolant reservoir (7) for this purpose on a horizontal surface. |
Evacuate
3 | Attach tester cap (1) to respective coolant expansion reservoir. |
4 | Attach control unit (2) to the tester cap (1). |
5 | Attach venturi nozzle (3) to control unit (2). |
6 | Close feed valve (4) and drain valve (5). |
7 | Attach feed hose (6) to coolant reservoir (7). |
8 | Insert waste air hose (8) into an empty container. |
9 | Connect compressed-air hose (9) to venturi nozzle (3) and apply compressed air. |
10 | Open drain valve (5). |
11 | Open feed valve (4) until feed hose (6) has filled. |
12 | Close drain valve (5) if display of the control unit (2) is in the green area. |
13 | Remove compressed-air hose (9) from the venturi nozzle (3). |
14 | Based on the indicator of the control unit (2), check whether the vacuum remains stable for 30 s. |
If the vacuum does not remain stable, |
|
Check hoses, connections and component parts of respective cooling circuit, eliminate causes and restart evacuation process. |
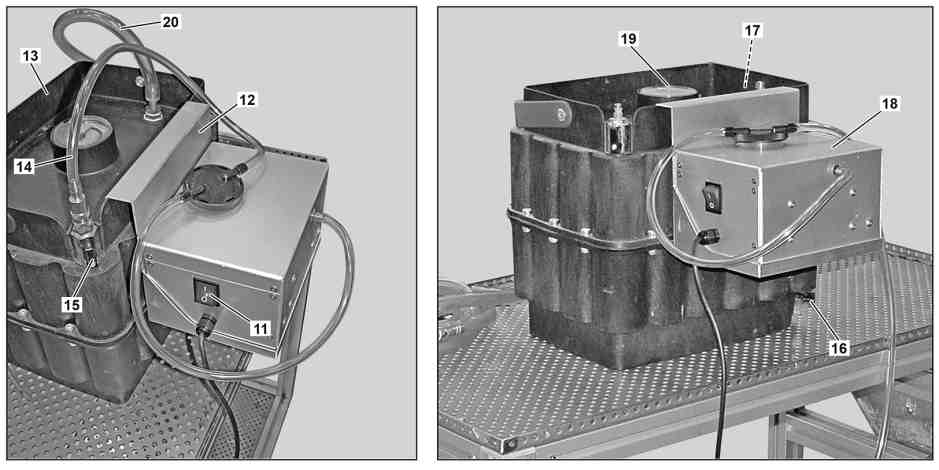
P20.00-2497-09
Tool kit of electric vacuum pump (18) contains bracket (12), hose (14) as well as electrical connection lines with POSITIVE and NEGATIVE terminals.
Tool kit of NTKL adaptation (13) contains hose (20) with a Y-distributor.
Drainage reservoir of NTKL adaptation (13) must be empty before start of work.
15 | Bring the switch (11) of the electrical vacuum pump (18) to the "0" position. |
16 | Connect POSITIVE and NEGATIVE terminals of electric vacuum pump (18) to a suitable 12 V voltage source (e. g. an on-board electrical system battery). |
Observe polarity of POSITIVE and NEGATIVE terminals. |
17 | Attach bracket (12), as shown, to NTKL adaptation (13). |
18 | Attach hose (14) to NTKL adaptation (13). |
19 | Close off shutoff valves (15, 16, 17). |
20 | Attach hose (20) to NTKL adaptation (13). |
21 | Remove Y-distributor from hose (20). |
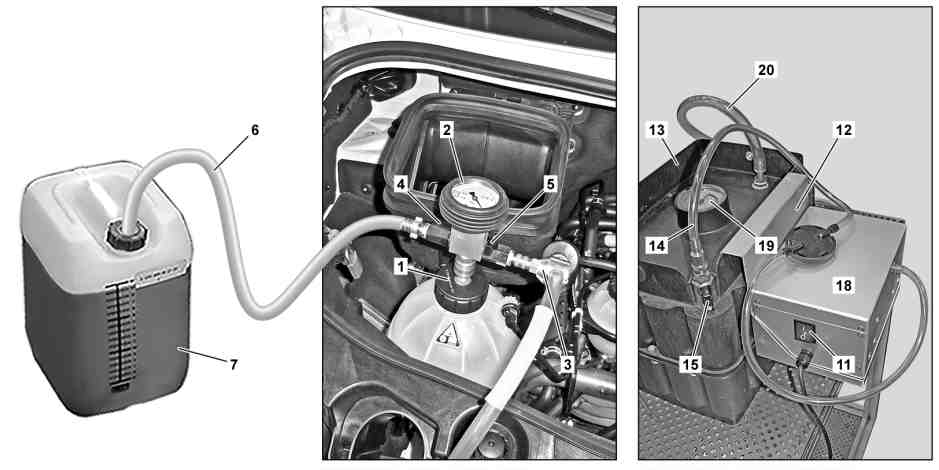
D08.50-A028-09
22 | Remove venturi nozzle (3) from the control unit (2). |
23 | Attach hose (20) to the control unit (2). |
Secure hose (20) to connection fitting using suitable clamp. |
24 | Switch on electrical vacuum pump (18). |
25 | Open stopcock (15). |
The feed valve (4) remains closed. |
Vacuum indicator (19) must at least show -0.9 bar. |
If -0.9 bar is not reached, |
|
Check cause, rectify it, and set up vacuum again. |
26 | Open drain valve (5) and evacuate cooling circuit for 5 min. |
In this connection, observe vacuum indicator (19). |
If the vacuum does not remain stable, |
|
Check hoses, connections and component parts of cooling circuit, eliminate causes and restart evacuation. |
Check
27 | drain valve (5). |
28 | Switch off electrical vacuum pump (18). |
29 | Remove hose (14) from NTKL adaptation (13). |
Vacuum in NTKL adaptation (13) is thereby reduced until vacuum indicator (19) shows 0.0 bar. |
30 | Based on the indicator of the control unit (2), check whether the vacuum remains stable for 30 s. |
If the vacuum does not remain stable, |
|
Check hoses, connections and component parts of cooling circuit, eliminate causes and restart evacuation. |
Filling
31 | Open feed valve (4). |
Cooling circuit is now filled. |
32 | Open drain valve (5). |
Once coolant is no longer flowing in cooling circuit. |
The remaining existing vacuum will be removed in this way. |
33 | Compare fill level of coolant reservoir (7) with noted fill level. |
Filled in coolant quantity of cooling circuit should be > 75% of filling capacity. |
Position coolant reservoir (7) for this purpose on a horizontal surface. |
If less than 75% of coolant filling capacity was filled, |
|
drain coolant again and repeat entire process. |
34 | Remove control unit (2) with all connections. |
Do not yet remove tester cap (1). |
35 | Remove hose (20) from control unit (2). |
36 | Attach Y-distributor to hose (20). |
Replace clamp. |
37 | Remove electric vacuum pump (18) from NTKL adaptation (13). |

Bleeding
A charger must be connected to 12 volt on-board electrical system battery. Vehicle diagnosis system must be connected. High-voltage on-board electrical system must be in operation.
Shown on auxiliary circuit |
S08.50-A021-71
38 | Attach pressure pump (10) to tester cap (1). |
39 | Using pressure pump (10), generate a pressure of 1 to 1.5 bar. |
40.1 | If auxiliary circuit will be bled. |
Electric coolant pumps are automatically unlocked during bleeding. |
Fully execute specified process for bleeding auxiliary circuit. |
Duration of bleeding process of auxiliary circuit approx. 30 min. |
40.2 | If main circuit will be bled. |
Electric coolant pumps are automatically unlocked during bleeding. |
Fully execute specified process for bleeding main circuit. |
Duration of bleeding process of main circuit approx. 15 min. |
41 | Reduce pressure at pressure pump (10). |
42 | Remove pressure pump (10) from tester cap (1). |
43 | Remove tester cap (1) from coolant expansion reservoir. |
Henviste dokumenter
- ah0000p500001a Oplysninger om forebyggelse af skader på grund af snavs og fremmedlegemer
- ah0000z030001a Generelle oplysninger ved køretøjer med højvoltsnet og/eller litium-ion-batteri og/eller gasdrivsystem samt personligt beskyttelsesudstyr
- ah2000n208001a Oplysninger om kølervæske
- ah2000p114201cw Oplysninger kølervæskestand
- ah5410p000101a
- ah5410p000101a Oplysninger om batterier
- as0000z003501a Livsfare ved arbejde på komponenter og systemer med U >= 30 V vekselspænding (AC) eller U >= 60 V jævnspænding (DC)
- as2000z000101a Risiko for skoldningsskader på hud og øjne pga. sprøjtende, varm kølervæske. Risiko for forgiftning ved indtagelse af kølervæske