
S20.20-A014-79
4 | Bolts | 8 | Coolant hose | 12 | Lock | ||
5 | Front end crossmember | 9 | Coolant hose | 13 | Bracket | ||
6 | Coolant hose | 10 | Coolant hose | 15 | Bracket | ||
7 | Coolant hose | 11 | Coolant hose |
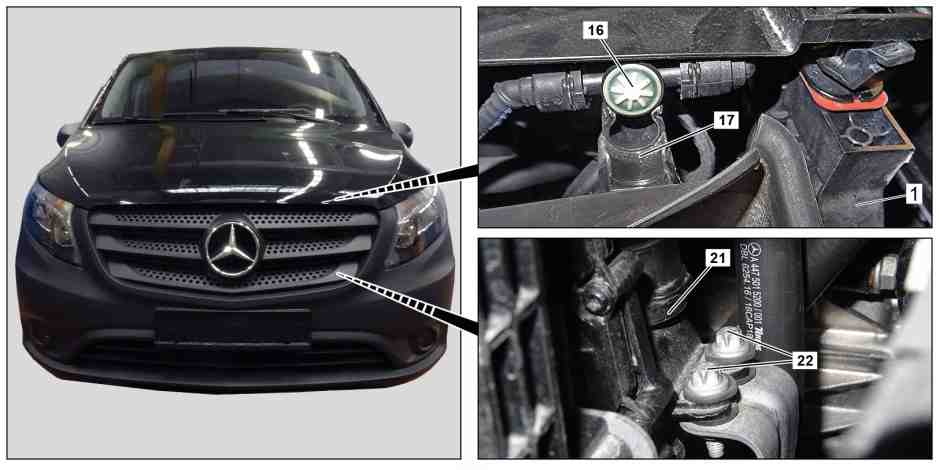
S20.00-A048-79
1 | Radiator unit | 21 | Switchover valve | |
16 | Distributor coolant line | 22 | Bolts | |
17 | Upper air ducting |

S20.20-A031-79
2 | Coolant pipe | 19 | Bracket | |
3 | Bracket | 20 | Coolant hose | |
18 | Electrical connector |

2 | Coolant pipe |
9 | Coolant pipe |
23 | Air ducting lower section bracket |
24 | Bracket |
25 | Bracket |
S20.20-A032-76
Warning | Risk of injury to skin and eyes suffering scalding from contact with hot coolantspray. Risk of poisoning from swallowing coolant. | Do not open cooling system unless coolant temperature is below 90 °C. Open cap slowly and release the pressure. Do not pour coolant into beverage containers. | |
Warning | Risk of injury. Skin or eye injuries may result when handling hot or glowing objects. | Wear protective gloves, protective clothing and safety glasses, if necessary. | |
Caution | Risk of injury caused by scraping or cutting body parts on sharp vehicle parts | Always wear protective gloves when working on or near sharp and non-deburred vehicle parts. | |
Topical note | Notes on avoiding damage through contamination and foreign objects | ||
Topical note | Information on preventing damage to electronic components due to electrostatic discharge | ||
Topical note | Notes on coolant | ||
Notes on coolant level | |||
| Remove/install | ||
1 | Remove the condenser. | Engine 622.8 in model 447 | |
2 | Remove air intake pipe. | ||
3 | Remove screws (4) and swivel front end crossmember (5) out of working area. | ||
4 | Drain off coolant. | ||
5 | Remove coolant hoses (6, 7, 8, 9, 10, 11). | ||
6 | Remove locks (12). | ||
7 | Turn brackets (13) by 90 ° and remove upwards. | ||
8 | Slightly pull radiator unit (1) forwards and unclip distributor coolant lines (16) out of upper air ducting (17). | ||
9 | Unclip coolant hose (20) from bracket (19). | ||
10 | Release and disconnect electrical connector (18) for fan. | ||
11 | Remove coolant pipe (2) from brackets (3, 24, 25). | ||
12 | Unclip coolant pipe (9) at bottom from air ducting lower section brackets (23). | ||
13 | Unclip bracket (15), electrical connector from supporting frame for radiator unit (1) at left. | ||
14 | Remove screws (22) and place switchover valve (21) to one side. | Electric line and coolant hoses remain on switchover valve (21). | |
15 | Tilt radiator unit (1) forwards, pull out of guides and remove. | Installation: Ensure correct seating in guides. | |
16 | Install in the reverse order. | ||
| Check | ||
17 | Check engine cooling system for leak tightness. |