B35.50-0004-09
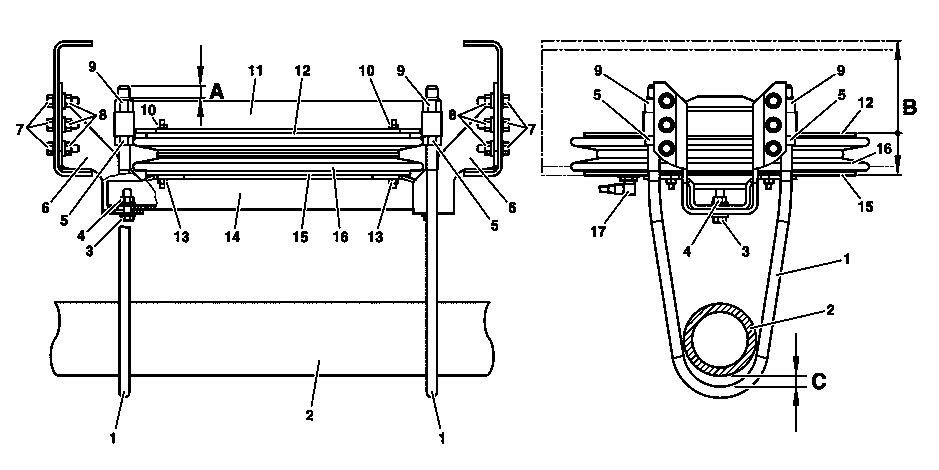
1 | Arc | 8 | Nuts | 15 | Holder | ||
2 | Axle tubular housing | 9 | Nut | 16 | Elevation bellows | ||
3 | Bolt | 10 | Nut | 17 | Compressed air piping | ||
4 | Nut | 11 | Platter | A | Thread protrusion | ||
5 | Nut | 12 | Holder | B | Stroke | ||
6 | Bellows consoles | 13 | Nut | C | Clearance | ||
7 | Bolts | 14 | Bellows bracket |
| Remove | ||
Notes on self-locking nuts and bolts | |||
1 | Park the vehicle on a level surface over a ditch | Perform the work only with the vehicle unloaded. | |
2 | Totally depressurize the rear drag axle | ||
3 | Disconnect the power supply with the main battery switch | ||
Danger | Risk of explosion from explosive gas. Risk of poisoning and caustic burns from swallowing battery electrolyte. Risk of injury through burns to skin and eyes from battery acid or when handling damaged lead-acid batteries | No fires, sparks, open flames or smoking. Wear acid-resistant gloves, clothing and glasses. Only pour battery acid into suitable and appropriately marked containers. | |
4 | Disconnect battery ground cable | Only for vehicles without a battery main switch. | |
Topical note | Notes on battery | ||
5 | Disconnect the compressed air lines (17) from the lifting device | Protect the openings against contaminants that may enter. | |
6 | Loosen the nuts (9) and remove the arc (1) | Check the bows (1) for wear. If the bows (1) are reused, do not twist the nuts (5). | |
7 | Remove the crosspiece (11) with the support (12) | If the crosspiece (11) and bracket (12) cannot be released from the lifting bellows (16), loosen the nuts (10) and remove the crosspiece (11) from the bracket (12). | |
8 | Remove the lifting bellows (16) | Check the support surfaces between the brackets (12, 15) and the lifting bellows (16) for damage and corrosion. Replace the damaged parts. | |
9 | Loosen the screws (3) and the nuts (4) and remove the bellows bracket (14) | Only if the bracket (15) has been removed. | |
10 | Loosen the screws (7) and nuts (8) and remove the bellows console (6) | Check the consoles (6) for deformations and cracks. Replace if necessary. | |
| Check | ||
11 | Clean all components and check for damage and cracks | Replace the damaged parts. | |
| Install | ||
12 | Install the bellows consoles (6) | Type 958.0/1Bellows console on chassis | |
Type 934.241/251, 958.2/4Bellows console on chassis | |||
13 | Install the support (15) on the bellows bracket (14) | Only if the support (15) has been removed from the bellows bracket (14). | |
14 | Install the bellows bracket (15) with the support (14) | Only if the bracket (15) has been removed. | |
Type 958.0/1Support for the lifting bellows on the console | |||
Type 934.241/251, 958.2/4Support for the lifting bellows on the console | |||
15 | Install the lifting bellows (16) on the bracket (15) | ||
16 | Install the support (12) on the crosspiece (11) | Only if the support (12) has been removed from the crosspiece (11). | |
17 | Install the crosspiece (11) with the support (12) | ||
18 | Install the nuts (5) on new bows (1) | Only when new bows are used (1). | |
The positions of the nuts (5) on the new bows (1) should be correspond to the positions of the nuts (5) on the bows (1) removed. | |||
19 | Install the bows (1) and tighten the nuts (9) | Type 934.241/251, 958.2/4Lifting bellows arch | |
Type 958.0/1Lifting bellows arch | |||
20 | Install the compressed air lines (17) on the lifting device | ||
| Check | ||
21 | Measure the clearance (C) between the bows (1) and the tubular housing of the axle (2) | The clearance (C) should be adjusted so that the stroke (B) is not too wide so as to cause leakage on the lifting bellows (16). | |
If the existing clearance (C) does not match the prescribed value: | |||
| |||
Adjust the clearance (C) | |||
"C" clearance between the arc and the axle tube housing | |||
"B" travel between the lift installation supports | |||
22 | Retighten the nuts (9) to the prescribed torque | Type 958.0/1Lifting bellows arch | |
Type 934.241/251, 958.2/4Lifting bellows arch | |||
23 | Measure the protrusion of the thread (A) in the bows (1) | If the thread protrusion (A) exceeds approx. 10 mm: | |
| |||
Cut the spare thread. | |||
Danger | Risk of explosion from explosive gas. Risk of poisoning and caustic burns from swallowing battery electrolyte. Risk of injury through burns to skin and eyes from battery acid or when handling damaged lead-acid batteries | No fires, sparks, open flames or smoking. Wear acid-resistant gloves, clothing and glasses. Only pour battery acid into suitable and appropriately marked containers. | |
24 | Connect ground cable to battery | Only for vehicles without a battery main switch | |
Topical note | Notes on battery | ||
25 | Connect the power supply to the main battery switch | ||
Warning | Risk of accident from vehicle starting off by itself when engine running. Risk of injury (bruises and burns) resulting from working on the engine while it is being started or when it is running. | Secure vehicle to prevent it from starting off by itself. Wear closed and snug-fitting work clothes. Do not touch hot or rotating parts. | |
26 | Start the engine and actuate the compressed air system to the working pressure | ||
27 | Lift and lower the rear drag axle several times to adjust the components | | |
28 | Run the tightness test on the lifting device. |
Documenti citati
- ah0000n000101a Avvertenze su viti e dadi autobloccanti
- ah5410p000101a Avvertenze sulla batteria
- ah5410p000101a
- ar3550b359301ta
- as0000z000501a Pericolo di infortunio per l'avviamento fortuito del veicolo con motore in funzione. Pericolo d'infortuni a causa di schiacciamenti o ustioni in caso di interventi durante l'avviamento o il motore acceso
- as5410z000101a Pericolo di incendio/esplosione in seguito a cortocircuito e fuoriuscita di gas detonante. Pericolo di ustioni/ustioni chimiche su occhi, pelle e mucose a causa dell'elettrolita della batteria o della relativa nebbia, di un cortocircuito o