
Shown on model 910.6 with code T16 (right sliding door), right side of vehicle |
D63.30-0344-05

Shown on model 907 with code T19 (left sliding door), left side of vehicle |
2 | Frame seal |
3 | Frame seal |
4 | Guide bearing |
5 | Bolts |
D60.00-A037-06
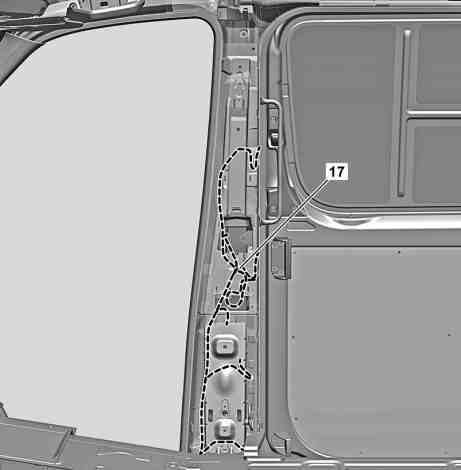
Shown on model 907 with code T16 (right sliding door), right side of vehicle |
17 | Electrical wiring harness |
D60.00-A032-12
Danger | Risk of death when working on component parts and systems with U >= 30 V alternating voltage (AC) or U >= 60 V direct voltage (DC) | Do not touch damaged or defective live component parts and lines or non-insulated electrical connections and lines.Typ 910.6 mit Motor 780.703 | |
Danger | Risk of death caused by vehicle slipping or toppling off of the lifting platform. | Align vehicle between vehicle lift columns and position the four support plates at the vehicle lift support points specified by the vehicle manufacturer. | |
Topical note | Notes on battery | Typ 910.6 mit Motor 780.703 | |
Topical note | Notes on carrying out repair work in the vehicle interior | ||
| Remove/install | ||
1 | Remove respective hinge of front door. | ||
2 | Remove respective front door sill trim. | ||
3 | Remove respective trim from sliding door entrance. |
| |
4 | Remove respective bottom guide rail for the sliding door. |
| |
5 | Remove fuel filler flap. | If left side of vehicle is damaged. | |
6 | Remove respective underfloor paneling. |
| |
7 | Remove respective underfloor paneling at high-voltage battery carrier. | * Applies to Europe only | |
Model 910.6 with engine 780.703 | |||
8 | Remove filler neck. | If left side of vehicle is damaged. | |
Model 907.6 with engine 654.9, Models 907.6/7 with engines 642, 651, Model 910.6 with engine 651 | |||
Model 907.6/7 with engine 274 | |||
9 | Remove lower trim from partition. |
| |
10 | Remove respective sealing frame (2) in the repair area and position outside the working area. | ||
11 | Remove respective sealing frame (3) in the repair area and position outside the working area. | ||
12 | Remove respective front fender. | ||
13 | Remove respective lower front fender. | ||
14 | Remove each front wheel. | ||
15 | Remove respective rear section of front fender liner. | ||
16 | Remove respective protective strip. | ||
17 | Remove respective electrical wiring harness (17) in the repair area and position outside the working area. | ||
18 | Remove guide bearings (4). | To do this, remove the screw/bolts (5). | |
Striker pin to B-pillar | |||
19 | Remove respective front floor covering. |
| |
Model 910.6 | |||
20 | Remove respective seat belt from B-pillar. | ||
21 | Install in the reverse order. |
Referenced documents
- ah5410p000101a Notes on battery
- ah5410p000101a
- ah6800n000101s Notes on carrying out repair work in the vehicle interior
- ar4010d1100ts Remove/install wheels
- ar4710d7541ts Remove/install filler neck of fuel tank
- ar4710d7541tsc Remove/install filler neck of fuel tank
- ar6130d1001ts Remove/install underbody paneling
- ar6130d1002te Remove/install underbody trim on high-voltage battery carrier
- ar6830d0018tsb Remove/install trim on sliding door entrance box
- ar6830d1306ts Remove/install entrance paneling
- ar6830d1408ts Remove/install lower trim on partition
- ar6880d0006tsf Remove/install front floor coverings
- ar6880d0006tsr Remove/install front floor coverings
- ar7210d2662ts Remove/install hinge of front door
- ar7216d7816ts Remove/install bottom guide rail for sliding door
- ar8810d0002ts Remove/install lower front fender
- ar8810d1005ts Remove/install front fender
- ar8810d1321ts Remove/install rear section of front fender liner
- ar8860d6023ts Remove/install tank flap
- ar8880d1040ts Remove/install moldings
- ar9140d1015ts Remove/install seat belt on B-pillar
- as0000z001001a Risk of death caused by vehicle slipping or toppling off of the lifting platform.
- as0000z003501a Risk of death when working on component parts and systems with U >= 30 V alternating voltage (AC) or U >= 60 V direct voltage (DC)