
P33.10-2240-09
Shown on model 251 with engine 113, with panoramic glass sunroof with top sliding sunroof, code 413 and AIRmatic (air suspension with level adjustment and adaptive damping system ADS), code 489 |
1 | Engine compartment paneling | 4 | Lifting device | |
2 | Underfloor paneling, right | 5 | Front axle | |
3 | Underfloor paneling, left | 6 | Protective panels |

P33.10-2241-09
Shown on model 251 with engine 113, with panoramic glass sunroof with top sliding sunroof, code 413 |
7 | Screw, rpm sensor | 15 | Plastic caps | |
10 | Cable tie | 16 | Guide pin | |
11 | Steering knuckle | 17 | Brake caliper | |
12 | Brake hose bracket | 20 | Upper transverse control arm | |
13 | Brake hose | L6/1 | Left front rpm sensor | |
14 | Clamp | L6/2 | Right front rpm sensor |

P33.10-2242-09
Shown on model 251 with panoramic glass sunroof with top sliding sunroof, code 413 |
17 | Brake caliper | 26 | Connector | |
20 | Upper transverse control arm | 27 | Nut, steering knuckle | |
21 | Puller | 28 | Steering column | |
22 | Link rod | 29 | Screw, steering coupling | |
23 | Suspension strut | 30 | Oil lines | |
24 | Threaded connection | 31 | Retaining plate | |
25 | Nut, link rod | 32 | Screw, retaining plate |

P33.10-2243-09
Shown on model 251 with panoramic glass sunroof with top sliding sunroof, code 413 |
33 | Screws, front engine mount | 35 | Propeller shaft | |
34 | Screws, propeller shaft |

P33.10-2310-08
36 | Screws, front axle carrier | 39 | Rear centering panel screws | |
37 | Screws, rear axle carrier | 41 | Bolts | |
38 | Centering plates | 42 | Centering bores |
| Remove/install | ||
Danger | Risk of death caused by vehicle slipping or toppling off of the lifting platform. | Align vehicle between vehicle lift columns and position the four support plates at the vehicle lift support points specified by the vehicle manufacturer. | |
Topical note | Notes on installing brake hoses | ||
Topical note | Notes on self-locking nuts and bolts | ||
Evaluating steering gear when repairing accident vehicles | |||
Notes on AIRmatic | |||
1 | When working on the front axle (5), be careful not to scratch, mark or notch the surfaces of aluminum parts. Otherwise the service life of the of the parts will be reduced. | ||
2 | Deactivate easy entry/exit function | ||
| |||
Only on vehicles with memory package (driver's seat, steering column, mirrors), code 275. | |||
3 | Raise vehicle | ||
4 | Remove the front wheels | ||
| |||
5 | Deflate front suspension struts using STAR DIAGNOSIS | Only on vehicles with AIRmatic (air suspension with level adjustment and Adaptive Damping System (ADS)), code 489. | |
The vehicle may not be standing on its wheels. | |||
6 | Switch off ignition and remove the transmitter key from the EIS [EZS] control unit | On vehicles with Keyless-Go, code 889: Press Keyless-Go start/stop button repeatedly until the ignition is switched off. Remove transmitter key from vehicle and store it at a location beyond its transmission range (at least 2 m). | |
7 | Open hood, position vertically. | ||
8 | Remove partition wall between wheel wells |
| |
9 | Remove engine cover | Engine 156: Lift front engine cover upwards vertically, otherwise the retaining lugs can break off. | |
Installation: Ignition switched off. | |||
10 | Suction off oil from expansion reservoir of power steering | Hand pump | |
11 | Attach engine hoist and raise engine | ||
Observe the manufacturer's assembly specifications and safety information. | |||
Bolt, partition wall reinforcement between wheel well liners to fender | |||
Engine lifting device | |||
12 | Lift vehicle to half height | ||
13.1 | Remove fender liner in left and right front fender | Vehicles with 4MATIC. | |
13.2 | Remove rear section of fender liner in left and right front fenders | Vehicles without 4MATIC. | |
14 | Remove rpm sensor screw (7) on left and right, take off front left rpm sensor (L6/1) and front right rpm sensor (L6/2) from steering knuckle (11), detach electrical lines of front left rpm sensor (L6/1) and front right rpm sensor (L6/2) as far as suspension strut (23) | Installation: Replace rpm sensor screw (7). | |
Self-locking bolt, front axle rpm sensor to steering knuckle | |||
15 | Cut through cable ties (10) on steering knuckle (11), open brake hose bracket (12) and unclip brake hose (13) together with decoupling element | Installation: Pay attention to installation position. | |
Pliers | |||
16 | Detach clamp (14) from brake caliper (17) | On both sides of the vehicle. | |
17 | Disconnect electrical connector from brake pad thickness contact sensor | The brake pad thickness contact sensor is only present on one side of the vehicle. | |
18 | Take off plastic caps (15), remove guide pins (16) | Guide pin to brake caliper support | |
19 | Take off brake caliper (17), remove brake pads and fasten brake caliper to upper transverse control arm (20) using a cable tie | Installation: Check brake pads, brake caliper, guide pins, brake pad thickness contact sensor, pistons and dust boots, replace if necessary: | |
Press back piston using pusher tool: | |||
| |||
Remove/install brakepads on floating brake caliper | |||
Resetting device | |||
20 | Unscrew link rod nut (25) and release link rod (22) from suspension strut (23) | In order to release the link rod (22), it may be necessary to lift the lower control arm with a suitable tool or a suitable fixture, until the screw can be removed from the bore on the suspension strut (23). | |
Nut, torsion bar linkage to front suspension strut | |||
21 | Undo threaded connection (24) on suspension strut (23) and remove screw | Installation: | |
Self-locking nut, shock absorber to wishbone | |||
22 | Remove steering knuckle nut (27) | Self-locking nut, upper ball joint out of upper transverse control arm to steering knuckle | |
23 | Detach steering knuckle (11) from upper transverse control arm (20) using puller (21) and thrust piece | Puller | |
Thrust piece | |||
24 | Install guard plates (6) for brake cover plates | Guard plate | |
25 | Raise vehicle fully | ||
26 | Loosen right underfloor paneling (2) and left underfloor paneling (3) behind the left and right front wheel well until screws (39, 41) on centering plates (38) are accessible | ||
27.1 | Detach lower engine compartment lining (1) | Vehicles with gasoline engine. | |
27.2 | Remove bottom section of soundproofing | Vehicles with diesel engine. | |
28 | Release and disconnect plug (26) from steering gear | ||
29 | Unscrew retaining plate screw (32) and remove retaining plate (31) | Bolt, retaining plate for oil line to control head | |
30 | Tie oil lines (30) of power steering system to one side | Drain oil lines (30) and seal with stop plugs. Collect and dispose of hydraulic fluid. | |
Record plug | |||
31 | Unscrew steering coupling screw (29) and remove steering column (28) from steering coupling (29) | The steering can be turned up to half a revolution of the steering column (28) if the steering coupling screw (29) is not accessible initially. | |
Screw/bolt, steering coupling to steering shaft | |||
32 | Lower the vehicle until the driver's door can be opened and the steering wheel is accessible | ||
| |||
33 | Mount holding device on steering wheel | Retainer device | |
34 | Raise vehicle fully | ||
35 | Remove front engine mount screws (33) at left and right front engine mount | Bolt, front engine mount to front axle carrier | |
36 | Mark position of propeller shaft (35) relative to flange of front axle transmission | Vehicles with 4MATIC. | |
37 | Remove propeller shaft screws (34) and remove together with shim plates |
| |
Installation: | |||
Vehicles with 4MATIC. | |||
Self-locking bolt, propeller shaft to front axle gear | |||
Retainer wrench | |||
38 | Release propeller shaft (35) from front axle differential and loosely fasten to vehicle floor using a cable tie | | |
Vehicles with 4MATIC. | |||
39 | Support front axle (5) with suitable lifting device (4) and fasten securely to lifting device (4). | ||
40 | Remove centering plates (38); to do this, remove screws (37, 39, 41) | Installation: Fit screws(37, 39, 41) but do not tighten yet. Insert drifts into centering bores (42) and align front axle (5) and centering plates (38). The front axle carrier is in the correct position when the drifts are aligned vertically in the centering bores (42). | |
Self-locking bolt, front axle carrier (front) to longitudinal member | |||
Self-locking bolt, front axle carrier at rear to longitudinal member | |||
Bolt, stiffening plate to longitudinal member | |||
Bolt, stiffening plate to body | |||
Drift set | |||
41 | Remove front axle carrier screws (36) | Installation: Fit front axle carrier screws (36) but do not tighten. | |
42 | Carefully lower front axle (5) | | |
| Check | ||
43 | Check front axle (5) for damage and replace damaged or worn parts if necessary | ||
44 | Install in the reverse order | ||
45 | Fill power steering pump and bleed | ||
| Check | ||
46 | Check oil level in front axle differential, correct if necessary | Vehicles with 4MATIC. | |
Oil filler screw, front axle transmission | |||
Filling capacity | |||
Loctite 7063 (400 ml) cleaning spray | |||
Sealant, Omnifit 100H (50 g) | |||
47 | Perform wheel alignment check | ||
48 | Check headlamp adjustment, correct if necessary | ||
| |||
Only if suspension components were replaced or if the vehicle level was adjusted. |
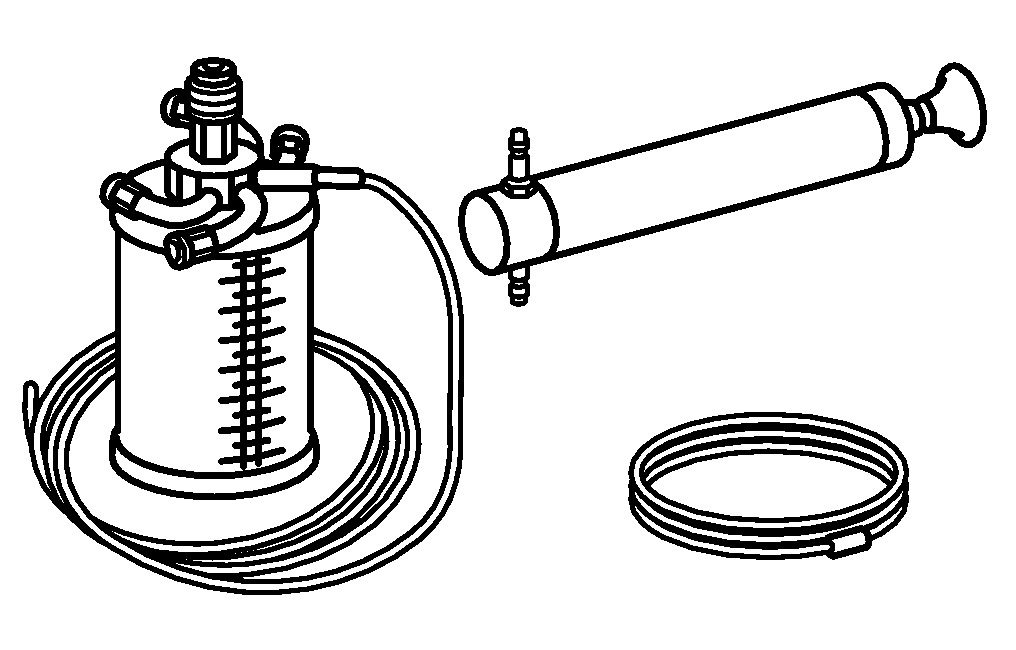


210 589 00 71 00
Hand pump
164 589 01 37 00
Pliers
140 589 00 63 00
Thrust piece
240 589 00 61 00
Engine lifting device


220 589 01 31 00
Guard plate
129 589 00 91 00
Record plug
601 589 04 33 00
Puller
164 589 01 15 00
Drift set


164 589 02 07 00
Retainer wrench
000 589 52 43 00
Resetting device
129 589 01 21 00
Retainer device
Referenced documents
- ah0000n000101a Notes on self-locking nuts and bolts
- ah3222p100002rt Notes on AIRmatic
- ah4210p940601a Notes on installing brake hoses
- ah4620p940901a Evaluating steering gear when repairing accident vehicles
- ap4010p4050rt Remove/install wheels, rotate if necessary
- ap8210p8260rt Check and correct the adjustment of the headlamps
- ar0060p1000rt Lift/jack up vehicle
- ar3310p010001rt Attach engine supporting frame and lifting engine
- ar4020p0200rt Perform chassis alignment
- ar4110p007003gz Tightening procedure for front propeller shaft
- ar4210p0160rt Remove/install brakepads on floating brake caliper
- ar4630p0010rt Fill power steering pump and bleed
- ar5430p100002rt Perform adjustments to the control system
- ar6120p1105rt Remove/install bottom engine compartment paneling
- ar6230p2400rt Remove/install partition wall between wheelhouses
- ar8810p1300rt Remove/install fender liner in front fender
- ar8840p1000rt Opening engine hood, moving to upright position and closing
- ar9430p5300rt Remove/install bottom sections of soundproofing
- as0000z001001a Risk of death caused by vehicle slipping or toppling off of the lifting platform.