
W26.50-1134-09
1 | Intermediate shaft brake | 11 | Oil pipe | 21 | Main shaft (with gear shift unit) | ||
2 | Counter shaft bearing cap (front) | 12 | Intermediate shaft | 22 | Synchronizing cone with synchronizing ring and ring spring | ||
3 | Drive shaft cover | 13 | Counter shaft bearing cap (rear) | 23 | Shifting collar | ||
4 | Drive shaft bearing cap (front) | 14 | Reverse gear switch | 24 | Drive shaft | ||
5 | Clutch actuation lever | 15 | Multiplier group | 25 | Control unit | ||
6 | Range group's control bar | 16 | Reverse gear axle | 26 | Splitter group fork bolt | ||
7 | Front housing | 17 | Pin of the shift fork of the R/ 1st and of the 2nd/ 3rd gears | B3 | Counter shaft rpm sensor | ||
8 | Lock | 18 | Central housing | B47 | Oil temperature sensor | ||
9 | Splitter group coupling fork | 19 | Shim | ||||
10 | Sliding shoes | 20 | Main shaft bearing cap (rear) |

7 | Front housing |
30 | Shift rail (R/ 1st gear) |
31 | Shift rail (2nd/ 3rd gear) |
32 | Coupling rail guide |
33 | Fixing device |
W26.60-1246-02
| Assemble | ||
1 | Assemble the counter-shaft (12) |
| |
2 | Install drive shaft (24) |
| |
3 | Assemble the secondary shaft (21) |
| |
4 | Install the main shaft bearing cap (20) the countershaft bearing cap (13), with the shim (19) in the center housing (18) | Utilize an appropriate mandrel. | |
Apply multipurpose grease on the taper roller bearing caps (13 and 20). | |||
VASELINE / DBL 6850.00 | |||
5 | Mount the reverse gear gearwheel (14) with the bearing and bushing | The long collar of the reverse gearwheel (14) has to point to the outlet side. | |
6 | Assemble the counter shaft (21) with the main shaft (12) in the central carcass (18) |
| |
Use the fastening device (33). | |||
Clamping device | |||
Retaining device | |||
7 | Assemble the fork pins (17) | Apply chemical lock on the fork pins (17). | |
Araldite 2014 resin | |||
.Selection fork retaining pin in the gearbox | |||
8 | Remove the fastening device (33) from the main shaft (21) and from the countershaft (12) | ||
9 | Place the synchronizer cone with synchronizer ring and annular spring (22) on the main shaft (21) | ||
10 | Install the shift sleeve (23) | The long collar must point towards the motion output. | |
11 | Install the drive shaft (24) | Move the countershaft (12) to the side. | |
Put multi-use grease on the drive shaft tapered roller bearing. | |||
VASELINE / DBL 6850.00 | |||
12 | Center the reverse gear gearwheel (14) and place the reverser gear shaft (16) | .Reverse gear axle fastening plate | |
13 | Assemble the oil tube (11) | ||
14 | Assemble the splitter group coupling fork (9) with sliding bases (10) | ||
15 | Put the centering drift in the oil tube (11) | Alignment punch | |
16 | Put the guide pins in the front housing (7) | ||
| |||
17 | Fit the front case (7) in the center case (17) | The coupling rails must slide on the front housing guide (7). | |
Apply a sealant to the sealing faces. | |||
Loctite 5203 surface sealant | |||
18 | Assemble the lock (8) on the oil tube (11) and remove the centering mandrel | ||
19 | Remove the guide pins from the front housing (7) and place the fastening bolts of the front housing (7) | Pay attention to the different sizes of the bolts. | |
.Front housing in the central housing | |||
20 | Assemble the tapered roller bearing caps (2, 4) | Utilize an appropriate mandrel. | |
Put multi-use grease on the tapered roller bearing caps (2, 4). | |||
VASELINE / DBL 6850.00 | |||
21 | Install the radial seal and the guide bushing of the splitter group control rod |
| |
Synthetic grease 50 g | |||
Drift | |||
22 | Install the splitter group control bar |
| |
The coupling fork of the splitter group (9) must engage in the control rod's recess. | |||
Apply sealing compound to the closing screw. | |||
Put a quick drying binding product on the splitter group coupling fork pin (26). | |||
Loctite 5203 surface sealant | |||
Thread locking agent, Loctite 243 (10 ml) | |||
.Selection fork retaining pin in the gearbox | |||
23 | Fasten the engagement rails (30, 31) to the guide (32) in the neutral position | Use the fastening device (33). | |
Retainer | |||
24 | Lift out the control rod of the split group (6) with the assembly tool, until the split group is engaged | ||
| Assembly tool for installing splitter group shift rod | ||
25 | Determine the shims for the input shaft (24) and countershaft (12) |
| |
.Pre-load of the primary shaft bearing | |||
.Intermediate shaft bearing adjustment clearance | |||
.Primary and intermediate shaft bearings pre-tension | |||
Torque screwdriver | |||
Clamping plates | |||
26 | Assemble the countershaft (1) brake with the determined shim |
| |
The brake blades oil grooves must be aligned. | |||
27 | Assemble the drive shaft (3) cover with the determined shim |
| |
28 | Position the gearbox in the horizontal position | ||
29 | Determine the compensation washer for the splitter group control piston |
| |
.Splitter group control piston adjustment dimension | |||
30 | Lift out the control rod of the split group (6) with the assembly tool, until the split group is engaged | ||
| Assembly tool for installing splitter group shift rod | ||
31 | Assemble the double groove retainer and the control piston | Lock the control piston with quick-drying adhesive. | |
Smear synthetic grease on the double groove seal. | |||
Quick-acting adhesive, Loctite 270 | |||
Synthetic grease 50 g | |||
.Fastening of the splitter group control piston | |||
Puller | |||
32 | Determine the compensation washer for the splitter group control cylinder |
| |
.Splitter group control cylinder adjustment dimension | |||
Internal extractor | |||
Counter stay | |||
33 | Remove the fastening device (33) | ||
34 | Assemble the operating unit (25) |
| |
35 | Install the oil temperature sensor (B47) | .Transmission oil temperature sensor | |
36 | Install the countershaft rpm sensor (B3) | Vehicle with code (GE3) Mercedes PowerShift | |
. | |||
37 | Assemble the range group (15) |
| |
38 | Assemble the range group (15) |
| |
39 | Install the compressed air tubes in the gear module, selection and engagement module, splitter group module, and power takeoff module | With compressed air connection system "VOSS 230". | |
. | |||
40 | Install the electric cables in the connectors and supports | ||
41 | Install the clutch actuation lever | .Gearbox fork |
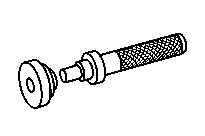


714 589 05 15 00
Drift
715 589 03 15 00
Alignment punch
000 589 30 33 00
Internal extractor
001 589 80 21 00
Torque screwdriver


315 589 02 31 00
Clamping device
715 589 02 07 00
Puller
715 589 01 31 00
Retaining device
715 589 18 63 00
Retainer


715 589 15 63 00
Clamping plates
000 589 34 33 00
Counter stay
Repair materials |
Number | Designation | Order number |
BR00.45-Z-1008-02A | Quick-acting adhesive, Loctite 270 | A 002 989 93 71 |
BR00.45-Z-1027-06A | Synthetic grease 50 g | A 001 989 32 51 10 |
BR00.45-Z-1098-06A | VASELINE / DBL 6850.00 | A 000 989 15 51 |
BR00.45-Z-1123-02A | Araldite 2014 resin | Huntsman Advanced Materials BVBA Everslaan 45 |
BR00.45-Z-1129-02A | Loctite 5203 surface sealant | Henkel AG & Co. KGaA |
BR00.45-Z-1133-02A | Thread locking agent, Loctite 243 (10 ml) | A 613 989 09 71 09 |
Referenced documents
- ar2619b0018ta Remove/install countershaft speed sensor
- ar2630b1020tkb Remove/install input shaft bearing cap
- ar2631b3102ta Install range group
- ar2631b3201ta Assembling range group
- ar2635b100001a Determine shim for shift piston of splitter group
- ar2635b100002ta Determine shim for cylindrical actuator of cascade box
- ar2635b100003ta Remove/install radial shaft seal and pilot bushing for splitter group shift rod
- ar2635b100004ta Install shift rod of splitter group
- ar2650b041003tkb Determine shims of drive shaft and countershaft
- ar2650b0426tkc Assembling transmission main shaft
- ar2650b400002tkc Install main shaft and countershaft with shift unit
- ar2650b4744tkb Dismantle, assemble drive shaft.
- ar2650b4775tkc Disassemble, assemble countershaft
- ar2650b6000tkb Remove/install countershaft brake (VGW-B)
- ar2660b0001th Remove and install gearshift system
- ar4210b0900ta Remove/install compressed air connector coupling
- wf5850b263501a Assembly tool for installing splitter group shift rod
- wf5850b310001a Guide bolt for installing range group