Modification notes |
18.11.2019 | Operation steps added. | Operation steps 2, 11.1, 15, 16, 19. | |
06.06.2019 | Reuse left rear hands-free system microphone (B25/32) and right rear hands-free system microphone(B25/33). | Operation steps 7, 8. | AR68.30-P-4305-16MFA |
06.06.2019 | Reuse center load compartment dome lamp (E15/4). | Operation step 10. | AR68.30-P-4305-16MFA |
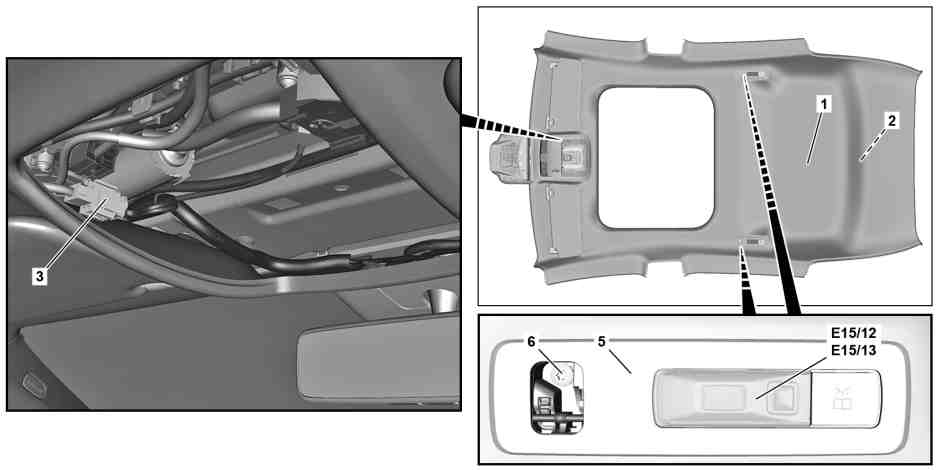
P68.30-A017-09
Shown on model 118.6 with code 413 (panoramic roof) |
1 | Headliner | 6 | Screw | |
2 | Guide | E15/12 | Left rear interior/reading lamp | |
3 | Electrical connector | E15/13 | Right rear interior/reading lamp | |
5 | Coat hook |
Topical note | Information on preventing damage to electronic components due to electrostatic discharge | ||
Notes on safety-relevant components | |||
| Remove/install | ||
1 | Remove front seats. | ||
2 | Remove center console. | ||
3 | Remove sun visors. | ||
4 | Remove overhead control panel control unit (N70). | ||
5 | Release and disconnect the electrical connector (3) above the overhead control panel control unit (N70). | ||
6 | Remove cover from inside rearview mirror (A67). | ||
7 | Remove trim from A-pillars. | ||
8 | Remove top B-pillar trims. | ||
9 | Remove C-pillar trims. | ||
10 | Remove grab handles from roof. |
| |
11.1 | Remove screws (6) and remove clothes hooks (5). | Model 118.6 | |
11.2 | Remove screws (6) from the clothes hooks (5); remove clothes hooks (5) until the electrical connectors of the left and right rear passenger compartment interior/reading lamp (E15/12 and E15/13) are accessible. | Model 118.6 | |
| |||
12 | Release and disconnect electrical connectors of the left and right rear passenger compartment interior /reading lamp (E15/12 and E15/13). | Model 118.6 | |
13 | Carefully lower roof lining (1) at front. | Helper required. | |
14 | Carefully pull down roof lining (1) from the panoramic sliding sunroof. | Model 118.6 | |
Helper required. | |||
15 | Release mounts for the luggage net from the brackets. | Model 118.6 | |
16 | Release velcro fasteners of the roof lining (1). | The Velcro fasteners are attached at the center and the rear of the roof lining (1). | |
Helper required. | |||
17 | Pull out roof lining (1) in the rear area downward out of the guide (2). | Helper required. | |
18 | Remove roof lining (1) through the front door. | | |
Helper required. | |||
19 | Prepare new headliner (1) for installation. | When replacing roof paneling (1). | |
Adhesive tape roll, non-woven Tesa tape, 50 meters, 50 mm wide | |||
20 | Install in the reverse order. |
Henviste dokumenter
- ah0000z001901a Oplysninger om sikkerhedsrelevante komponenter
- ah5400p000101a Oplysninger med henblik på at undgå skader på elektroniske komponenter på grund af elektrostatisk afladning
- ar6820p2000mfa
- ar6830p4050mfa
- ar6830p430516mfa
- ar6830p4330mfa
- ar6830p4498mfd
- ar6830p4705mfa
- ar6840p0001mfa
- ar6860p5480mfa
- ar8220p1000mfa
- ar9110p1000mfa