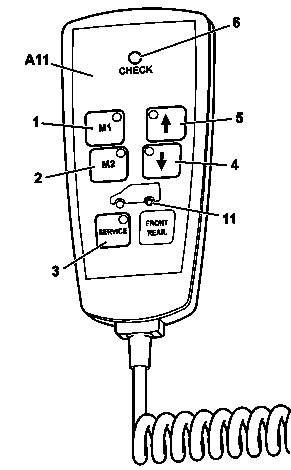
1 | "M1" button |
2 | "M2" button |
3 | "SERVICE" button |
4 | Lower button |
5 | Raise button |
6 | "CHECK" LED |
11 | Rear axle LED |
A11 | Remote control |
D32.22-0037-03
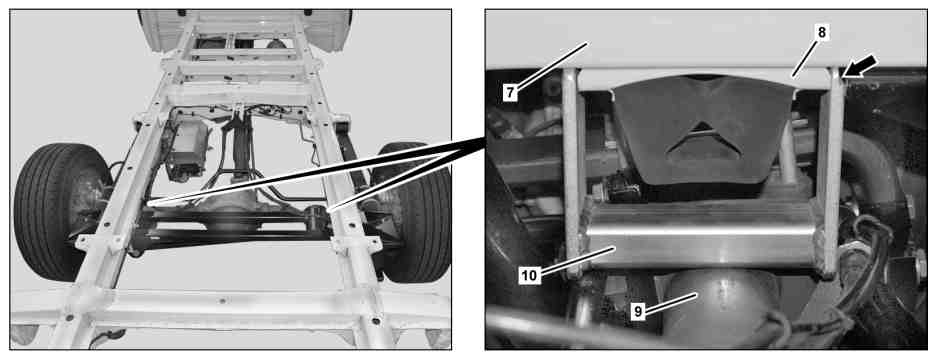
D32.22-0038-08
Shown on model 906.13 |
7 | Longitudinal frame member | 9 | Rear axle tube | |
8 | Support | 10 | Calibration gauge |
Danger | Risk of death from lowering vehicle when working between wheels and body. Risk of injury from pinching or crushing when working on the air suspension. | Testing and repair work between the wheel and wheel arch or in the wheel well should only be performed if the vehicle is secured using suitable support fixtures to prevent it from lowering. | |
Topical note | Notes on carrying out repair work in the vehicle interior | ||
Topical note | Notes on air suspension | ||
Calibrate | |||
1 | Switch on ignition. | ||
2.1 | Take remote control (A11) out of holder. | If the holder of the remote control (A11) is installed in the area of the driver's seat. | |
2.2 | Move driver's seat forward and remove remote control (A11) from seat base. | If the remote control (A11) is positioned in the seat base according to a customer request. | |
3 | Check whether the rear axle LED (11) lights up blue. | The air suspension can be operated when the rear axle LED (11) is lighting up blue. | |
If the rear axle LED (11) does not light up blue or if other displays on the remote control (A11) light up or flash. | |||
| |||
Check fault memory. | |||
| Air suspension diagnosis, fault memory | ||
4 | Operate parking brake. | Model 906 as of 01.06.15 | |
5 | Press "SERVICE" button (3) on remote control (A11) briefly. | The LED of the "SERVICE" button (3) lights up. Service menu is activated. | |
6 | Press first button combination on remote control (A11). | Button combination: | |
7 | Press second button combination on remote control (A11). | Button combination: Raise button (5) | |
Calibration mode is activated. LED "CHECK" (6) flashes. The air suspension can be operated. | |||
If "CHECK" LED (6) does not flash. | |||
| |||
Press same button combination on remote control (A11) again. | |||
8 | Press Raise button (5) and lift up longitudinal frame members (7) of vehicle in this way. | Raise longitudinal frame members (7) of the vehicle until it is possible to insert the calibration gauges (10) into the supports (8) on both sides between the rear axle tube (9) and the longitudinal frame members (7). | |
The calibration gauges currently in use (10) can be found on the homepage of the company CARS Technik & Logistik GmbH. | |||
9 | Insert calibration gauges (10) into supports (8) on both sides between rear axle tube (9) and longitudinal frame members (7). | ||
10 | Press Lower button (4) and lower longitudinal frame members (7) in this way. | Lower longitudinal frame members (7) until they are seated on the calibration gauges (10). | |
Hold down Lower button (4) until all of the compressed air has escaped and no discharge noise can be heard. | |||
11 | Press and hold "SERVICE" (3) button until a long acoustic signal is heard. | The driving level of the vehicle is now stored in the control unit. | |
12 | Press Raise button (5) and lift up longitudinal frame members (7) in this way. | Lift longitudinal frame members (7) until calibration gauges (10) can be removed on both sides between rear axle tube (9) and longitudinal frame members (7). | |
13 | Remove calibration gauges (10). | ||
14 | Press and hold Lower button (4) until all the compressed air escapes from the air suspension bellows. | ||
15 | Press "SERVICE" (3) button briefly. | This deactivates the calibration mode. | |
16 | Press "SERVICE" (3) button briefly. | This exits the service menu. | |
17 | Press and hold Raise button (5). | The vehicle is raised to the stored driving level. | |
18.1 | Place remote control (A11) into seat base and move driver's seat to previous position. | If the remote control (A11) is positioned in the seat base according to a customer request. | |
18.2 | Hook remote control (A11) into holder. | If the holder of the remote control (A11) is installed in the area of the driver's seat. | |
19 | Switch off ignition. |
Henviste dokumenter
- ad3222d0001a
- ah3222n100001h Oplysninger om luftaffjedring
- ah6800n000101s Oplysninger om udførelse af reparationsarbejde i kabinen
- as3222z000101a Livsfare på grund af sænkning af køretøjet ved arbejde mellem hjul og opbygning.Fare for personskade på grund af fastklemning eller knusning ved arbejde på luftaffjedringen.