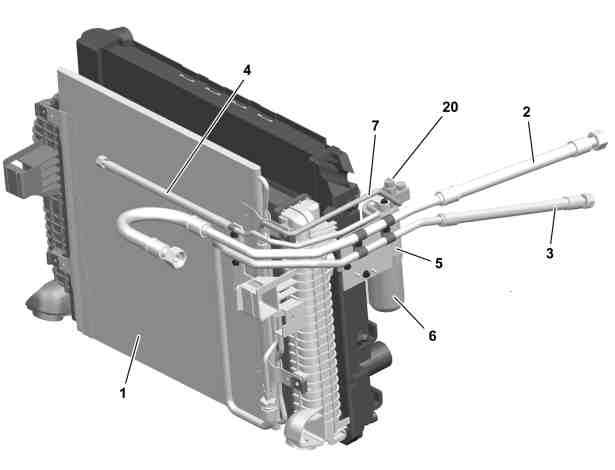
Previous version |
1 | Condenser |
2 | Refrigerant line |
3 | Refrigerant line |
4 | Refrigerant line |
5 | Bracket |
6 | Fluid reservoir |
7 | Refrigerant line |
20 | Electrical connector |
W83.30-1289-06

Changed version |
2 | Refrigerant line |
8 | Condenser (A 970 500 01 54) |
9 | Refrigerant line (A 973 830 18 15) |
10 | Refrigerant line (A 973 830 19 15) |
11 | Bracket (A 973 830 01 14) |
12 | Clamps |
B46 | High-low pressure switch |
W83.30-1290-06

13 | Information label (A 967 817 02 20) |
W83.30-1291-11
Danger ! | Risk of injury caused by body parts being pinched or crushed as cab is tilted | Ensure that no one is within the tilting range of the cab as it is being tilted. Always tilt the cab all the way to the end position and secure with the safety strut. | |
Danger ! | Risk of explosion caused by welding or soldering work on closed air conditioning system. Risk of poisoning caused by inhaling overheated refrigerant vapors. Risk of injury to skin and eyes caused by contact with liquid refrigerant. | Never perform welding work on or near a closed air conditioning system. No smoking or open flames. Wear safety glasses and protective gloves. Work only in well ventilated areas. Carry out repair work on the air conditioning system circuit only after the system has been drained. | |
| Notes on tilting the cab | ||
| Procedure for a damaged or leaky air conditioning system | ||
| Protect air conditioning circuit and components from moisture when carrying out repair work | ||
| Notes on handling refrigerant R134a | ||
| Remove | ||
1 | Drain air conditioning system | ||
2 | Disconnect refrigerant lines (2, 4) from connecting point to cab | ||
3 | Disconnect refrigerant lines (3, 7) from condenser (1) | ||
4 | Remove condenser (1) | The condenser (1) is no longer required. | |
5 | Tilt cab | ||
6 | Remove refrigerant lines (2, 3, 4, 7) | The refrigerant lines (3, 4, 7) are no longer required. The refrigerant line (2) and all clamps (12) will be reused. | |
7 | Disconnect electrical connector (20) at accumulator (6) | ||
8 | Remove accumulator (6) with bracket (5) | The accumulator (6) and the bracket (5) are no longer required. | |
| Install | ||
9 | Install bracket (11) | ||
10 | Install refrigerant lines (2, 9) with clamps (12) | Observe installation position of clamps (12) at bracket (11) as shown in picture. | |
Bolt, refrigerant line to condenser | |||
Union nut, refrigerant lines | |||
11 | Connect high-low pressure switch electrical connector (B46) of refrigerant line (10) to electrical connector (20) | Route electrical line without kinks or chafing. | |
12 | Lower cab | ||
13 | Install condenser (8) | ||
14 | Install refrigerant line (10) | Bolt, refrigerant line to condenser | |
Union nut, refrigerant lines | |||
15 | Evacuate the air conditioning system, refill it, and then check the system to make sure that it functions correctly and does not leak | ||
Condenser with integrated desiccant cartridgeRefrigerant total filling capacity | |||
16 | Attach information label (13) with modified filling capacity at fresh-air intake | ||
17 | Attach note "Condenser converted according to AR83.30-W-6545A" in VeDoc under field organization texts for design group 50 and design group 83 |