
1 | Transmission housing |
4 | Torque converter housing ventilation hose |
5 | Transfer case |
15 | Torque converter housing |
S27.40-A006-75

S27.40-A007-09
1 | Transmission housing | 12 | Valve lifter | 16 | Intermediate panel | ||
9 | Radial shaft sealing ring | 13 | Bolts | 17 | Output shaft | ||
10 | Deep-groove ball bearing | 14 | Bolts | 18 | Retaining ring | ||
11 | Support plate | 15 | Torque converter housing |

8 | Lifting device |
S27.10-A019-04
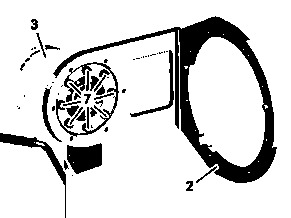
2 | Support fixture |
3 | Assembly stand |
7 | Bolts |
S27.00-A008-01
Caution | Risk of injury caused by scraping or cutting body parts on sharp vehicle parts | Always wear protective gloves when working on or near sharp and non-deburred vehicle parts. | |
Caution | Risk of injury to skin and eyes due to handling of transmission oil. Health risk caused by swallowing transmission oil | Wear protective gloves, protective clothing and safety glasses. | |
Topical note | Notes on self-locking nuts and bolts | ||
Topical note | Notes on threaded connections with aluminum screws/bolts | ||
Topical note | Notes on avoiding damage through contamination and foreign objects | ||
Notes on automatic transmission | |||
| Remove | ||
1 | Remove automatic transmission. | ||
Remove | |||
2 | Fasten automatic transmission to assembly stand (3). | ||
| 000 588 00 31 00 Assembly stand for cars | ||
Commercially available devices/tools | |||
Support fixture | |||
Lifting device | |||
3 | Expose torque converter housing ventilation hose (4) at transmission housing (1). | ||
4 | Position automatic transmission vertically on assembly stand (3) and remove torque converter. | ||
Direct torque converter housing (15) upwards. | |||
Assembly device | |||
5 | Remove park pawl actuator. | ||
6 | Remove transfer case (5). | ||
7 | Remove radial shaft sealing ring (9). | ||
8 | Remove retaining ring (18) and then remove deep-groove ball bearing (10). | ||
Pliers | |||
Puller | |||
Collet chuck | |||
9 | Unscrew bolts (13). | ||
10 | Position automatic transmission vertically and remove screws (14). | | |
11 | Tighten support plate (11) at transmission housing (1) with as many screws as possible and position valve lifter (12) as shown. | Valve lifter | |
Support plate | |||
12 | Detach transmission housing (1) from torque converter housing (15) using valve lifter (12). | | |
13 | Remove intermediate panel (16) from torque converter housing (15). | ||
14 | Remove multiplate clutch K27. | If transmission housing (1) is to be replaced. | |
15 | Remove valve lifter (12) and support plate (11). | ||
| Measure | ||
16 | Measure end play of automatic transmission. | If transmission housing (1) is to be replaced. | |
Commercially available devices/tools | |||
Parallel support | |||
Drift | |||
Device | |||
If necessary, | |||
| |||
Adjust end play with determined shim thickness. | |||
| Clean | ||
17 | Clean sealing surfaces between transmission housing (1) and torque converter housing (15). | ||
Install | |||
18 | Install multiplate clutch K27. | If transmission housing (1) has been replaced. | |
19 | Attach new intermediate panel (16) to torque converter housing (15). | ||
20 | Align disks of clutch packs in transmission housing (1). | ||
21 | Place transmission housing (1) onto torque converter housing (15). | | |
22 | Guide transmission housing (1) gradually onto intermediate panel (16) of torque converter housing (15) by abruptly turning the power output shaft (17) and simultaneously lifting the transmission housing (1). | | |
| |||
23 | Screw in new screws (13, 14). | ||
Topical note | Notes on threaded connections fastened using a tightening angle-based tightening process | ||
Screw/bolt, torque converter housing to transmission housing | |||
24 | Install deep-groove ball bearing (10) in transmission housing (1) using a suitable drift and then install retaining ring (18). | Pliers | |
25 | Install new radial shaft sealing ring (9). | ||
26 | Install transfer case (5). | ||
27 | Install park pawl actuator. | ||
28 | Attach torque converter housing ventilation hose (4) to transmission housing (1). | ||
29 | Position automatic transmission vertically on assembly stand (3) and insert torque converter. | ||
Direct torque converter housing (15) upwards. | |||
Commercially available devices/tools | |||
Long-life grease | |||
Protrusion of torque converter to torque converter housing | |||
Parallel support | |||
Support fixture | |||
Assembly device | |||
30 | Attach lifting device (8) to automatic transmission, remove automatic transmission from assembly stand (3) using an engine hoist and secure on support plate. | ||
| 000 588 11 62 00 Major assembly mount | ||
| 000 588 10 62 00 Support plate | ||
| |||
Commercially available devices/tools | |||
Lifting device | |||
31 | Remove screws (7) and remove support fixture (2) from assembly stand (3). | ||
| Install | ||
32 | Install automatic transmission. |


725 589 01 31 00
Assembly device
722 589 06 15 00
Drift
725 589 00 40 00
Support fixture
725 589 00 31 00
Device


442 589 00 31 00
Valve lifter
724 589 02 63 00
Lifting device
140 589 06 34 00
Collet chuck
000 589 52 37 00
Pliers


001 589 50 33 00
Puller
168 589 03 21 00
Parallel support
722 589 00 31 00
Support plate
Powiązane dokumenty
- ah0000n000101a Wskazówki dotyczące samozabezpieczających śrub i nakrętek
- ah0000p000601rm Wskazówki dotyczące połączeń śrubowych ze śrubami aluminiowymi
- ah0000p002001a Wskazówki dotyczące połączeń śrubowych tworzonych według kąta dokręcenia
- ah0000p500001a Wskazówki dotyczące zapobiegania uszkodzeniom na skutek zabrudzeń i ciał obcych
- ah2719p000101nkb Wskazówki dotyczące automatycznej skrzyni biegów
- ah2719p000101nkb
- ar2710s0005eb
- ar2710s0007ea
- ar2710s060001ea
- ar2720s050001ea
- ar2740s0206ea
- ar2750s058001ea
- ar2750s060101ea
- ar2750s0614ea
- ar2810s0100ea
- as0000z001701a Niebezpieczeństwo obrażeńo elementy pojazdu o ostrych krawędziach.
- as0040z000101a Niebezpieczeństwo obrażeń skóry i oczu podczas kontaktu z olejem przekładniowym. Zagrożenie dla zdrowia na skutek połknięcia oleju przekładniowego
- ws0100n3028b
- ws0100p0092b
- ws2600p3309b