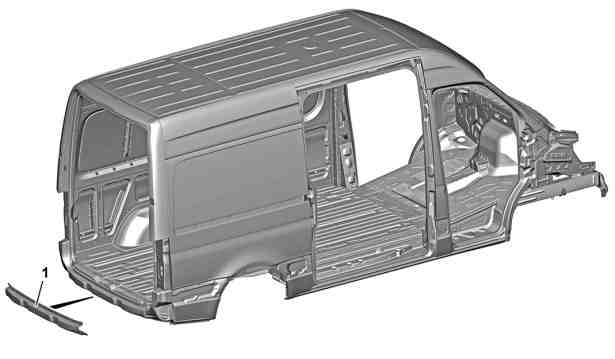
Shown on model 907.6 |
1 | Rear crossmember paneling |
D64.20-0088-05
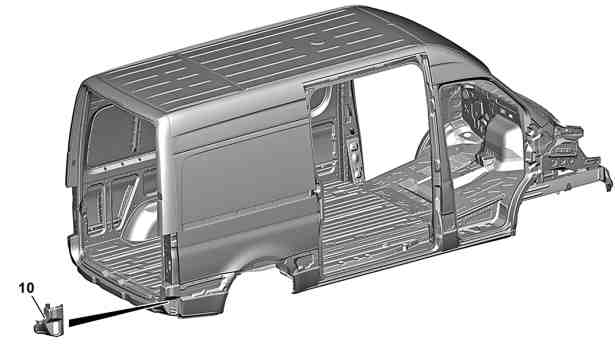
Shown on model 907.6, right side of vehicle |
10 | Corner pillar paneling lower section |
D60.00-A026-05

D60.00-A000-09
Shown on model 907 with code Q50 (Removable ball head for trailer coupling) |
2 | Rear-end doors | 5 | Frame seal | 7 | Right guide pin | ||
3 | Bumper | 6 | Left lock striker | 8 | Cover | ||
4 | Trailer hitch |

D60.00-A001-09
Shown on model 907 with code Q50 (Removable ball head for trailer coupling) |
4 | Trailer hitch | 9 | Electrical wiring harness |
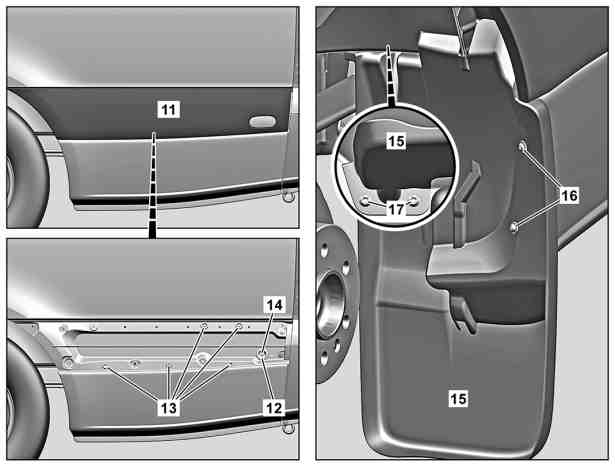
Shown on model 907 with code P48 (Rear mud flap), left side of the vehicle |
11 | Protective strip |
12 | Passage grommet |
13 | Plug |
14 | Connector |
15 | Dirt trap |
16 | Bolts |
17 | Nuts |
D60.00-A027-06
Danger | Risk of death when working on component parts and systems with U >= 30 V alternating voltage (AC) or U >= 60 V direct voltage (DC) | Do not touch damaged or defective live component parts and lines or non-insulated electrical connections and lines.Model 910.6 with engine 780.703 | |
Danger | Risk of death caused by vehicle slipping or toppling off of the lifting platform. | Align vehicle between vehicle lift columns and position the four support plates at the vehicle lift support points specified by the vehicle manufacturer. | |
Topical note | General information on vehicles with high-voltage on-board electrical system and/or lithium-ion battery and/or gaseous-fuel drive system as well as personal protective equipment | Model 910.6 with engine 780.703 | |
Topical note | Notes on carrying out repair work in the vehicle interior | ||
| Remove/install | ||
1 | Remove left and right wheel well trims. |
| |
2 | Remove left and right rear load compartment trim at the side. |
| |
3 | Remove left and right rear side wall trim in passenger compartment. |
| |
4 | Remove tie-down rails on left and right side walls. |
| |
5 | Remove sealing frame (5) in repair area and position outside the working area. | ||
6 | Remove cover (8) for rear entrance. | ||
In the process, the left lock striker (6) and the right guide pin (7) are removed. | |||
7 | Remove rear bumper (3). |
| |
Model 907.6/7, 910.6 | |||
8.1 | Remove sprung step. | Model 907.6/7, 910.6 | |
To do so, counterhold nuts and remove screws/bolts of the sprung step. | |||
Helper required. | |||
Screw/nut, sprung running board to longitudinal member | |||
8.2 | Remove step. | Model 907.6/7, 910.6 | |
To do so, counterhold nuts and remove screws/bolts of the step. | |||
Helper required. | |||
Screw/nut, running board to longitudinal member | |||
9 | Remove trailer hitch (4). |
| |
10 | Remove spare wheel holder under frame end. | Model 907.6/7, 910.6 | |
Topical note | Notes on self-locking nuts and bolts | ||
For this purpose, remove nuts. | |||
11 | Remove left and right protective strips (11). | ||
12 | Remove left and right feed-through grommets (12). | Model 907.6/7, 910.6 | |
To do so, position connector (14) with feed-through grommets (12) outside the working area in the vehicle interior. | |||
13 | Remove plugs (13) on left and right. | The number of plugs (13) may vary depending on the body length. | |
14 | Remove rear-end doors (2). | ||
15 | Remove electrical wiring harness (9) and position outside the working area. | ||
16 | Remove left and right rear lamp units. | ||
17 | Remove vent flaps from the lower sections of the corner pillar paneling (10). | ||
18 | Install in the reverse order. |
Referenced documents
- ah0000n000101a Notes on self-locking nuts and bolts
- ah0000z030001a General information on vehicles with high-voltage on-board electrical system and/or lithium-ion battery and/or gaseous-fuel drive system as well as personal protective equipment
- ah6800n000101s Notes on carrying out repair work in the vehicle interior
- ar3110d8000ts Remove/install trailer hitch
- ar6830d0016ts Remove/install wheel well trim
- ar6830d1185ts Remove/install side load compartment paneling
- ar6830d1208tsr Remove/install rear side wall trim in passenger compartment
- ar6830d3520ts Remove/install rear entrance cover
- ar6850d8250ts Remove/install tie-down rail on sidewall
- ar7220d1901ts Remove/install rear-end door
- ar8210d4731ts Remove/install rear lamp unit
- ar8210d4731tsb Remove/install rear lamp unit
- ar8820d2200ts Remove/install rear bumper
- ar8820d2200tsb Remove/install rear bumper
- ar8880d1040ts Remove/install moldings
- as0000z001001a Risk of death caused by vehicle slipping or toppling off of the lifting platform.
- as0000z003501a Risk of death when working on component parts and systems with U >= 30 V alternating voltage (AC) or U >= 60 V direct voltage (DC)