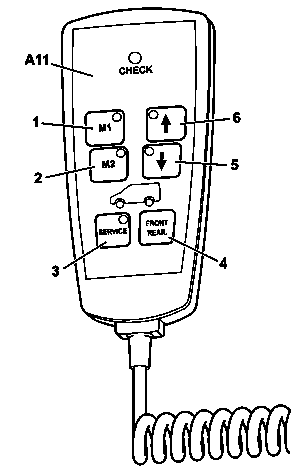
1 | M1 button |
2 | M2 button |
3 | SERVICE button |
4 | FRONT REAR button |
5 | Lower button |
6 | Raise button |
A11 | Remote control |
D32.22-0043-03
Danger ! | Risk of death from lowering vehicle when working between wheels and body. Risk of injury from pinching or crushing when working on the air suspension. | Testing and repair work between the wheel and wheel arch or in the wheel well should only be performed if the vehicle is secured using suitable support fixtures to prevent it from lowering. | |
| Notes on air suspension | ||
Draining | |||
1 | Raise the vehicle lift until the supports of the vehicle lift make slight contact with the lifting points on the body | ||
2.1 | Take remote control (A11) out of holder | Vehicles in which the remote control (A11) is located in the area around the driver's seat. | |
2.2 | Slide driver's seat forward and remove remote control (A11) from the seat base | On vehicles in which the remote control (A11) is located in the seat base as per customer request. | |
3 | Operate parking brake | Model 906 as of 6/1/15 | |
4 | Switch on ignition | ||
5 | Press SERVICE button (3) | ||
6 | Press button combination on remote control (A11) | Button combination: | |
The remote control (A11) emits a signal tone and all LEDs briefly light up in sequence. | |||
Discharge mode is activated. | |||
7 | Press FRONT REAR button (4) | The LED in the Raise button (5) lights up. | |
8 | Press Lower button (5) and release compressed air from right air suspension bellows | Do not begin the next step until the compressed air has completely escaped from the right air suspension bellows and the discharge noise can no longer be heard. | |
9 | Press FRONT REAR button (4) | The LED in the M2 button (2) lights up. | |
10 | Press Lower button (5) and release compressed air from left air suspension bellows | Do not begin the next step until the compressed air has completely escaped from the left air suspension bellows and the discharge noise can no longer be heard. | |
11 | Press SERVICE button (3) | Discharge mode is deactivated. | |
12 | Press SERVICE button (3) | Service mode is activated. | |
13 | Switch off ignition | ||
Filling | |||
14 | Switch on ignition | ||
15 | Press SERVICE button (3) | Service mode is deactivated. | |
16 | Press button combination on remote control (A11) | Button combination: | |
The remote control (A11) emits a signal tone and all LEDs briefly light up in sequence. | |||
Fill mode is activated. | |||
17 | Press FRONT REAR button (4) | The LED in the Raise button (5) lights up. | |
18 | Press Raise button (6) and fill right air suspension bellows with compressed air | Do not begin the next step until the right air suspension bellows has been completely filled with compressed air and the filling noise can no longer be heard. | |
19 | Press FRONT REAR button (4) | The LED of M2 button (2). | |
20 | Press Raise button (6) and fill left air suspension bellows with compressed air | Do not begin the next step until the left air suspension bellows has been completely filled with compressed air and the filling noise can no longer be heard. | |
21 | Press SERVICE button (3) | Fill mode is deactivated. | |
22.1 | Place the remote control (A11) in the seat base and push driver's seat back | On vehicles in which the remote control (A11) is located in the seat base as per customer request. | |
22.2 | Place the remote control (A11) in the holder | Vehicles in which the remote control (A11) is located in the area around the driver's seat. | |
23 | Switch off ignition | ||
24 | Lower vehicle |
Henviste dokumenter
- ah3222n100001h Oplysninger om luftaffjedring
- ar0060d1000h
- as3222z000101a Livsfare på grund af sænkning af køretøjet ved arbejde mellem hjul og opbygning.Fare for personskade på grund af fastklemning eller knusning ved arbejde på luftaffjedringen.