AR83.30-D-5620B | Remove/install pressure switch on fluid reservoir | 16.3.01 |
MODELS 901.6, 902.6, 903.6, 904.6, 905.6 with CODE (HH9) Automatic air conditioning "Tempmatic"
MODELS WD1, WD2, WD3, WD6, WD7
MODELS XD1, XD2, XD3, XD4, XD5, XD6, XD7, YD1, YD2, YD3, YD4, YD5, YD6, YD7 with CODE (HH9) Automatic air conditioning "Tempmatic"
MODEL 690.6 with CODE (HH9) Automatic air conditioning "Tempmatic"
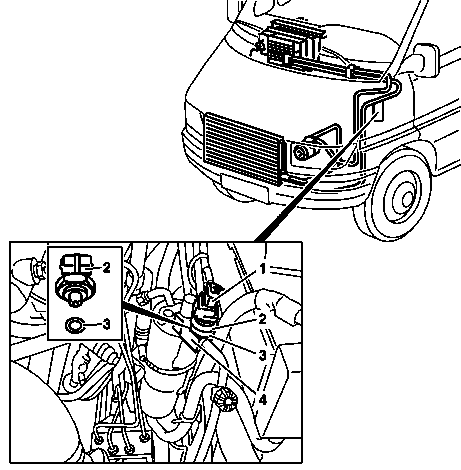
D83.30-1111-12
1 Electrical connection leads
2 Pressure switch
3 Sealing ring
4 Fluid reservoir
| Remove/Install | ||
Danger! | Risk of explosion from welding or soldering work on closed air conditioning system. Risk of poisoning. Inhaling overheated refrigerant vapors may be toxic. Risk of injury. Contact with liquid refrigerant may result in injury to the skin and eyes. | Never perform welding work on or near a closed air conditioning system. No smoking or open flames. Wear eye protection and protective gloves. Work only in well ventilated areas. Carry out repair work on the air conditioning system circuit only after the system has been discharged. | |
1 | Discharge air conditioning system | ||
| Protect air conditioning circuit and components from moisture when carrying out repair work | ||
2 | Remove electrical connection leads (1) from pressure switch (2) | ||
3 | Unscrew pressure switch (2) from lead connection (4) | Installation: Replace O-ring (3). Moisten thread with compressor oil. | |
4 | Install in the reverse order | ||
5 | Evacuate the air conditioning system, re-fill it, and then check the system to make sure that it functions correctly and does not leak. |
Fluid reservoir