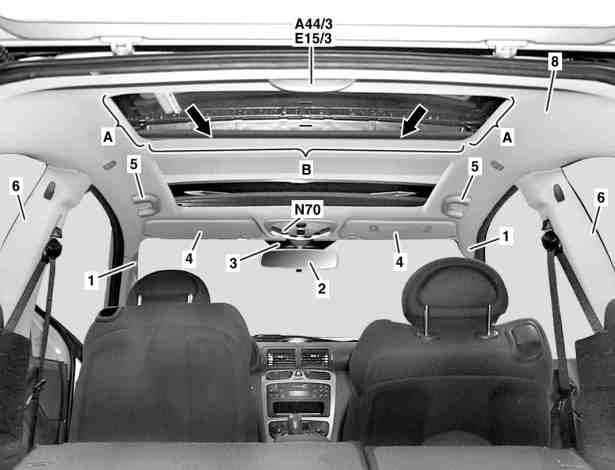
P68.30-2806-06
Illustrated on vehicle with code (413) panorama sliding roof
1 A-pillar paneling
2 Inside rearview mirror
3 Rain sensor cover (with code (345a) Rain sensor)
4 Sun visor
5 Grab handle
6 B-pillar paneling
8 Headliner
A44/3 PTS warning display, rear dome lamp (with code (220a) Parktronic system (PTS))
E15/3 Rear dome lamp
N70 Overhead control panel control unit
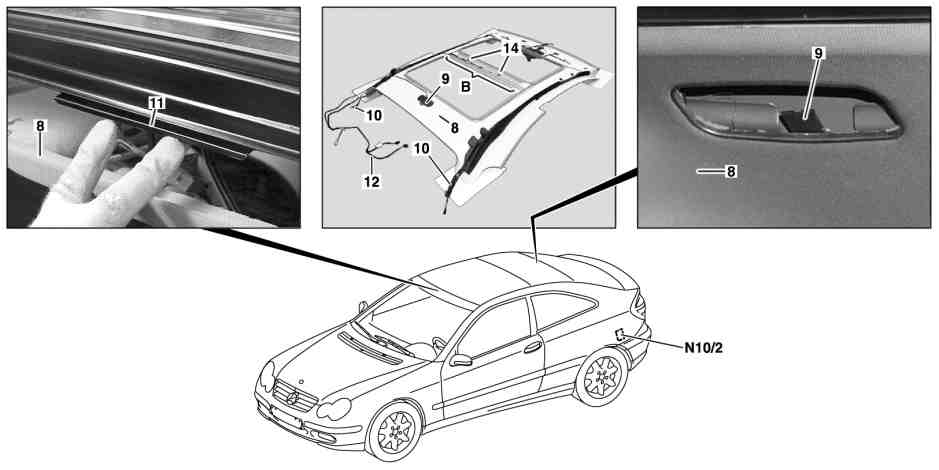
P68.30-2807-09
Illustrated on vehicle with code (413) panorama sliding roof
8 Headliner
14 Clip
N10/2 Rear SAM control unit with fuse and relay module
9 Mounting clip
10 Check strap
11 Front bracket
12 Wiring harness
Modification notes
| Remove/install | ||
| Note on function reliability of windowbag | ||
1 | Move left and right front seats toward front | See Operator's Manual | |
2 | Unclip left and right door sill molding and remove | ||
3 | Remove edge guard from door cutout on left and right | ||
4 | Remove left and right paneling from A-pillar (1) | ||
5 | Remove overhead control panel control unit (N70) | ||
6 | Remove rearview mirror (2). | ||
7 | Remove inside rearview mirror holder | ||
8.1 | Remove rain sensor cover (3) and disconnect rain sensor | On vehicles with code (345a) Rain sensor | |
9 | Disconnect light switch-on sensor | ||
10 | Remove left and right sun visor (4), unscrew bolt from left and right pivot bearing. | ||
11 | Remove left and right handle (5) | ||
12 | Remove left and right paneling from B-pillar (6) | ||
13.1 | Remove interior protection transmitter and receiver | Only on vehicles with code (882b) Interior monitoring (only with ATA) when replacing headliner (8). | |
14.1 | Remove rear dome lamp (E15/3) | On vehicles without code (220a) Parktronic system (PTS) | |
14.2 | Remove rear dome lamp PTS warning indicator (A44/3) | On vehicles with code (220a) Parktronic system (PTS) | |
15 | Move mounting clips (9) toward front | ||
16 | Fold rear seat backrest forward | See Operator's Manual | |
17 | Remove left and right paneling from Remove C-pillar | ||
18 | Disconnect electrical connectors for headliner (8) wiring harness (12) from rear SAM control unit with fuse and relay module (N10/2) | ||
19.1 | Expose headliner wiring harness (8) in area of right C-pillar and disconnect electrical connectors | On vehicles with code (273) telephone preequipped for D-net portable cellular telephone or code (329) portable cellular telephone preequipped for AMPS system or code (494) California version or code (498) Japanese version or code (852) portable cellular telephone preequipped completely on dome or code (853) MB standard telephone or code (854) MB portable cellular telephone or code (855) TELE AID or code (810) sound system | |
20 | Remove edge guard from rear door cutout | ||
21 | Unhook catch straps (10) from headliner (8) | ||
22.1 | Unclip headliner (8) in area B (arrows) | On vehicles with code (413) Panoramic sliding roof Installation: Ensure that clips (14) arrest audibly | |
23.1 | Unhook headliner (8) on left and right in area A | On vehicles with code (413) Panoramic sliding roof For this purpose move headliner (8) slightly on side left and right sides and remove | |
24 | Remove headliner (8) from front mount (11) and lay down in passenger compartment | Installation: Ensure that headliner (8) is positioned on front mount (11) | |
25 | Mask in area of rear door cutout with adhesive tape | This allows the headliner (8) to slide through the rear door cutout more easily | |
26 | Remove headliner (8) through rear door | Remove headliner (8) with aid of helper and lay down on suitable subbase. | |
27.1 | Prepare headliner (8) for installation | Only when replacing headliner (8). | |
28 | Install in the reverse order |