
P68.30-2199-06
Illustrated on vehicles with code (414a) Electric glass sliding/pop-up roof
1 Sliding roof rail
2 Headliner
3 Sun visor
4 Grab handle
N70 Overhead control panel control unit

P68.30-2322-06
11 Velcro strip
12 Hook
13 Installation frame
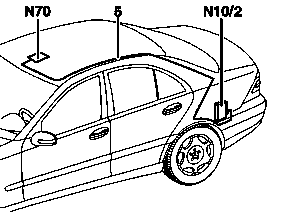
P68.30-2204-01
5 Main wiring harness
N10/2 Rear SAM control unit with fuse and relay module
N70 Overhead control panel control unit

P68.30-2203-07
Illustrated on vehicles with code (414a) Electric glass sliding/pop-up roof
7 Cover
8 Cover
2 Headliner
6 Cover
Modification notes
| Remove/install | ||
| Note on function reliability of windowbag | ||
1.1 | Open sliding/pop-up roof and remove sliding roof rail (1) | on vehicles with code (414a) electric glass titling/sliding roof | |
2 | Remove left and right paneling from A-pillar | ||
3 | Remove left and right paneling from upper B-pillar and lay down to side | ||
4 | Remove left and right paneling from Remove C-pillar | ||
5 | Remove center console | ||
6 | Move shift lever or selector lever toward rear. | On vehicles with transmission 722.6 it is necessary to release the selector, see: | |
| Function of shift lock override | ||
7 | Remove overhead control panel control unit (N70) | ||
8 | Remove inside rearview mirror | ||
9 | Remove inside rearview mirror holder | ||
10.1 | Remove rain sensor cover and disconnect rain sensor | On vehicles with code (345a) Rain sensor | |
11 | Disconnect light switch-on sensor | ||
12 | Remove left and right sun visor (3), unscrew bolt from left and right pivot bearing. | ||
13 | Remove handle (4) on left and right side of vehicle | ||
14.1 | Remove interior protection transmitter and receiver | Only on vehicles with code (882b) Interior monitoring (with ATA only) when replacing headliner (2). | |
15.1 | Remove rear dome lamp | On vehicles except code (220a) Parktronic system (PTS) | |
15.2 | Remove Rear PTS warning indicator dome lamp | On vehicles with code (220a) Parktronic system (PTS) | |
16.1 | Remove rear seat backrest | For vehicles without code (287a) Through-loading feature | |
16.2 | Remove side upholstery of left rear seat backrest | For vehicles with code (287a) Through-loading feature. | |
17.1 | Expose headliner wiring harness (2) in area of right C-pillar and disconnect electrical connectors | On vehicles with code (273) telephone preequipped for D-net portable cellular telephone or code (329) portable cellular telephone preequipped for AMPS system or code (494) California version or code (498) Japanese version or code (852) portable cellular telephone preequipped completely on dome or code (853) MB standard telephone or code (854) MB portable cellular telephone or code (855) TELE AID or code (810) sound system | |
18 | Expose main wiring harness (5) for headliner (2) in the interior of vehicle up to passage in trunk | ||
19 | Remove left paneling in trunk | ||
20 | Disconnect electrical connectors for headliner (2) main wiring harness (5) from rear SAM control unit with fuse and relay module (N10/2) | ||
21 | Expose main wiring harness (5) for headliner (2) in the trunk up to vehicle interior | ||
22 | Pull main wiring harness (5) for headliner (2) through passage in trunk into vehicle interior from passenger compartment side | ||
23 | Remove edge guard from passenger door cutout | ||
24 | Move left and right seats all the way back and move backrests to prone position to extent possible | See Operator's Manual | |
25 | Install cover (6), cover (7) and cover (8) | Use suitable adhesive tape. | |
26 | Loose Velcro strip (11) in area of installation frame (13) | ||
27 | Unhook hooks (12) in area of installation frame (13) from roof paneling | ||
28.1 | Pull headliner (2) to front | on vehicles with code (414a) electric glass titling/sliding roof | |
29 | Guide headliner (2) between driver seat backrest and B-pillar paneling, then between area of gearshift bracket and area of center console connection | Aid of helper required. Deformation of the headliner (2) is not critical and considered to be normal. When handled correctly, there will be no permanent deformation. | |
30 | Remove headliner (2) through passenger door cutout | ||
31.1 | Prepare headliner (2) for installation | Only when replacing headliner (2). | |
32 | Install in the reverse order |