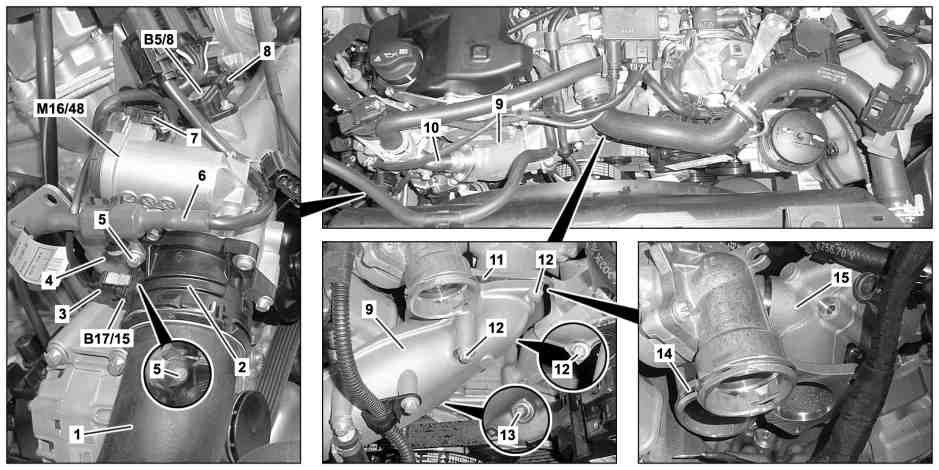
D09.20-1029-09
1 Charge air hose
2 Fitting
3 Electrical connector
4 Bracket
5 Screw
6 Wiring harness
7 Electrical connector
14 Sealing ring
15 Charge air manifold
B5/8 Boost pressure sensor
B17/15 Charge air temperature sensor
M16/48 Throttle valve positioner
8 Electrical connector
9 Mixing chamber
10 Exhaust gas recirculation pipe
11 Gasket
12 Screw
13 Screw
| Remove/install | ||
1 | Disconnect battery ground line | ||
2 | Lift/jack up vehicle | ||
3 | Open coupling and remove charge air hose (1) from fitting (2) | Plug connections with protective hoods.. | |
Installation: Replace seal ring and coat with antifriction paste. | |||
| |||
Lubricant paste | |||
4 | Unscrew bolts (5) from bracket (4), unscrew fittings (2) and throttle valve actuator (M16/48) | | |
| |||
5 | Remove electrical wiring harness (6) from bracket (4) and unclip throttle valve actuator (M16/48) | ||
6 | Disconnect electrical connector (3) at charge air temperature sensor (B17/15) | ||
7 | Lower vehicle | ||
8 | Remove air filter housing | ||
9 | Remove exhaust gas recirculation pipe (10) from exhaust gas recirculation valve to mixing chamber (9) | ||
10 | Remove viscous fan clutch | ||
11 | Unscrew bolts (12) | | |
12 | Unscrew bolt (13) and remove mixing chamber (9) toward front | Installation: Replace sealing ring (14) on charge air manifold (15) and seal (11). Install mixing chamber (9) free of tension. | |
| |||
13 | Lift out mixing chamber (9) and disconnect electrical connector (7) from throttle valve actuator (M16/48) | ||
14 | Disconnect electrical connector (8) at boost pressure sensor (B5/8) | ||
15 | Remove fittings (2) and throttle valve actuator (M16/48) from mixing chamber (9) | Only if installing new mixing chamber (9). | |
16 | Detach boost pressure sensor (B5/8) on mixing chamber (9) | Only if installing new mixing chamber (9). | |
| |||
| Clean | ||
17 | Clean sealing surfaces on charge air manifold (15), charge air hose (1) and fittings (2) | ||
18 | Clean sealing surfaces on mixing chamber (9) | Only if mixing chamber (9) is not replaced. | |
19 | Install in the reverse order | ||
Danger! | Risk of accident caused by vehicle starting off by itself when engine is running. Risk of injury caused by contusions and burns during starting procedure or when working near the engine as it is running | Secure vehicle to prevent it from moving by itself. | |
20 | Test run engine and check connections for leaks in the area of mixing chamber (9) |
Charge air pipe/charge air cooling
Number | Designation | Engine | ||
BA09.41-N-1007-01O | Bolt, engine charge air duct downstream of charge air cooler to throttle valve actuator | Nm | 9 | |
BA09.41-N-1008-01O | Bolt, throttle valve actuator holder to cylinder head | Nm | 9 | |
BA09.41-N-1011-01O | Bolt, boost air pressure sensor to mixing chamber | Nm | 6 | |
BA09.41-N-1012-01O | Bolt of mixing chamber to charge air manifold | M6 | Nm | 9 |
BA09.41-N-1013-01O | Bolt, mixing chamber to support brace | M8 | Nm | 20 |

Set of protective covers
001 589 01 91 00
Repair materials
Number | Designation | Order number |
BR00.45-Z-1002-06A | Lubricating paste, rubber parts 2.5 kg, DB supply specification 6867.00 | A 000 989 01 60 |