AR68.30-P-4300TA | Remove/install headliner | 25.7.06 |
MODEL 211.0 with CODE (414) Power glass tilting/sliding roof
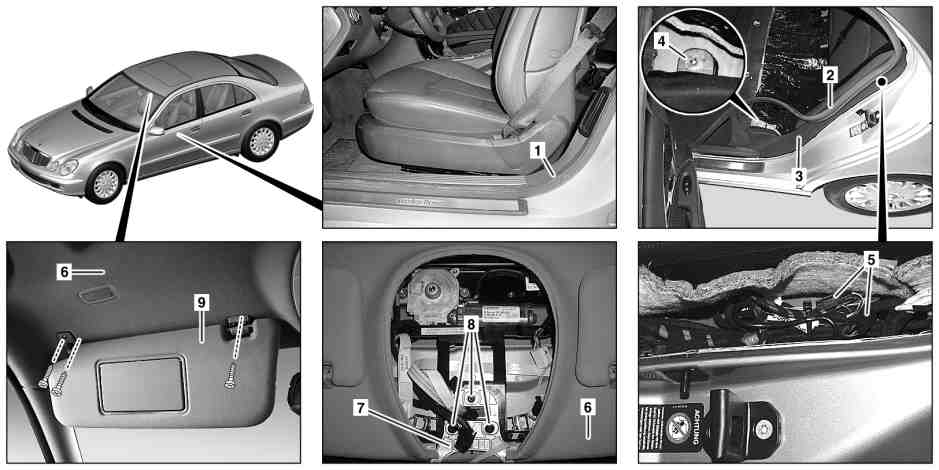
P68.30-2498-09
1 Edge guard
2 Edge guard
3 Rear paneling
7 Inside rearview mirror carrier
8 Bolts
9 Sun visor
4 Nut
5 Electrical connectors
6 Headliner

P68.30-2500-06
6 Headliner
10 Wiring harness
11 Clip
12 Clip
13 Centering bolt
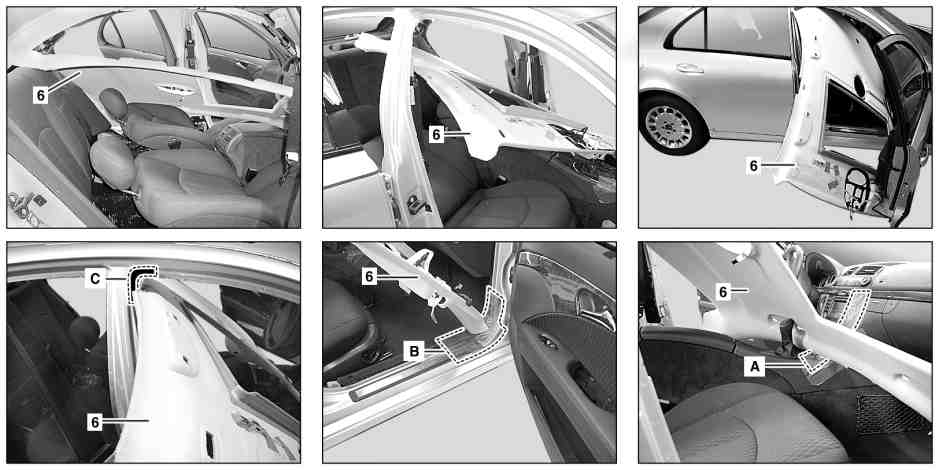
P68.30-2678-09
6 Headliner
B Area on right front door cutout
C Area on B-pillar/headliner
A Area on center console connection
Modification notes
| Remove/install | ||
| Note on function reliability of windowbag | ||
1 | Open tilting/sliding roof | ||
2 | Operate parking brake | ||
3 | Remove edge guard (1) from left front door cutout | ||
4 | Remove paneling from left A-pillar | ||
5 | Remove grab handle from roof on left front | ||
6 | Remove edge guard (2) from left rear door cutout | ||
7 | Loosen paneling from left B-pillar | Do not remove belt end fitting. | |
8 | Remove grab handle from left rear of roof | ||
9 | Loosen paneling from left C-pillar | Do not remove belt end fitting. | |
10 | Remove edge guard (2) from right rear door cutout | ||
11 | Remove grab handle from right rear of roof | ||
12 | Loosen paneling from right C-pillar | Do not remove belt end fitting. | |
13 | Remove edge guard (1) from right front door cutout | ||
14 | Remove grab handle from right front of roof | ||
15 | Remove paneling from right B-pillar | ||
16 | Remove paneling on right A-pillar | ||
17 | Move driver and passenger seats all the way toward rear and fold backrests downward | ||
18 | Remove overhead control panel control unit | ||
19 | Unscrew screws (8) and remove inside rearview mirror carrier (7) from headliner (6). | ||
20 | Remove left and right sun visors (9) | ||
21 | Remove front cover strip from tilting/sliding roof | ||
22 | Remove rear dome lamp | ||
23 | Remove left antenna amplifier module | ||
24 | Unscrew nuts (4) and loosen left paneling in rear (3) until electrical connectors (5) on wiring harness (10) are accessible. | ||
25 | Remove wiring harness (10) from body. | ||
26 | Disconnect electrical connectors (5) from wiring harness (10) | Number of electrical connectors (5) according to equipment. | |
27 | Move shift lever or selector lever toward rear. | On vehicles with transmission 722.6 it is necessary to release the selector, see: | |
| Function of shift lock override | ||
28 | Cover area of center console connection (A), area of right front door cutout (B) and area of B-pillar/headliner (D) with suitable means or mask | ||
29 | Loosen clips (11) in area of rear dome lamp and rear edge of roof | ||
30 | Pull centering bolt (13) for headliner (6) out of roof and slide headliner (6) toward rear | ||
31 | Slowly lower headliner (6) and pull toward front. | Pull headliner (6) toward front until clip (12) loosens from headliner. | |
Installation: Move clip (12) into roof paneling. | |||
32 | Lay headliner (6) down in vehicle | ||
33 | Move headliner (6) between driver's seat backrest and B-pillar, then between gearshift bracket and instrument panel center section connection. | Remove headliner (6) carefully because strong deformation can lead to damage. | |
Aid of helper required. | |||
34 | Remove headliner (6) through passenger door and lay down on clean surface | Aid of helper required. | |
35.1 | Prepare roof paneling (6) for installation | When replacing roof paneling (6). | |
36 | Install in the reverse order |
Связанные документы
- ah9160p069301a Указание по функциональной безопасности оконной подушки безопасности
- ar6830p4050t
- ar6830p4305t Подготовить обшивку крыши к установке
- ar6830p4330t
- ar6830p4490t
- ar6830p4700t
- ar8220p0113t
- ar8220p1000t
- ar8262p8300t
- gf2710p3023t Снятие стояночной блокировки, функциональное описание