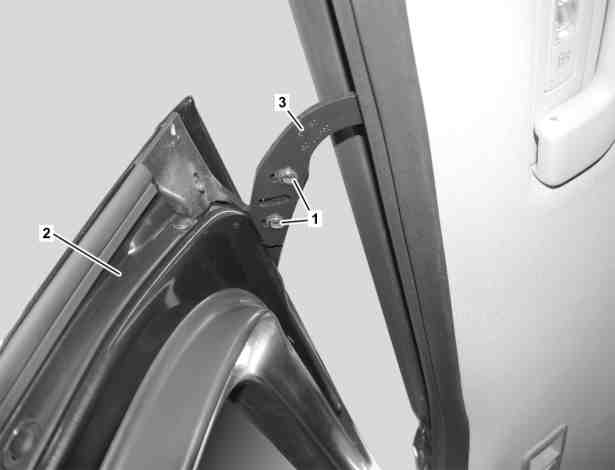
Shown on model 447.8 |
1 | Bolts |
2 | Sliding door |
3 | Upper carriage |
S72.16-4609-06
Danger ! | Risk of injury caused by fingers being jammed or pinched when removing, installing or aligning hoods, doors, trunk lid/rear-end door or sliding roof. | No parts of the body or limbs should be within the operating area when the components are moving. | |
| Remove/install | ||
1.1 | Remove fuse 74 on left electric sliding door (2) | Model 447.7/8, 448.8 | |
| Assignment of right footwell firewall fuse and relay module | ||
1.2 | Remove fuse 311 on right electric sliding door (2) | Model 447.7/8, 448.8 | |
| Assignment of fuse and relay module, right A-pillar | ||
2 | Mark installation position of upper carriage (3) on mount for sliding door (2) | ||
3 | Secure sliding door (2) against falling down | ||
4 | Remove bolts (1) | Screw/bolt, upper carriage to mount | |
5 | Separate upper sliding carriage (3) from mount for sliding door (2) | Installation: Align upper sliding carriage (3) at markings on mount for sliding door (2). | |
6 | Move upper sliding carriage (3) out of upper guide rail for sliding door (2) | Installation: Check roller on upper carriage (3) for damage. | |
for damage | |||
| |||
Replace upper carriage (3) | |||
7 | Install in the reverse order | ||
| Check | ||
8 | Check gap dimension "FA" and transition between sliding door (2) and front door | The contour of the sliding door (2) must be flush with the contour of the front door or project by a maximum of 1 mm. | |
Gap dimensions | |||
Feeler gauge | |||
In the event of complaints | |||
| |||
Adjust upper sliding carriage (3) | |||
Gap dimensions |
Number | Designation | Model 447, 448 except code W65, W68 | Model 447, 448 with code W65, model 447, 448 with code W68 | |||
BE60.00-N-1006-01J | Gap dimensions | Sliding door to roof frame | Dimension "FA" | mm | 4,5 (1,4) | 4,5 (1,4) |
Sliding door to sidewall | Dimension "FB" | mm | 4 (+1,2/-0,8) | 4 (+1,2/-0,8) | ||
Glass pane in sliding door, all-round | Dimension "FC" | mm | 3 | 3 | ||
For picture, see | ||||||

129 589 03 21 00
Feeler gauge
Powiązane dokumenty
- ar7216s1023e
- as0000z001101a Niebezpieczeństwo zranienia przez zakleszczenie lub zmiażdżenie palców podczas demontażu, montażu i prac regulacyjnych przy pokrywach, drzwiach i oknie dachowym.
- gf5415s125638tra
- gf5415s125639tra