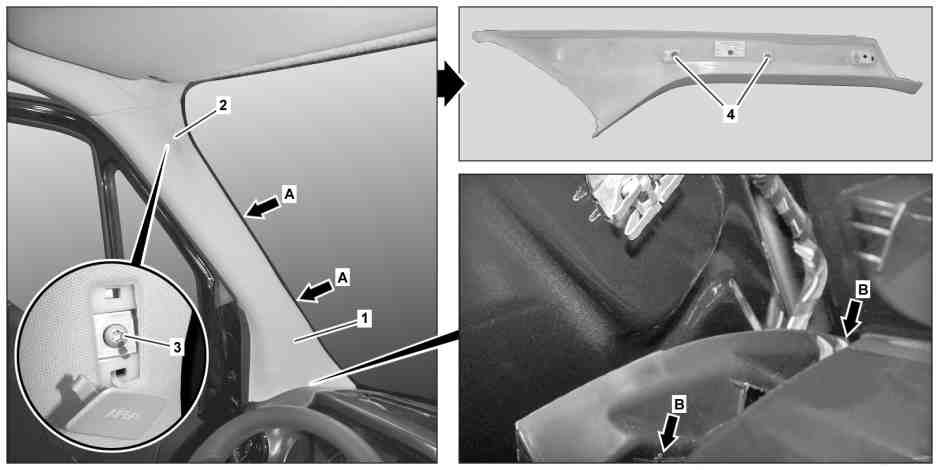
D68.30-2496-09
Shown on model 910 on the driver's side with code SH9 (window airbag for driver and front passenger) |
1 | A-pillar trim panel | 3 | Screw | |
2 | Cover | 4 | Fasteners |
Topical note | Notes on carrying out repair work in the vehicle interior | ||
| Remove/install | ||
1 | Switch off ignition and store transmitter key outside of transmission range (min. 2 m) | ||
2 | Detach sealing frame along A-pillar trim (1) | ||
3 | Unclip cover (2) from A-pillar trim (1) | Model 907, 910 | |
Clip remover | |||
4 | Unscrew screw/bolt (3) | Model 907, 910 | |
5.1 | Detach A-pillar trim (1) in top area from A-pillar and unclip in the center area (arrows A) from A-pillar | Model 907, 910 | |
Installation: Ensure correct bedding in of the fasteners (4) in the A-pillar. | |||
Clip remover | |||
5.2 | Unclip A-pillar trim from the A-pillar starting at the top | Model 907, 910 | |
Clip remover | |||
6 | Remove A-pillar trim (1) | Installation: Insert A-pillar trim (1) first into guides (arrows B) on the instrument panel. | |
7 | Install in the reverse order |

452 589 01 63 00
Clip remover
Powiązane dokumenty
- ah6800n000101s Wskazówki dotyczące wykonywania prac naprawczych we wnętrzu pojazdu