Test and adjustment values for gap dimensions |
Number | Designation | Model 907.6/7/8, 910 | |||
BE60.00-N-1006-01TS | Gap dimensions of tail lamp | Tail lamp to D-pillar | Dimension "FA" | mm | 2,0 (1) |
Tail lamp to hinge of rear-end door | Dimension "FB" | mm | 4,7 (1,5) | ||
Taillamp to bumper corner | Dimension "FC" | mm | 1,9 (1,5) | ||
For picture, see | |||||
Test and adjustment values for gap dimensions |
Number | Designation | Model 907.6/7/8, 910 | |||
BE60.00-N-1007-01TS | Gap dimensions of rear-end door | Rear-end door to D-pillar | Dimension "GA" | mm | 5,5 (1) |
Rear-end door to tail lamp | Dimension "GB" | mm | 5,5 (1,5) | ||
Left rear-end door to right rear-end door | Dimension "GC" | mm | 6,0 (1) | ||
Rear-end door to bumper at bottom | Dimension "GD" | mm | 10 (1,5) | ||
Rear windows to each other | Dimension "GE" | mm | 6,3 (1) | ||
For picture, see | |||||

129 589 03 21 00
Feeler gauge
Additional information can be found in the superordinate service document.
The safety information in the superordinate KD document must be observed.
The following operation steps are shown on model 907.633 with code D03 (Roof and rear-end doors, high version) on the right side of vehicle and must be performed analogously on the left side of vehicle if damaged.
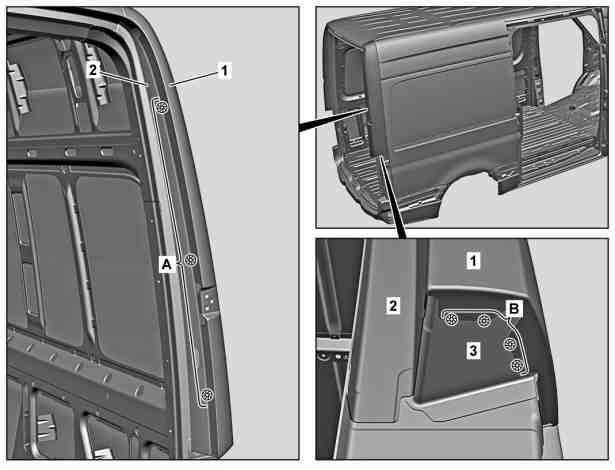
1 | Install outer section (1), inner section (2), and lower section (3), fit, and fix in place. |
Commercially available devices/tools |
2 | Tack outer section (1), inner section (2), and lower section (3) to each other (areas A and B). |
3 | Remove tacked outer section (1), inner section (2), and lower section (3). |
D64.30-1247-06
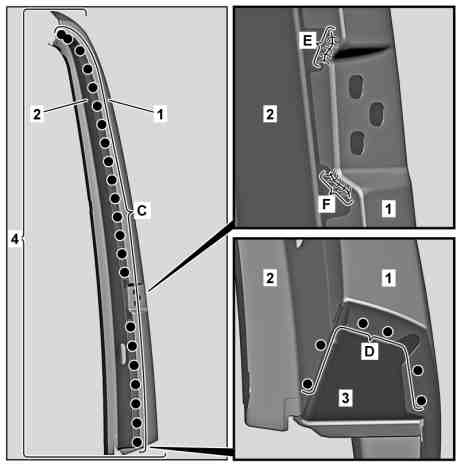
4 | Outer section (1), inner section (2), and lower section (3) (areas C and D). |
5 | Outer section (1) (areas E and F). |
Inert gas weld in intervals and allow to cool down in between. |
Together, the outer section (1), inner section (2), and lower section (3) form the upper section of the outside corner pillar paneling completely (4). |
6 | Surface grind inert gas welds (areas E and F). |
Commercially available devices/tools |
7 | Clean weld joints. |
Commercially available devices/tools |
8 | Remove shavings. |
Commercially available devices/tools |
9 | Apply zinc dust paint to insides of the spot weld flanges (areas C and D) and inert gas welds (areas E and F). |
D64.30-1248-12
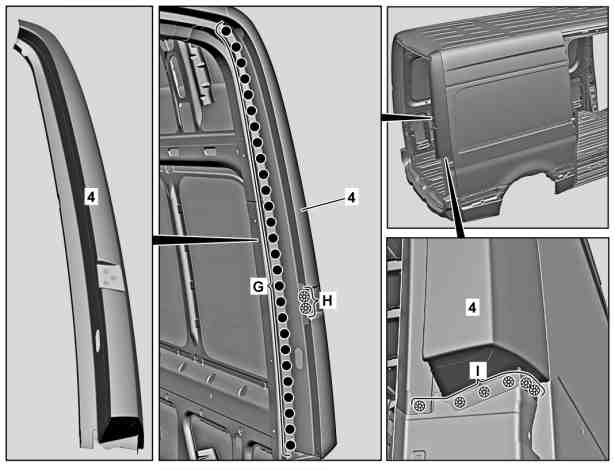
10 | Install complete upper section of the outside corner pillar paneling (4), hinges, rear-end door, sealing frame, and rear lamp unit and fit. |
11 | Check gaps using feeler gauge and adjust. |
12 | Fix complete outside upper section of the corner pillar paneling (4) in place. |
Commercially available devices/tools |
13 | Remove hinges, rear-end door, sealing frame, and rear lamp unit. |
14 | Complete upper section of the outside corner pillar paneling (4) (area G). |
15 | Complete upper section of the outside corner pillar paneling (4) (areas H and I). |
16 | Surface grind inert gas spot welds (areas H and I). |
Commercially available devices/tools |
17 | Clean weld joints. |
Commercially available devices/tools |
18 | Remove shavings. |
Commercially available devices/tools |
D64.30-1249-06
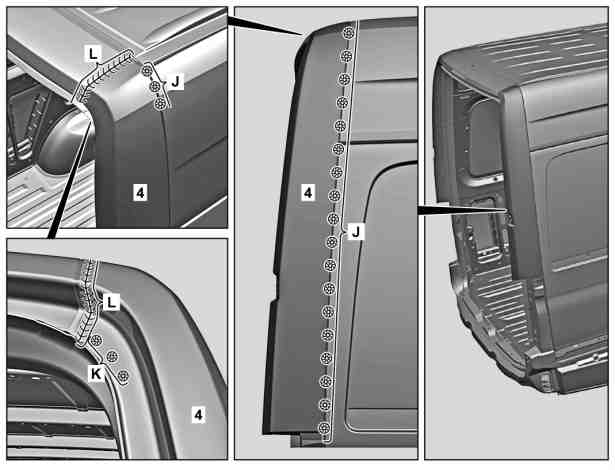
19 | Complete upper section of the outside corner pillar paneling (4) (areas J and K). |
20 | Complete upper section of the outside corner pillar paneling (4) (area L). |
Inert gas weld in intervals and allow to cool down in between. |
21 | Surface grind inert gas spot welds (areas K and J) and inert gas weld (area L). |
Commercially available devices/tools |
22 | Clean weld joints. |
Commercially available devices/tools |
23 | Remove shavings. |
Commercially available devices/tools |
D64.30-1250-06