Model | 907.6/7 |
with code D03 (Roof and rear-end doors, high version) | |
except code T16 (Sliding door right) | |
Right side of vehicle | |
Model | 907.6/7 |
with code D03 (Roof and rear-end doors, high version) | |
except code T19 (Sliding door left) | |
Left side of vehicle | |
Model | 907.6 |
with code D05 (Super-high roof) | |
except code T16 (Sliding door right) | |
Right side of vehicle | |
Model | 907.6 |
with code D05 (Super-high roof) | |
except code T19 (Sliding door left) | |
Left side of vehicle | |
Model | 907.6 |
with code D06 (Super-high roof painted in vehicle colour) | |
except code T16 (Sliding door right) | |
Right side of vehicle | |
Model | 907.6 |
with code D06 (Super-high roof painted in vehicle colour) | |
except code T19 (Sliding door left) | |
Left side of vehicle | |
Model | 910.6 |
with code D03 (Roof and rear-end doors, high version) | |
except code T16 (Sliding door right) | |
Right side of vehicle | |
Model | 910.6 |
with code D03 (Roof and rear-end doors, high version) | |
except code T19 (Sliding door left) | |
Left side of vehicle |
Additional information can be found in the superordinate service document.
The safety information in the superordinate service document must be observed.
The next steps are shown on model 907.733 with code D03 (roof and rear-end doors, high version) except code T19 (left sliding door) on the left side of the vehicle and must be carried out in the same way for vehicles except code T16 (right sliding door) on the right side of the vehicle in the event of damage.

D63.10-1911-09
1 | Scribe separation lines on rear side wall paneling (1) (areas A, B, C). |
Scribe separation lines along edges. |
2 | Disconnect rear side wall paneling (1) from separating point (area B). |
Do not cut too deeply. |
During installation, the cut-to-size new part is pushed under the remaining piece (3) and welded together with the rear side wall paneling (1). |
3 | Disconnect rear side wall paneling (1) from separating points (areas A and C). |
Do not make the cuts too deep. |

D63.10-1912-09
4 | Model 907.6/7 with window in side wall |
5 | Model 907.6/7 with window in side wall |

D63.10-1913-09
6 | Expose spot welds on rear side wall paneling (1) (areas E, F, G, H, and I). |
7 | Cut off spot welds on rear side wall paneling (1) (areas E, F, G, H, and I). |
8 | Reshape spot weld flange on rear side wall paneling (1) on the wheel arch (area I). |

9 | Model 907.6 without window in side wall, Model 910.6 |
D63.10-1910-01
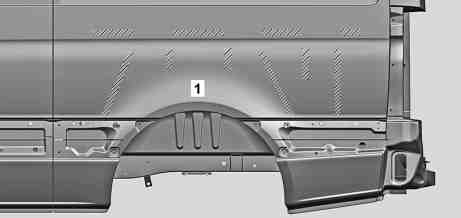
10 | Heat adhesive in hatched areas and separate. |
11 | Remove damaged rear side wall paneling (1). |
D63.10-2002-10

D63.10-1915-09
12 | Scribe separation line on rear side wall paneling remaining piece (2.2) (area N). |
Scribe separation line as shown. |
13 | Disconnect rear side wall paneling remaining piece (2.2) from separating point (area N). |
Do not cut too deeply. |
14 | Expose spot welds on rear side wall paneling remaining piece (2.1) (area M). |
15 | Cut off spot welds on rear side wall paneling remaining piece (2.1) (area M). |
16 | Remove rear side wall paneling remaining piece (2.1). |
17 | Bend rear side wall paneling remaining piece (2.2) (area K). |
18 | Drill holes with a diameter of 7 mm (area L). |
Drill holes (area L) between the respective resistance spot weld connections. |
19 | Remove shavings and drill chips. |

D63.10-1916-09
20 | Grind off remaining side roof paneling laser solder seam (area O). |
21 | Grind mating surfaces down to bare metal in cross-hatched areas and around holes. |
22 | Zinc dust paint to insides of spot weld flanges. |
Observe pretreatment of bonding surfaces. |
23 | Remove shavings. |

24.1 | Model 907.6 without window in side wall, Model 910.6 |
Observe pretreatment of bonding surfaces. |
See Fig. A. |
24.2 | Model 907.6/7 with window in side wall |
See Fig. B. |
25 | Model 907.6/7 with window in side wall |
26 | Model 907.6/7 with window in side wall |
D63.10-2042-02

27 | Level adhesive residues in hatched areas to 1 mm. |
Observe pretreatment of bonding surfaces. |
D63.10-1917-10