P68.30-2597-09
Shown on model 240.078 |
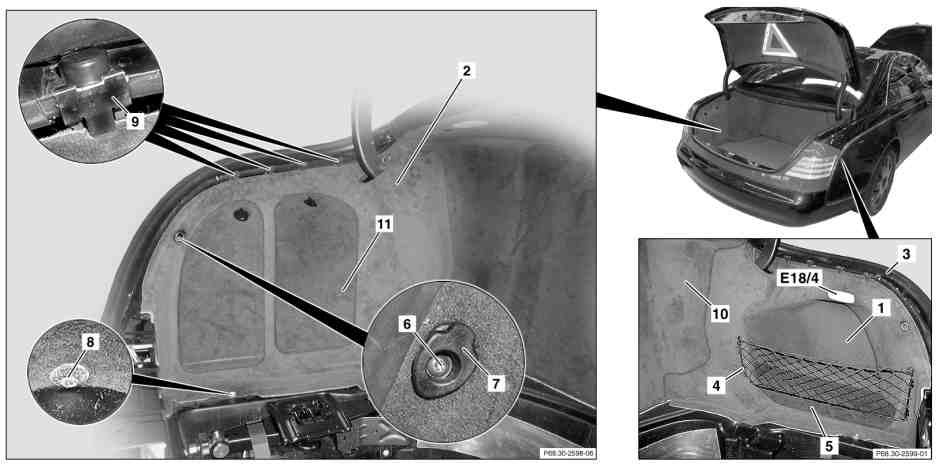
1 | Right trunk paneling | 7 | Anchoring hook | |
2 | Left trunk paneling | 8 | Screw | |
3 | Trunk lid seal | 9 | Retaining clamp | |
4 | Net | 10 | Center paneling trunk | |
5 | Battery cover | 11 | Cover | |
6 | Screw | E18/4 | Right luggage compartment lamp |
| Remove/install | ||
Danger | Risk of fire/risk of explosion due to short circuit and escaping oxyhydrogen gas. Risk of (burn) injury caused by caustic burns to eyes, skin and mucous membranes from battery electrolyte/mist, short circuit and arcing. Risk of poisoning caused by swallowing battery electrolyte or absorption of lead through the skin or body orifices. Risk of death due to voltage U >= 30 V AC and U >= 60 V DC. | No fires, sparks, open flames, or smoking. Wear acid-resistant gloves, clothing, and glasses. Pour battery acid only into suitable and appropriately marked containers. | |
1 | Disconnect battery ground line | ||
Topical note | Notes on battery | ||
2 | Remove trim from rear end center assembly | ||
3 | Remove luggage compartment paneling | ||
4 | Release trunk lid seal (3) in area of side trim | ||
5 | Unclip net (4) | Only for right trunk lining. | |
6 | Remove battery cover (5) | Only for right trunk lining. | |
7 | Unclip right trunk lamp (E18/4) and remove electrical coupling | Only for right trunk lining. | |
8 | Remove cover(11) | Only for left trunk lining. | |
9 | Remove screw (6) and remove load-securing hook (7) | ||
10 | remove screw/bolt (8) | ||
11 | Release side trunk lining (1, 2) from retaining clips (9) and remove from trunk | Installation: Ensure trim is seated correctly at center trim in trunk (10). | |
12 | Install in the reverse order |
Referenced documents
- ah5410p000101a Notes on battery
- ah5410p000101a
- ar5410p0003h Disconnect/connect battery ground line
- ar6830p4785h Remove/install rear center section paneling
- ar6830p4820h Remove/install trunk floor paneling
- as5410z000101a Risk of fire/risk of explosion due to short circuit and escaping oxyhydrogen gas. Risk of (burn) injury caused by caustic burns to eyes, skin and mucous membranes from battery electrolyte/mist, short circuit and arcing. Risk of