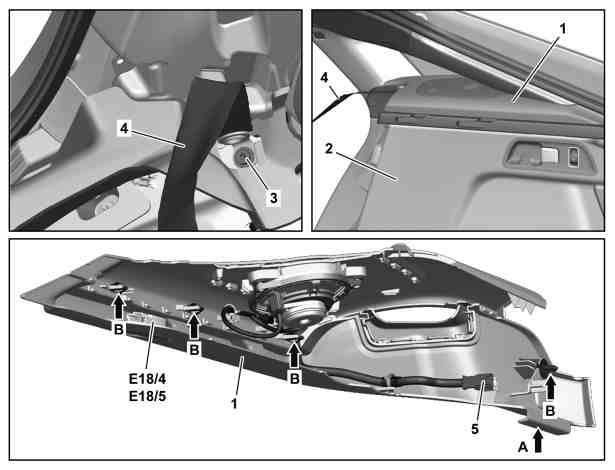
Shown on the right side of the vehicle with code 811 (Advanced Sound System) |
1 | Upper load compartment trim |
2 | Cargo area paneling |
3 | Screw |
4 | Rear passenger compartment seat belt |
5 | Electrical connector |
E18/4 | Right load compartment lamp |
E18/5 | Left load compartment lamp |
P68.30-A027-06
Warning | Risk of injury caused by fingers being jammed or pinched when removing, installing or aligning hoods, doors, trunk lid/rear-end door or sliding roof. | No parts of the body or limbs should be within the operating area when the components are moving. | |
Topical note | Information on preventing damage to electronic components due to electrostatic discharge | ||
Notes on HANDS-FREE ACCESS | |||
| Remove/install | ||
1 | Remove seat cushion in rear passenger compartment. | ||
2 | Remove screw (3) and remove seat belt end fitting of the rear passenger compartment seat belt (4). | Installation: Ensure that the seat belt end fitting is positioned correctly on the rear-end floor. | |
Bolt, rear belt end fitting | |||
3 | Release load compartment trim (2) in the front area. | ||
The top load compartment trim (1) is hooked in the front area into the load compartment trim (2) (arrow A). | |||
4 | Unclip top load compartment trim (1) (arrows B). | ||
5 | Disconnect electrical connector (5). | Model 167.3 | |
6 | Disconnect electrical connector from the right load compartment lamp (E18/4) or from the left load compartment lamp (E18/5). | ||
7 | Guide rear passenger compartment seat belt (4) through the top load compartment trim (1) and remove top load compartment trim (1) from the vehicle. | ||
8 | Remove speakers and the electrical wiring harness from the top load compartment trim (1). | Model 167.3 | |
9 | Remove right load compartment lamp (E18/4) or left load compartment lamp (E18/5) from the top load compartment trim (1). | When installing a new top load compartment trim (1). | |
10 | Install in the reverse order. |
Referenced documents
- ah5400p000101a Information on preventing damage to electronic components due to electrostatic discharge
- ah8061p000101a Notes on HANDS-FREE ACCESS
- ar6830p1185mec Remove/install side load compartment paneling
- ar9112p1021me Remove/install rear seat cushion
- ar9112p1021mem Remove/install rear seat cushion
- as0000z001101a Risk of injury caused by fingers being jammed or pinched when removing, installing or aligning hoods, doors, trunk lid/rear-end door or sliding roof.