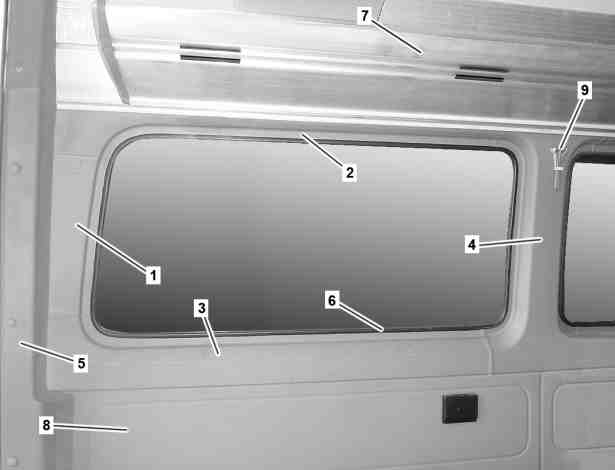
D68.30-2428-06
Shown on model 900.633 at left rear side window
1 Rear trim
2 Upper trim panel
3 Lower trim panel
4 Front paneling
5 Paneling on rear pillar
6 Frame seal
7 Stowage compartment in passenger compartment (with code (D46) Overhead luggage shelf)
8 Rear side wall paneling
9 Emergency hammer
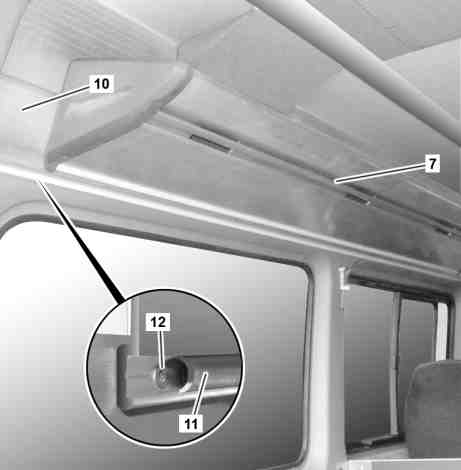
D68.30-2429-12
7 Stowage compartment in passenger compartment (with code (D46) Overhead luggage shelf)
10 Air shaft
11 Weather strip
12 Screw
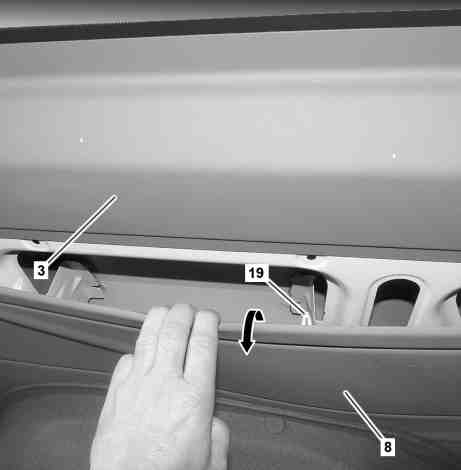
D68.30-2430-12
3 Lower trim panel
8 Rear side wall paneling
19 Clip

D68.30-2431-12
Illustrated on model 900.633
4 Front paneling
8 Rear side wall paneling
9 Emergency hammer
13 Frame seal
14 Cover
15 Cover
16 Bracket
17 Expansion clips
18 Front side wall paneling
| Remove/install | ||
| Notes on carrying out repair work in the vehicle interior | ||
1 | Remove paneling (5) from rear pillar | ||
2 | Remove frame seal (6) | ||
3 | Remove rear paneling (1) | The rear paneling (1) is fastened to the body with adhesive tape. | |
Carefully loosen rear paneling (1). Otherwise the rear paneling (1) can break and must be replaced. | |||
Installation: If the rear paneling (1) is reused, check adhesive foils for damage, replace if necessary. | |||
Long wedge | |||
4 | Remove weather strip (11) from air shaft (10) | ||
5 | Unscrew all bolts (12) | ||
6 | Slightly lift air shaft (10) from bottom | ||
7 | Remove top paneling (2) | The upper paneling (2) is fastened to the body with adhesive tape. | |
Carefully loosen upper paneling (2). Otherwise the upper paneling (2) can break and must be replaced. | |||
Installation: If the upper paneling (2) is reused, check adhesive foils for damage, replace if necessary. | |||
Long wedge | |||
8 | Unclip rear side wall paneling (8) and slightly lift from side wall as shown | It is not necessary to remove rear side wall paneling (8) completely. | |
Installation: Check clips (19) for damage, replace if necessary. | |||
Clip remover | |||
9 | Remove lower paneling (3) | The lower paneling (3) is fastened to the body with adhesive tape. | |
Carefully loosen rear paneling (3). Otherwise the lower paneling (3) can break and must be replaced. | |||
Installation: If the lower paneling (3) is reused, check adhesive foils for damage, replace if necessary. | |||
Long wedge | |||
10 | Remove sealing frame (13) from front side window | ||
11 | Unclip front side wall paneling (18) at top and slightly lift from side wall | It is not necessary to remove front side wall paneling (18) completely. Check clips (19) for damage, replace if necessary | |
Clip remover | |||
12 | Remove paneling (14) and paneling (15) from front side window | The paneling (14, 15) is fastened to the body with adhesive tape. | |
Carefully loosen paneling (14, 15). Otherwise the paneling (14, 15) can break and must be replaced | |||
Installation: If the paneling (14, 15) is used again, check adhesive foil for damage, replace if necessary. | |||
Long wedge | |||
13 | Remove seal from emergency hammer (9) and remove emergency hammer (9) | ||
14 | Remove expansion clips (17) and bracket (16) | Replace expansion clips. | |
15 | Slightly lift air shaft (10) on stowage compartment in passenger compartment (7) | On vehicles with code (D46) Overhead luggage shelf | |
16 | Remove front paneling (4) | The front paneling (4) is fastened to the body with adhesive tape. | |
Carefully loosen front paneling (4). Otherwise the front paneling (4) can break and must be replaced. | |||
Installation: If the front paneling (4) is reused, check adhesive foils for damage, replace if necessary. | |||
Long wedge | |||
17 | Install in the reverse order |


452 589 01 63 00
Clip remover
Long wedge
115 589 03 59 00
Referenced documents
- ah6800n000101s Notes on carrying out repair work in the vehicle interior
- ar6830d4505ch Remove/install paneling on rear pillar