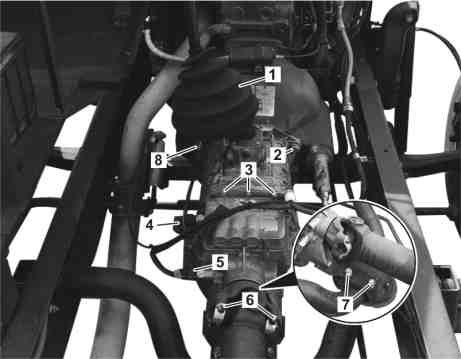
1 | Protective boot for the shitting lever |
2 | Bolt that fasten the gearbox to the engine |
3 | Mounting bracket for electrical wirings |
4,5,8 | Electric connectors |
6 | Bolt on output flange |
7 | Bolts of the transmission rear support |
B26.00-A015-11
| Remove/install | ||
Danger | Risk of death caused by vehicle slipping or toppling off of the lifting platform. | Align vehicle between vehicle lift columns and position the four support plates at the vehicle lift support points specified by the vehicle manufacturer. | |
1 | Disconnect ground cable or turn off the battery main switch | ||
2 | Apply the parking brake | ||
3 | Puts stick shift on neutral position | ||
4 | Open the accessing compartment to the transmission | ||
5 | Loosen the handle and remove the protective boot (1) of the transmission shifting lever | ||
6 | Drain gearbox oil | ||
| |||
.Oil drain plug | |||
7 | Remove the seal and detach the electrical connectors (4, 5, 8) | ||
8 | Remove the brackets on transmission (3) | ||
9 | Remove the clutch booster | ||
10 | Loosen the bolts on the output flange (6) and remove the propeller shaft | Mark the position of the output flange in relation to the propeller shaft. In that case, mark the position on the secondary shaft notch. If this procedure is not observed and it is assembled out of its original position, the transmission shaft will be unbalanced, causing serious vibration problems on the vehicle. | |
11 | Loosen the bolts of the transmission rear support (7) | Should it be necessary, remove the entire supporting assembly of the transmission rear part, to do so, remove the mounting bolts and nuts of the rear support to the cross member. | |
12 | Loosen the mounting bolts of the transmission to the engine (2) | ||
13 | Support the gearbox and remove it | Use a proper lifting equipment. | |
| Clean | ||
14 | Clean well all components | Dry clean components linked to the gearbox, do not use chemical products. | |
| Check | ||
15 | Verify the gearbox components condition | Check all components for wear and damages and replace if necessary | |
16 | Fit the clutch plate installed on engine flywheel in the transmission | Lubricate the primary shaft grooving with long last grease before installing gearbox. Utilize an appropriate device. | |
| Install | ||
17 | Tighten screws (2) | The gearbox will have to be aligned and centered to facilitate the fitting of the input shaft in the clutch disc. | |
.Bolts | |||
18 | Tighten the bolts of the transmission rear supporting (7) | ||
19 | Install the transmission shaft | ||
20 | Fit the electrical connectors (4, 5, 8) | ||
21 | Install the electrical wiring mounting brackets (3) to the transmission | ||
22 | Fill gearbox with oil | .Filler plug | |
.Oil volume | |||
23 | Install the protective boot of the transmission shifting lever (1) | Perform the test of synchronization of the gears. | |
24 | Close the engine compartment |
Complete gearbox |
Number | Designation | Gearbox 710.27 (except 710.271 ) | ||
BF26.10-B-1001-01B | Oil volume | Approximate level | Litros | 4,7 |
Oil class | Consultar documento AH00.40-B-0001-01ETA no site Mercedes-Benz / Guia de Lubrificantes |
Referenced documents
- ap2600b2601i Manual transmission - oil change
- as0000z001001a Risk of death caused by vehicle slipping or toppling off of the lifting platform.