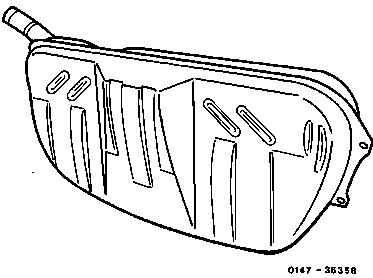
47-100 Removing, installing fuel tank
Job no. of Job Texts and Work Units or Standard Texts and Flat Rates 47-4100 |
A. Model 124 Sedan

Safety regulations | observe, risk of accident! |
Battery ground cable | disconnect, connect. |
Fuel tank (50) | drain. Carefully pump out fuel to ensure no fuel remains in tank. Capacity approx. 70 litres. Stick on 4 sound-absorbing strips (74), if necessary, with MB universal adhesive |
Filler cap (62) | remove, fit. Examine seal (62/1), renew if necessary. |
Cup seal (60 /1) | remove, fit. |
Fuel tank lining and left, right side lining |
remove, install. |
Fuel gauge | detach, attach connector at sending unit (B4) and check operation. Remove, install sending unit (B4), if necessary, 39 Nm (47-120). Renew seals. |
Supply hose (69), return hose (70), vent |
disconnect, connect, 28 Nm. Check for re-use. Collect remaining fuel. |
Nut (50/2, 4 off) | 21 Nm, use 4 washers (50/1). |
Fuel filter (68) | remove, install, if necessary, 39 Nm and clean. Check for re-use, renew seal (68/1). |
Run engine briefly | check connections and joints for leaks. |
Note
Engine 601.912, Code 885 only (immobilizer)
Check valve in fuel return flow hose so that injection pump does not draw in fuel from return flow when feed valve closed.
Production breakpoint: as of February 1994
Model | Engine | Engine end no. Manual transmission | Engine end no. Automatic transmission |
124.120 | 601.912 | 208212 | 022435 |
Engine 601.912, Taxi Germany only
Fuel tank modified. Fuel tank and injection pump for vegetable oil methyl ester fuel.
Production breakpoint: as of December 1994
Model | Engine | Engine end no. Automatic transmission |
124.120 | 601.912 | 023765 |
Engine 601.912
Fuel hose modified to improve starting properties.
Production breakpoint: as of April 1995
Model | Engine | Engine end no. Manual transmission | Engine end no. Automatic transmission |
124.120 | 601.912 | 219103 | 024943 |
B. Model 124 Station Wagon

Safety regulations | observe, risk of accident! |
Battery ground cable | disconnect, connect. |
Filler cap (62/1) | remove, fit. Check seal (62/1), renew if necessary. |
Fuel tank (50) | drain, carefully pump out fuel to ensure no fuel remains in tank. Capacity approx. 72 litres. |
Cup seals (60/1) | remove, fit. |
Front cargo area flap or 3rd bench seat |
remove, install. |
Front cargo area lining | detach and fold back; fold forward and fix in place. |
Vent line (64/1) | remove, install. When installing, pre-assemble on fuel tank. Lay line to run downhill free of kinks. Ensure cup seal (60/2) is correctly seated. |
Fuel gauge | detach, fit on connector at sending unit (B4). Check operation. Remove, install sending unit (B4), if necessary, 39 Nm (47-120), renew seals. |
Cup seal (60/1, 2 off) | remove, install. |
Supply hose (69, return hose (70), |
detach, connect, check for re-use. Collect remaining fuel. Seal hoses. |
Vent valve (51) | remove, fit. |
Exhaust | detach, attach at both rear hangers (detach with V-belt). |
Splash guard (58) filler neck | remove, install. |
Bracket of level line (lefthand side) | remove, install. |
U-rail (56) | remove, install, 30 Nm (support fuel tank). |
Front mounting (50/1-50/3) of fuel tank | unscrew, screw on 30 Nm. |
Fuel filter (68) | remove, install, if necessary, 39 Nm, clean. Check for re-use. Renew seal (68/1). |
Run engine briefly | check connections and joints for leaks. |
C. Model 201

Safety regulations | observe, risk of accident! |
Battery ground cable | disconnect, connect. |
Filler cap (62) | remove, fit. Check seal (62/1), renew if necessary. |
Fuel tank (50) | drain. Carefully pump out fuel to ensure no |
Cup seal (60/1) | remove, install. |
Lining of fuel tank | detach, attach. |
Fuel gauge | detach, fit on connector at sending unit (B4). Check operation. Remove, install sending unit (B4), if necessary, 39 Nm (47-120). Renew seals. |
Supply line (69), return line (70), |
disconnect, connect, 28 Nm. Check for re-use. Collect remaining fuel. Seal connections. Ensure cup seal (71) is correctly seated. |
Nut (50/2, 4 off) | 21 Nm, use 4 washers (50/1). |
Drain hose of tank recess | before taking out the fuel tank, pull drain hose slightly up the way and lay to behind edge of fuel tank. Lay correctly after installation. |
Fuel filter (68) | remove, install if necessary, 39 Nm, clean. Check for re-use. Renew seal (68/1). |
Run engine briefly | check connections and joints for leaks. |
Fuel tank of model 201.122/125
(except nationl version)
Fuel tank for 6000 diesel models made of plastic.
When performing repairs, a replacement fuel tank (sheet metal) should be installed.
Production breakpoint
Model | Installation period | Vehicle ident no. from to |
201.122/126 | June - September 1986 | A 308994 - A 330380 |

Modifications effective 09/88 (Model Care)
The contours of the fuel tanks have been adapted to the modified space conditions.
Capacity approx. 55 and 70 litres, respectively, reserve quantity approx. 6.5 and 8 litres, respectively.
The 70-litre fuel tank of Model 201.035
(190 E 2.5-16) is available in place of the
55-litre fuel tank as optional equipment,
except for , , .
up to 08/88
Repair instruction
Fuel tanks effective from Model Care cannot be installed in cars manufactured prior to this date.
effective 09/88
The 55-litre fuel tank is manufactured either from sheet steel or from plastic. Only steel fuel tanks are supplied to the countries , , .
Note
If replacing fuel tank, only the plastic fuel tank with tensioning strap is supplied with the exception of the countries , , .
55-litre plastic fuel tank
Fuel tank (55 liters) of models 201 (except 201.035 and national version , , ) made of plastic.
Production breakpoint: September 1989
Model | Vehicle ident no. | |
201.122/126/128 | A 531551 | |
Repair instruction
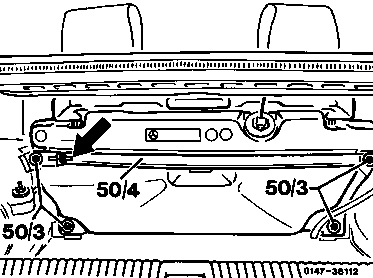
The plastic fuel tank has different cup seals on the rear floor and different filler necks than the sheet steel fuel tank. When installing the tensioning strap (50/4), slightly tighten the nuts (50/3) at first. Following this, tighten the tensioning bolt (arrow) to 10 Nm. Then, tighten the nuts (50/3) to 21 Nm.
D. Model 202

Pay attention to safety precautions! | |
Fuel tank | drain, fill (47-050.) |
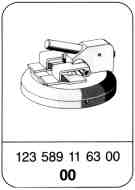
Vehicle | lift at rear with special tool 123 589 11 63 00, lower. |
Rear axle complete | remove, install (35-010). |
Front brake cable at intermediate lever | detach, attach (42-520). |
Rear right inner fender | remove, install. |
Hose clip (60/3) at bottom of connection hose of filler neck |
slacken, tighten. |
Nut (60/4) at bottom of filler neck | unscrew, screw in. |
Right bracket at torsion barr | take off, fit on. Replace micro-encapsulated bolts. Tightening torque 25 Nm. |
Fuel suction hose (69) and fuel return hose (70) |
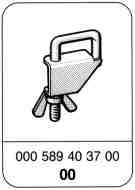
pinch off with clamp (011), take off. Special tool 000 589 40 37 00. |
Fuel suction hose (69) and fuel return hose (70) |
pull off, fit on. To do this, slacken hose clips, tighten. Collect remaining fuel, seal connections and check suitability for reuse. |
Bracket (64/2) of air admission and vent lines | take off, fit on. |
Nuts (80/4) at fuel tank | unscrew, screw on. Tightening torque 20 Nm. |
Tensions straps (80/2) and shield (80/3) | take off, fit on. To do this, support fuel tank with inspection pit lift. Tightening torque of tensioning straps 40 Nm. |
Air admission and vent lines (64/3, 64/4) | pull off, fit on. To do this, lower inspection pit lift approx. 30 cm and slacken hose clips, tighten. Collect remaining fuel. Seal connections and check suitability for reuse. |
Fuel tank (50) | remove, insert. |
Leak tightness of all connection points | check with engine running. |

Special tools