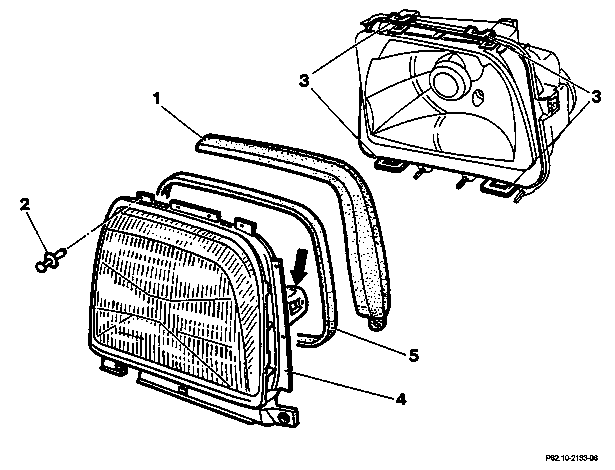
2 | Expansion rivet |
3 | Retaining tabs |
4 | Lens |
5 | Seal |
P82.10-2133-06
| Remove/install | ||
Danger | Risk of death when working on component parts and systems with U >= 30 V alternating voltage (AC) or U >= 60 V direct voltage (DC) | Do not touch damaged or defective live component parts and lines or non-insulated electrical connections and lines. | |
Danger | Risk of explosion/risk of fire caused by highly flammable materials in the vicinity of damaged xenon bulbs. Risk of injury caused by UV light, hot components on xenon headlamps and glass splinters produced by bursting xenon bulbs. Risk of poisoning caused by inhalation of mercury vapors and by swallowing of/skin contact with toxic salts and mercury compounds. | Do not touch parts conducting high voltage. Persons with active electronic implants (e.g. cardiac pacemakers) must never work on xenon headlamps. Switch off the entire lighting system. Wear insulated safety shoes, safety glasses and protective gloves. Remove highly inflammable materials from the danger zone. Ensure sufficient ventilation in the working area. | |
1 | Switch off ignition | ||
2 | Remove lamp unit |
| |
With code 612 (Xenon headlamp unit) | |||
3 | Detach sealing lip (1) | To do so, pull up sealing lip and remove expansion rivets (2). | |
4 | Unclip retaining tabs (3) | Installation: The retaining tabs must engage audibly. | |
5 | Remove diffuser lens (4) | Installation: Ensure that the guides (arrow) are seated correctly. Check seal (5) for signs of damage, replace if necessary. | |
6 | Install in the reverse order |
Henviste dokumenter
- ar8210p4730a
- ar8210p4730b
- as0000z003501a Livsfare ved arbejde på komponenter og systemer med U >= 30 V vekselspænding (AC) eller U >= 60 V jævnspænding (DC)
- as8210z000101a Fare for eksplosion/brandfare på grund af letantændelige stoffer i beskadigede xenon-pærers område. Fare for personskade på grund af UV-lys, varme komponenter på xenon-forlygter og glassplinter i forbindelse med, at xenon-pærer går