AR82.10-P-4730A | Removing and installing headlamp unit | 10.6.98 |
MODEL 129 except CODE (612b) Xenon headlamp unit
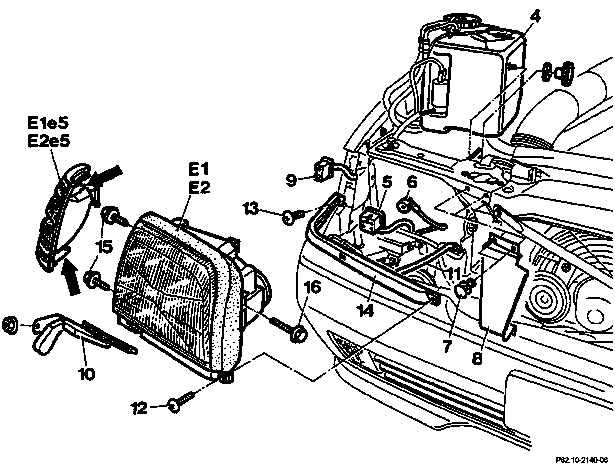
P82.10-2140-06
4 Windshield washer water reservoir
5 Electrical connector
6 Pneumatic lead for headlamp range adjustment
7 Spreading rivet
8 Cover
9 Electrical connector
10 Wiper arm
11 Hose
12 Bolt
13 Bolt
14 Cover
15 Bolt
16 Bolt
E1 Left headlamp unit
E2 Right headlamp unit
E1e5 Left turn signal lamp
E2e5 Right turn signal lamp
| Removing, installing | ||
1 | Open engine hood, raise to upright position | ||
2.1 | Remove windshield washer water reservoir (4) | Only required for right lamp unit. | |
3 | Disconnect electrical connector (5) | ||
4.1 | Remove pneumatic line (6) from headlamp range adjustment | Except with adaptive damping system (code 216) and (code 419). | |
5 | Pull out spreading rivets (7) and remove cover (8) | ||
6 | Unclip turn signal (E1e5, E2e5), pull out toward front | Installation: The two pins (arrows) should be moved into the guide | |
7 | Disconnect electrical connector (9) | ||
8.1 | Remove wiper arm (10) | With headlamp cleaning system (code 600a). | |
9.1 | Remove hose (11) from headlamp cleaning system | With headlamp cleaning system (code 600a). | |
10 | Unscrew screws (12, 13) and carefully pull out cover (14) | Cover remains with seal in vehicle. | |
11 | Unscrew screws (15, 16) and remove lamp unit (E1, E2) toward front | Cover bumper with rag to protect against scratches and damage | |
12 | Install in the reverse order | ||
13 | Check and correct headlamp adjustment | ||
14 | Carry out operational check |
Henviste dokumenter
- ap8210p8260a Kontrol, korrektion af forlygteindstilling