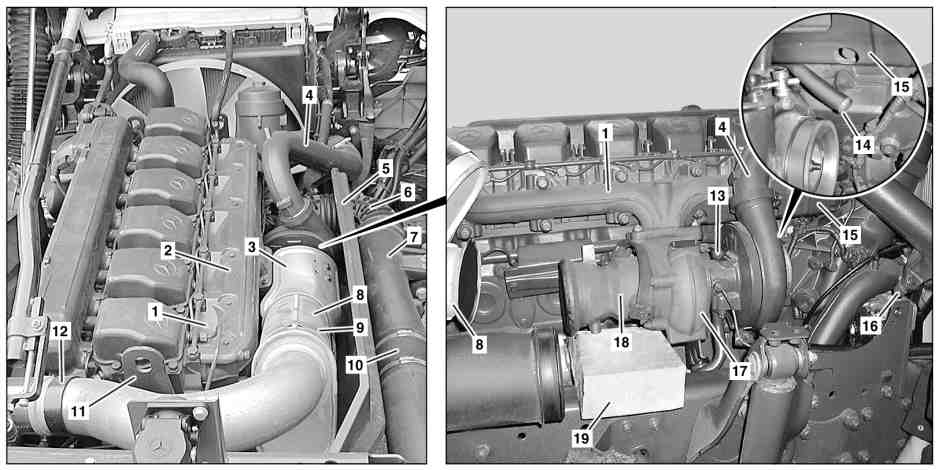
W14.10-1025-09
1 | Exhaust manifold | 8 | Muffler | 14 | Crankcase breather line | ||
2 | Heat shield | 9 | Tensioning strap | 15 | Heat shield | ||
3 | Heat shield | 10 | Air intake hose | 16 | Bracket | ||
4 | Charge air pipe | 11 | Lifting eye | 17 | Turbobrake | ||
5 | Soundproofing panel | 12 | Clip | 18 | Brake module | ||
6 | Air intake hose | 13 | Oil pressure line | 19 | Wooden block | ||
7 | Air intake pipe |
| Remove/install | ||
Topical note | Notes on self-locking nuts and bolts | ||
Warning | Risk of injury caused by body parts being pinched or crushed as cab is tilted | Ensure that no one is within the tilting range of the cab as it is being tilted. Always tilt the cab all the way to the end position and secure it with the safety strut. | |
1 | Tilt cab | ||
Topical note | Notes on tilting the cab | ||
Installation: Only tilt back cab after the leak test. | |||
Danger | Risk of fire/risk of explosion due to short circuit and escaping oxyhydrogen gas. Risk of (burn) injury caused by caustic burns to eyes, skin and mucous membranes from battery electrolyte/mist, short circuit and arcing. Risk of poisoning caused by swallowing battery electrolyte or absorption of lead through the skin or body orifices. Risk of death due to voltage U >= 30 V AC and U >= 60 V DC. | No fires, sparks, open flames, or smoking. Wear acid-resistant gloves, clothing, and glasses. Pour battery acid only into suitable and appropriately marked containers. | |
2 | Disconnect ground line from battery | ||
Topical note | Notes on battery | ||
3 | Remove soundproofing (5) from the frame at top right | Clamp, air intake hose to crankcase breather line | |
4 | Remove air intake hose (6) from the engine vent line (14) | ||
5 | Remove air intake hoses (6, 10) with the air intake pipe (7) | Installation: Clean sealing surfaces. | |
Air intake hose clamp on air intake pipe | |||
Clamp, air intake hose to turbocharger | |||
6 | Remove heat shield (3) from the turbobrake (17) | Bolt, heat shield to Turbobrake | |
7 | Remove tensioning strap (9) from muffler (8) and bracket | Screw, premuffler tensioning strap to holder | |
8 | Remove clamp (12) of the exhaust gas pipe from the rear lifting eye (11) | Bolt, clamp to bracket | |
9 | Remove muffler (8) from the brake module (18), push it to away to the rear and connect it | Clean sealing surfaces. | |
Screw, premuffler clamp to flanged manifold/brake module of turbobrake | |||
10 | Remove heat shield (2) from the exhaust manifold (1) at the top | Heat shield to exhaust manifold and exhaust gas turbocharger | |
11 | Release charge air pipe (4) at bracket (16). | ||
12 | Remove oil pressure line (13) from the turbobrake (17) | Catch escaping and engine oil and seal bores. | |
Installation: Install new sealing rings. | |||
Banjo bolt, oil feed line to Turbobrake | |||
13 | Support the turbobrake (17) and brake module (18) in the area of the starter with a suitable wooden block (19) | ||
14 | Remove exhaust manifold (1) from the turbobrake (17) | Seal bores at turbobrake (17) and clean sealing surfaces. | |
Nut, turbobrake to exhaust manifold | |||
15 | Remove exhaust manifold (1) from the cylinder head | Only loosen the rear screw of the exhaust manifold (1) in the bottom row, the exhaust manifold (1) remains attached to this screw. Clean sealing surfaces. | |
Screw/bolt, exhaust manifold to cylinder head | |||
16 | Take off seals | Installation: Clean sealing surfaces and replace seals. Observe installation position of seals; "TOP" must point towards the exhaust manifold (1). | |
17 | Remove heat shield (15) from the exhaust manifold (1) at the front bottom | Only when replacing exhaust manifold (1). | |
Heat shield to exhaust manifold and exhaust gas turbocharger | |||
18 | Install in the reverse order | ||
19 | Check engine oil level with oil dipstick or on display, add oil if necessary | ||
Notes on engine oil | |||
Observe oil grade set in maintenance system or Specifications for Operating Fluids. | |||
Warning | Risk of accident from vehicle starting off by itself when engine running. Risk of injury (bruises and burns) resulting from working on the engine while it is being started or when it is running. | Secure vehicle to prevent it from starting off by itself. Wear closed and snug-fitting work clothes. Do not touch hot or rotating parts. | |
20 | Start engine, and observe oil pressure indicator with the engine running at idle speed and perform an engine test run | Do not rev up engine before oil pressure is indicated. The oil pressure gage must show the oil pressure after approximately 10 s. | |
Engine oil pressure at | |||
21 | Switch off the engine and check the area of the exhaust manifold (1), the turbobrake (17) and the brake module (18) for leaktightness | Visual inspection. | |
22 | Synchronize time between tachograph disk and display |
Henviste dokumenter
- ah0000n000101a Oplysninger om selvlåsende bolte og møtrikker
- ah1800n010101ha Oplysninger om motorolie
- ah5410p000101a
- ah5410p000101a Oplysninger om batterier
- ah6080n000301a Oplysninger om tipning af førerhus
- as0000z000501a Fare for ulykke ved automatisk igangsætning når motoren kører. Fare for personskade på grund af knusning og forbrænding, hvis der arbejdes mens motoren startes eller kører
- as5410z000101a Brand-/eksplosionsfare på grund af kortslutning og udsivende knaldgas. Forbrændingsfare/fare for personskade ved ætsning af øjne, hud og sliminder på grund af batterielektrolyt/-tåge, kortslutning og lysbuepåvirkning. Fare for
- as6080z000101a Fare for personskade ved fastklemning og knusning, når førerhuset tippes