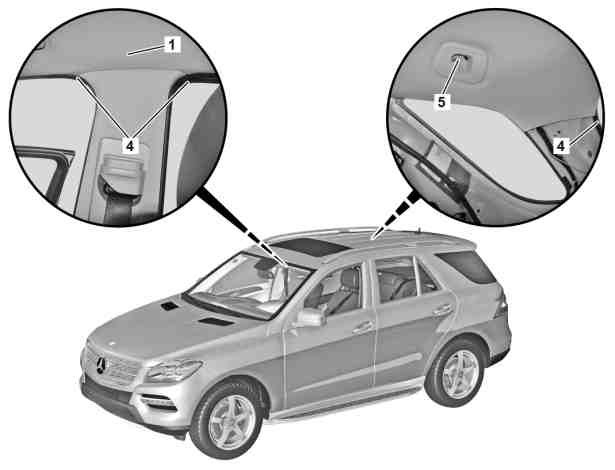
Shown on model 166.024 with code (414) Power glass tilting/sliding roof |
1 | Headliner |
4 | Edge guards |
5 | Tie-down eye |
P68.30-3581-06
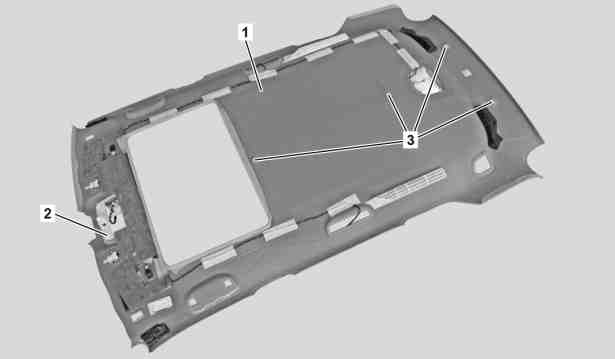
Shown on model 166.024 with code (414) Power glass tilting/sliding roof |
1 | Headliner |
2 | Retaining frame |
3 | Solenoids |
P68.30-3582-05
P68.30-3636-08
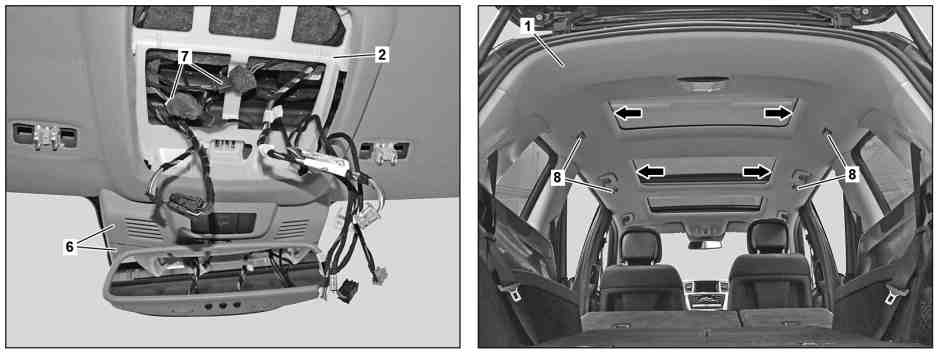
Shown on model 166.873 with CODE 413 (Panoramic glass roof with top sliding roof) and CODE 582 (Air conditioning system in rear) |
1 | Headliner | 7 | Electrical connector | |
2 | Retaining frame | 8 | Outlet | |
6 | Cover |
| Remove/install | ||
1 | Remove front overhead control panel | ||
2 | Remove panelings (6) | Mounting wedge | |
3 | Release and disconnect electrical connectors (7) | ||
4 | Remove sun visors | ||
5 | Remove paneling from A-pillars | ||
6 | Remove grab handles | ||
7 | Detach upper paneling on B-pillars | ||
8 | Remove paneling on C-pillars | Remove/install trim at C-pillar | |
9 | Detach paneling on D-pillars | Removing and installing trim panel at D-pillar | |
10 | Remove lashing eye (5) | If installed. | |
11 | Remove edge guard (4) from headliner (1) | ||
12 | Detach headliner (1) from roof frame and remove toward rear from vehicle | | |
MODEL 166 | |||
MODEL 166 | |||
Unclip retaining frame (2) on front overhead control panel on roof frame and detach headliner (1) at front, rear and center from roof frame. Headliner (1) is held by magnets (3). | |||
Long wedge | |||
| Check | ||
13 | Check headliner (1) | Check whether all magnets (3) are present on headliner (1). If loose magnets (3) are present, bond to specified positions on headliner (1). Previously remove old adhesive residues. | |
2-component adhesive/Devcon 5 Min. Epoxy | |||
14 | Fasten electrical wiring harness to headliner (1) with adhesive tape | When replacing headliner (1) or electrical wiring harness | |
Adhesive tape roll, non-woven Tesa tape, 50 meters, 50 mm wide | |||
15 | Install in the reverse order |


115 589 03 59 00
Long wedge
110 589 03 59 00
Mounting wedge
Odkazované dokumenty
- ar6830p4050wx Demontáž, montáž obložení u A-sloupku
- ar6830p4330gq
- ar6830p4490gq
- ar6830p4490gqc Demontáž, montáž obložení na C-sloupku
- ar6830p4490gqs
- ar6830p4490gqx
- ar6830p4495gq
- ar6830p4495gqx
- ar6830p4700gq Demontáž, montáž obložení u B-sloupku
- ar6860p5480gq
- ar8220p1100gq Demontáž a montáž přední střešní ovládací jednotky
- ar8220p1100gqc Demontáž a montáž přední střešní ovládací jednotky