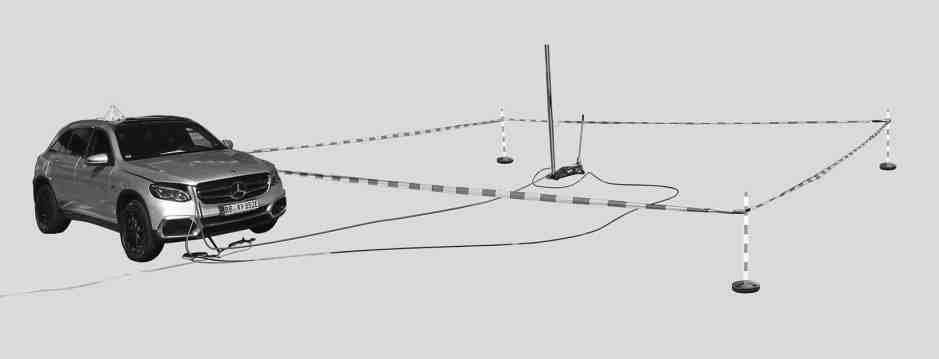
P06.00-A016-08
Hydrogen discharge area shown as an example |

P47.60-2076-09
1 | Manual valve | 2 | Manual valve |
Danger | Risk of explosion caused by escaping hydrogen or overheating of the fuel tanks when working on the hydrogen system. Risk of frostbite to body parts caused by escaping gas and by touching component parts carrying gas when emptying fuel tanks. Risk of asphyxiation caused by inhalation of air diluted by hydrogen. Risk of burn injuries by coming into contact with an invisible pale blue hydrogen flame. | ||
Topical note | Notes on fuel cell system | ||
Notes on safety-relevant components | |||
Empty fuel system with diagnostic device | |||
1 | Park vehicle in the open air in the hydrogen discharge area and secure it in place. | ||
2 | Perform quick test for leaks. | ||
If the measured hydrogen concentration is 8000 ppm or there is an audible leak in the fuel cell system, | |||
| |||
Prepare vehicle with major leakage in fuel system for repair | |||
3 | Charge the high-voltage battery module (A100) to a charge level of 80 % in the open air, then remove the charging cable. | ||
Perform the following jobs in the open air as well. | |||
The charge level of the high-voltage battery module (A100) is necessary for the diagnosis routines as well as activating different valves. | |||
4 | Remove all external power supplies or maintainers. | If an external power supply is connected, | |
The 12 V on-board electrical system is protected, from a voltage of 11.4 V, by the high-voltage battery module (A100). | |||
5 | Perform a diagnosis-based deactivation of the fuel cell in the powertrain control unit (N127). | ||
| |||
To do this, select the following menu item: | |||
6 | Perform a diagnosis-based deactivation of the vehicle standby mode in the powertrain control unit (N127). | ||
| |||
To do this, select the following menu item: | |||
7 | Attach the drain fitting. | ||
| Connect STAR DIAGNOSIS and read out fault memory | ||
| 000 588 10 90 00 Evacuation hose | ||
Connector | |||
Wiring harness repair kit, basic | |||
New passenger car wiring harness repair kit | |||
Unlocker with ejector MLK 1.2_plug | |||
8 | Lower the engine hood and position it carefully in place. | Do not damage the discharge hose that has already been attached. | |
The hydrogen sensor 3 (B72/11) in the engine hood monitors hydrogen leaks and interrupts the routine if a leak occurs. | |||
9 | It is essential to discharge both fuel tanks to 24 bar (hydrogen) using the diagnostic device. | ||
| |||
Select the correct menu item for the job to be performed: | |||
If there is an audible leak in the fuel cell system or the diagnosis routine is interrupted due to a leak, | |||
| |||
Prepare vehicle with major leakage in fuel system for repair | |||
10 | Discharge both fuel tanks to 2 bar (hydrogen) using the diagnostic device. | If the fuel tank is secured in the vehicle, e.g. due to an accident or partial lowering of the fuel tank. | |
| |||
Select the correct menu items for the job to be performed: | |||
11 | Seal manual valves (1, 2) on both fuel tanks. | If the fuel tank remains in the vehicle. | |
Commercially available devices/tools explosion-proof flashlight, comparable with AccuLux flashlight MHL 5 EX of the company Witte + Sutor GmbH. | |||
The manual valves (1, 2) can be reached without lifting the vehicle and without removing the underfloor paneling. | |||
Torque for sealing of manual valve in valve unit | |||
12 | Close the manual valve (1, 2) of the fuel tank remaining in the vehicle. | When removing, installing or replacing a fuel tank. | |
Commercially available devices/tools explosion-proof flashlight, comparable with AccuLux flashlight MHL 5 EX of the company Witte + Sutor GmbH. | |||
The manual valves (1, 2) can be reached without lifting the vehicle and without removing the underfloor paneling. | |||
Torque for sealing of manual valve in valve unit | |||
13 | Inertize the fuel tank to be removed with diagnostic device. | ||
If diagnosis-based inertization is not possible, | |||
| |||
Notify the responsible market support department immediately. | |||
14 | Remove the drain fitting. | ||
| 000 588 10 90 00 Evacuation hose | ||
Stop plug to pressure regulating valve holder | |||
Connector | |||
Wiring harness repair kit, basic | |||
New passenger car wiring harness repair kit | |||
Unlocker with ejector MLK 1.2_plug | |||
15 | Release pressure in fuel cell system with vehicle diagnosis system. | ||
16 | Manually release the pressure in the fuel cell system. | If the diagnosis-based pressure release cannot be performed. | |
17 | Diagnosis-based activation of the vehicle standby mode via Service in the powertrain control unit (N127). | ||
| |||
To do this, select the following menu item: | |||
18 | Drive into the workshop powered by a battery. |


220 589 01 99 25
Unlocker with ejector MLK 1.2_plug
220 589 04 99 00
New passenger car wiring harness repair kit
000 589 13 99 00
Wiring harness repair kit, basic
253 589 00 91 00
Connector