
01 | Headlamp aimer |
E1 | Left front lamp unit |
P82.10-8143-12

Dynamic LED headlamps, ECE version |
E1 | Left front lamp unit |
E1e15 | Left low beam (short range) |
E1e16 | Left low beam (long range) |
P82.10-8140-01

Light gradient for low beams |
1 | Light-dark boundary |
2 | Reference line for height adjustment |
3 | Central mark |
4 | Reference line for lateral setting |
P82.10-7546-76

Light gradient for diagnostic light pattern |
1 | Light-dark boundary |
2 | Reference line for height adjustment |
3 | Central mark |
P82.10-7559-01
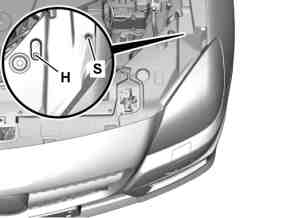
H | Height adjusting screw |
S | Side position adjusting screw |
P82.10-8141-01
Danger ! | Risk of accident from vehicle starting off by itself when engine running. Risk of injury (bruises and burns) resulting from working on the engine while it is being started or when it is running. | Secure vehicle to prevent it from starting off by itself. Wear closed and snug-fitting work clothes. Do not touch hot or rotating parts. | |
| General information on checking/correcting headlamp adjustment | ||
Preparatory activity | |||
1 | Prepare vehicle for checking/correcting headlamp adjustment | ||
2 | Determine degree of inclination for main headlamps | ||
| Notes on determining headlamp aiming values | ||
The degree of inclination for the main headlamps is specified on the model plate on the B-pillar on the passenger side. | |||
3 | Set specified degree of inclination for main headlamps at headlamp aimer (01) | ||
4 | Switch on low beam | When testing and adjusting the low beams, make sure that the extended fog light function is not active. | |
Check and, if necessary, adjust (checking and adjustment of the low beams is described at the left low beam headlamp (long range) (E1e16); the same procedure is used for the right side.) | |||
5 | Check height adjustment of left low beam headlamp (long range) (E1e16); adjust if necessary | If for a low beam light gradient the height adjustment is correct, the light-dark boundary (1) of the light gradient for the left low beams (long range) (E1e16) to the left of the center mark (3) must be congruent with the reference line for the height adjustment (2) in the headlamp aimer (01), as shown in the colored image. The colored area of the light-dark boundary (1) of the left low beam headlamp (long range) (E1e16) must be above the reference line for the height adjustment (2), as shown in the color image. | |
If the height adjustment of the left low beams (long range) (E1e16) is correct. | |||
| |||
No further check necessary, continue with operation step 6. | |||
If the height adjustment of the left low beams (long range) (E1e16) is not correct. | |||
| |||
Adjust zero position using diagnostic system in headlamp control unit. | |||
Diagnosis Control units view Body SGSW left headlamp Adaptations Zero position adjustment. | |||
| |||
| |||
Switch on rectangular diagnostic light pattern using diagnostic system. | |||
Diagnosis Control units view Body SGSW left headlamp Adaptations Adjusting headlamps using diagnosis. | |||
| |||
| |||
When the diagnostic light pattern is switched on and the height adjustment is correct, the horizontal light-dark boundary (1) of the left low beam headlamp (long range) (E1e16) to the left of the center mark (3) must be congruent with the reference line for the height adjustment (2) in the headlamp aimer (01). The colored area of the light-dark boundary (1) of the left low beam headlamp (long range) (E1e16) must be above the reference line for the height adjustment (2). | |||
If the height adjustment of the left low beams (long range) (E1e16) is correct with the diagnostic light pattern switched on. | |||
| |||
No further check necessary, continue with operation step 6. | |||
If the height adjustment of the left low beams (long range) (E1e16) is not correct with the diagnostic light pattern switched on. | |||
| |||
Turn the adjustment screw for the height adjustment (H) to correct the height adjustment of the left low beams (long range) (E1e16). | |||
6 | Check lateral adjustment of left low beam headlamp (long range) (E1e16); adjust if necessary | If, for a low beam light gradient the lateral adjustment is correct, the light-dark boundary (1) of the light gradient for the left low beam headlamp (long range) (E1e16) starting at the center mark (3) on the right must be congruent with the reference line for the lateral adjustment (4) in the headlamp aimer (01), as shown on the color image. The colored area of the light-dark boundary (1) of the left low beam headlamp (long range) (E1e16) must be above the reference line for the lateral adjustment (4), as shown in the color image. | |
If the lateral adjustment of the left low beams (long range) (E1e16) is correct with the diagnostics light pattern already switched on | |||
| |||
No further check necessary, continue with operation step 7. | |||
If the lateral adjustment of the left low beams (long range) (E1e16) is not correct with the diagnostics light pattern already switched on | |||
| |||
Turn the adjustment screw for lateral adjustment (S) to correct the lateral adjustment of the left low beam headlamp (long range) (E1e16). | |||
If lateral adjustment of the left low beam headlamp (long range) (E1e16) is correct. | |||
| |||
No further check necessary, continue with operation step 7. | |||
If lateral adjustment of the left low beam headlamp (long range) (E1e16) is not correct. | |||
| |||
Adjust zero position using diagnostic system in headlamp control unit. | |||
Diagnosis Control units view Body SGSW left headlamp Adaptations Zero position adjustment. | |||
| |||
| |||
Switch on rectangular diagnostic light pattern using diagnostic system. | |||
Diagnosis Control units view Body SGSW left headlamp Adaptations Adjusting headlamps using diagnosis. | |||
| |||
| |||
Check the height adjustment of the left low beam headlamp (long range) (E1e16) again using the diagnostic light pattern switched on; if necessary, correct by turning the adjustment screw for the height adjustment (H). | |||
| |||
Check the lateral adjustment of the left low beam headlamp (long range) (E1e16) with the diagnostic light pattern switched on; if necessary, correct by turning the adjustment screw for the lateral adjustment (S). | |||
Finishing activity | |||
7 | Reset switch positions to input condition | Only if the high beam setting is not to be checked afterwards. |