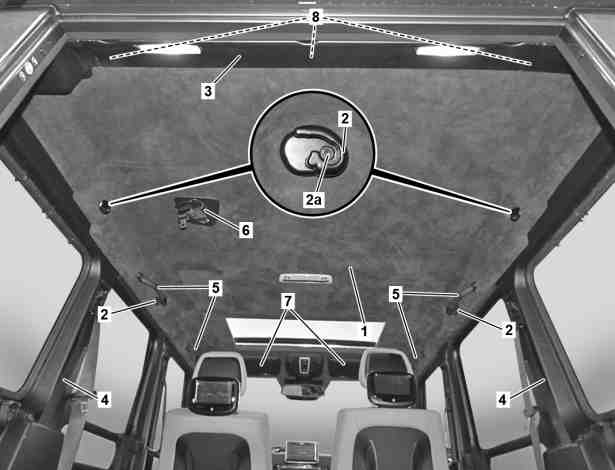
1 | Headliner |
2 | Bracket |
2a | Screw |
3 | Cover |
4 | Cover |
5 | Grab handles |
6 | Seat belt guide |
7 | Sun visors |
8 | Bolts |
P68.30-3613-06
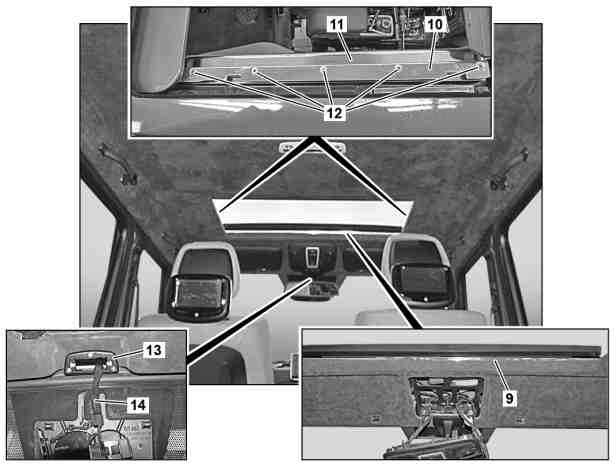
9 | Trim element |
10 | Guide rail |
11 | Cover |
12 | Bolts |
13 | Bracket |
14 | Electrical connector |
P68.30-3611-06

1 | Headliner |
15 | Plate clamps |
16 | Plate clamps |
P68.30-3612-12
Topical note | Notes on battery | ||
| Remove/install | ||
1 | Open sliding roof completely. | ||
2 | Remove rear seat and seat backrest in rear passenger compartment. |
| |
Only left rear seat. | |||
3 | Move driver's seat toward rear into end position. | ||
4 | Remove ground line at battery. |
| |
Model 463 (except 463.202/234/236/241/242/248) | |||
5 | Remove screw (2a). | ||
6 | Remove holder (2). | ||
7 | Remove trim (3). |
| |
8 | Remove side trims (4). |
| |
9 | Remove grab handles (5). |
| |
10 | Remove seat belt guide (6) of center rear seat belt from roof lining (1). | ||
11 | Remove sun visors (7). |
| |
12 | Remove trims from A-pillars. |
| |
Model 463 (except 463.202/242) | |||
13 | Remove the overhead control panel. | ||
14 | Remove inside rearview mirror. | ||
15 | Disconnect electrical connector (14) from rain sensor (B38/2). | ||
16 | Remove screws from holder (13). | ||
17 | Remove holder (13). | The holder (13) is secured with three screws. | |
18 | Remove reading lamp in rear passenger compartment. | ||
19 | Remove screws from trim element (9). | ||
20 | Remove trim element (9). | The trim element (9) is secured with six screws. | |
21 | Remove screws (12) from both guide rails (10). | ||
22 | Remove guide rails (10) and covers (11) located below. | Installation: Coat left and right slide shoes with grease. | |
Synthetic grease, sliding roof 500 g, DB supply specification 6827.60 | |||
23 | Unhook roof lining (1) at tilting/sliding roof opening. | To do so, unhook metal clips (15, 16). | |
24 | Remove screws (8) of roof lining (1). | ||
25 | Disconnect velcro connections (arrows) between roof panel and roof lining (1). | Secure roof lining (1) against falling down with the aid of a second person. | |
26 | Lower left roof lining (1) and remove diagonally through rear-end door opening. | ||
27 | Install in reverse order. | ||
| Check | ||
28 | Read out and clear fault memory with XENTRY Diagnosis. | ||
| |||
29 | Perform function test of all removed component parts. |
Documente menționate
- ad0000p200004a Conectaţi STAR DIAGNOSIS, citiţi memoria de erori
- ad0000p200004a
- ah5410p000101a Indicaţii pentru acumulator
- ah5410p000101a
- ar5410p0003gw
- ar5410p0003pm Deconectare, conectare cablu de masă acumulator
- ar6830p1450gw
- ar6830p1450gwc
- ar6830p4050gw
- ar6830p4050gwa
- ar6830p430101gw
- ar6830p4470gw
- ar6840p0001gw
- ar6860p5480gw
- ar8220p1000gw Demontarea, montarea calculatorului unităţii de comandă la plafon
- ar8220p1120gw Demontare, montare lampă de citit în spate
- ar9112p1700gw