AR68.30-P-4300AK | Remove/install headliner | 15.11.11 |
MODEL 169.0 /3 except CODE (417) Lamella roof
MODEL 245.2
except CODE (417) Lamella roof
except CODE (416) Fixed panoramic glass roof

P68.30-3125-06
Shown on model 169.0
1 Headliner
2 Expansion clip
3 Edge guard
5 Spacer
6 Electrical connectors
Modification notes
| Removing | ||
| Note on function reliability of windowbag | ||
1 | Remove overhead control panel control unit | ||
2 | Remove expansion clip (2). | ||
3 | Remove left and right sun visor | ||
4 | Separate electrical connectors (6) | Number of electrical connectors (6) according to equipment. | |
5.1 | Remove paneling from left and right upper B-pillar | Model 169.0, 245.2 | |
5.2 | Remove left and right B-pillar paneling | Type 169.3 | |
6 | Remove paneling from left and right C-pillar | Do not remove belt end fitting Lay paneling with seat belts installed down to side | |
Type 169.0 | |||
Type 169.3 | |||
Model 245.2 | |||
7 | Remove Parktronic system warning display (PTS) in rear | On vehicles with code (220) Parktronic system (PTS). | |
8 | Remove rear dome lamp | Not on vehicles with code (876) Interior lights package | |
9 | Remove eyeglass compartment on driver-side from roof | Model 245.2 | |
10 | Remove all handles from roof | ||
11 | Remove edge guard (3) from all door cutouts in area of headliner (1). | ||
Danger! | Risk of injury due to tear or warming up of cutting wire and through glass splinters when cutting out glued windows | Wear protective gloves and safety glasses. | |
12 | Cut out headliner with cutting wire | Replace headliner (1) because it will be damaged during removal. | |
Glass removal gotis://K_67.0_01.0 | |||
13 | Remove headliner (1) from vehicle through rear wall cutout. | ||
| Clean | ||
14 | Remove old adhesive bead and remove grease from roof paneling | Clean carefully! Otherwise the roof paneling can be damaged. | |
Observe drying time for cleaning agent | |||
Cleaner | |||
15 | Repair paint damage with primer stick | ||
| Install | ||
16 | Prepare new headliner (1) for installation | ||
17 | Uniformly apply adhesive bead to imprint of old glue bead | Apply adhesive bead carefully. Danger of damaging vehicle interior. | |
Width of adhesive bead, approx. 7 mm; height of adhesive bead, approx. 8 mm. | |||
Mechanical cartridge gun gotis://K_67.0_02.1 | |||
Beta Seal adhesive | |||
18 | Lay headliner (1) through rear-end door cutout into vehicle with aid of helper | Handle headliner (1) carefully Danger of damaging headliner (1). | |
Lay headliner (1) down on head restraints of front seat and rear bench seat | |||
19 | Position headliner (1) on vehicle roof with aid of helper and press on roof paneling in area of adhesive bead. | Press headliner (1) on only until headliner (1) can be moved for installing grab handles. | |
20 | Install all handles on roof | If required, align headliner (1) again. | |
21 | Install eyeglass compartment on driver-side on roof | Model 245.2 | |
22 | Roll headliner (1) onto roof paneling with roller | | |
23 | Install dome lamp in rear | Not on vehicles with code (876) Interior lights package | |
24 | Install Parktronic warning display (PTS) in rear | On vehicles with code (220) Parktronic system (PTS). | |
25 | Right and left paneling Install C-pillar | Type 169.0 | |
Type 169.3 | |||
Model 245.2 | |||
26.1 | Install paneling on left and right upper B-pillar | Model 169.0, 245.2 | |
26.2 | Install paneling on left and right B-pillar | Type 169.3 | |
27 | Install edge guard (3) on all door cutouts | Ensure correct seating. | |
28 | Connect electrical connectors (6) | Number of electrical connectors (6) according to equipment. | |
29 | Install left and right sun visor | ||
30 | Install expansion clip (2) | Replace damaged expansion clip (2). | |
31 | Install overhead control panel control unit. |
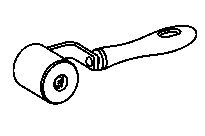
Roller
168 589 05 63 00
Repair materials
Number | Designation | Order number |
BR00.45-Z-1005-02A | Adhesive Betaseal 1751 | A 004 989 53 71 |
BR00.45-Z-1025-04A | Cleaner | A 005 989 19 71 |
Documente menționate
- ah9160p069301a Indicaţie pentru asigurarea funcţionării windowbag
- ar5465p0007ak
- ar6830p430019ak
- ar6830p4305ak
- ar6830p4330ak
- ar6830p4400bk
- ar6830p4490ak
- ar6830p4490al
- ar6830p4490bk
- ar6830p4700al
- ar6830p4700am
- ar6860p5480ak
- ar8220p0113ak Demontarea, montarea plafonierei în spate
- ar8220p1000ak Demontarea, montarea calculatorului unităţii de comandă la plafon
- as6700z000401a Pericol de rănire prin ruperea respectiv prin încălzirea sârmei de tăiere şi prin cioburi de sticlă la tăierea geamurilor lipite