
D68.30-2435-04
1 Cover
2 Front headliner
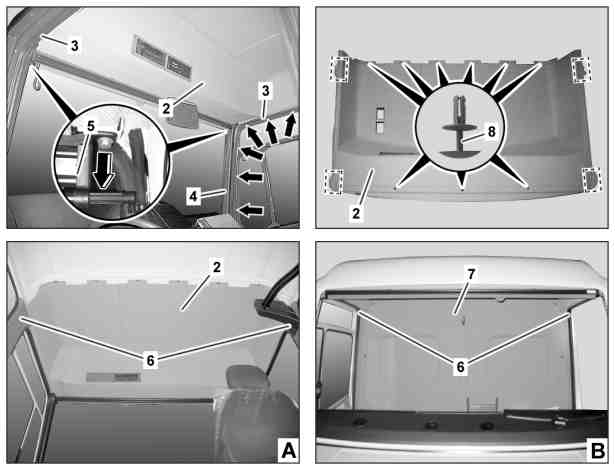
D68.30-2436-06
2 Front headliner
3 Rubber seal
4 A-pillar trim panel
5 Roller sun blind
6 B-pillar paneling
7 Rear wall paneling
8 Clips
A Vehicle variant with partition wall
B Vehicle variant with partition wall
| Remove/install | ||
1 | Remove roof hatch cover frame | On vehicles with roof hatch | |
2 | Remove electrical equipment with cover (1) from front headliner (2) | The number of the electrical devices installed can vary depending on the equipment. | |
3 | Remove inside rearview mirror | ||
4 | Remove interior illumination | ||
5 | Loosen rubber seal (3) in area of front headliner (2) and A-pillar paneling (4) on left and right | ||
6 | Remove A-pillar paneling (4) on left and right | ||
7 | Remove roller sun blind (5) | ||
8 | Remove upper door guide for sliding door | On vehicles with front sliding door. | |
9 | Remove B-pillar paneling (6) at top, in area of front headliner (2) on left and right | ||
10 | Remove upper rear wall paneling (7) in area of front headliner (2) | Only with code (D50) Full-width partition wall with window and without code (D51) Full-width partition wall with 1 window | |
Long wedge | |||
11 | Remove center headliner | Only with code (W02) Panel van with panorama glazing | |
12 | Remove clips (8) from front headliner (2) | Long wedge | |
13 | Unhook front headliner (2) from body panel in areas indicated by broken lines | ||
14 | Remove front headliner (2) | Aid of helper required. Guide front headliner (2) toward front, lower and remove from vehicle to side. | |
15 | Install in the reverse order |

Long wedge
115 589 03 59 00
Documentos referenciados
- ar7216d7841ad
- ar7755d6170ad Remover e instalar a escotilha do teto