S82.00-4507-09
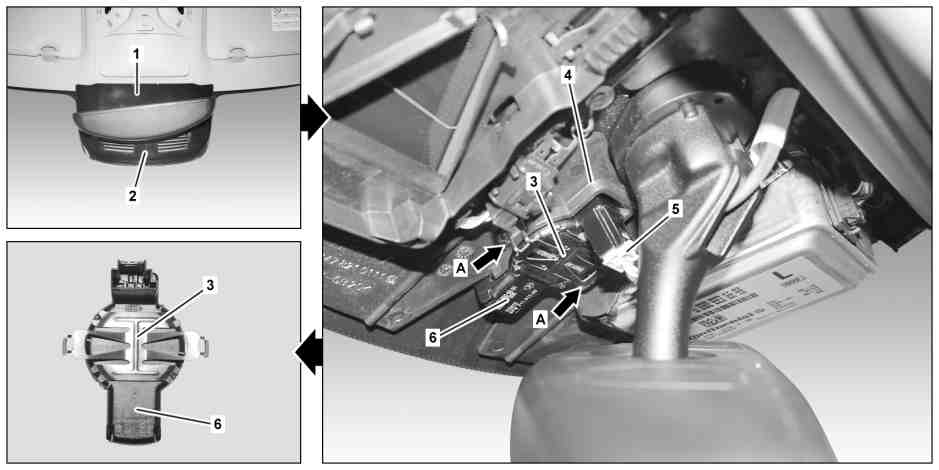
1 | Cover | 4 | Housing | |
2 | Cover | 5 | Electrical connector | |
3 | Retaining clamp | 6 | Humidity sensor/light sensor/rain sensor |
Topical note | Notes on carrying out repair work in the vehicle interior | ||
Topical note | Information on preventing damage to electronic components due to electrostatic discharge | ||
| Remove/install | ||
1 | Switch off ignition and store transmitter key outside of transmission range (min. 2 m). | ||
2 | Unclip and remove cover (1). | Installation: Make sure that the cover (1) is seated correctly. | |
Clip remover | |||
3 | Unclip and remove cover (2). | Installation: Ensure that cover (2) is seated correctly. | |
Clip remover | |||
4 | Release and disconnect electrical connector (5). | ||
5 | Release retaining clamp (3) on both sides (arrows A) from housing (4). | Retaining clip (3) is permanently installed on humidity sensor/light sensor/rain sensor (6). | |
6 | Remove humidity sensor/light sensor/rain sensor (6) with retaining clamp (3) from housing (4). | Installation: Always replace the humidity sensor/light sensor/rain sensor (6). | |
| Clean | ||
7 | Remove silicone residue from windshield. | | |
Loctite 7200 | |||
8 | Install in the reverse order. | ||
9 | Commission humidity sensor/light sensor/rain sensor (6). | ||
| |||
Either "Clear glass" or "Green glass" must be selected in the Adaptations/Teach-in processes/Rain and light sensor menu item. Otherwise, commissioning will not be completed successfully. | |||
10 | Set CAN bus to quiescent state. | Ignition must be switched off and vehicle must be locked. After 5 minutes, the CAN bus is in quiescent state and the new values are transferred to the rain sensor. | |
| Check | ||
11 | Check function of humidity sensor/light sensor/rain sensor (6). |

452 589 01 63 00
Clip remover
Powiązane dokumenty
- ad0000s200004e
- ah5400p000101a Wskazówki dotyczące zapobiegania uszkodzeniom elementów elektronicznych na skutek rozładowania potencjału elektrostatycznego
- ah6800n000101s Wskazówki dotyczące wykonywania prac naprawczych we wnętrzu pojazdu
- ar8200s002001s Przeprowadzenie kontroli działania czujnika deszczu i światła