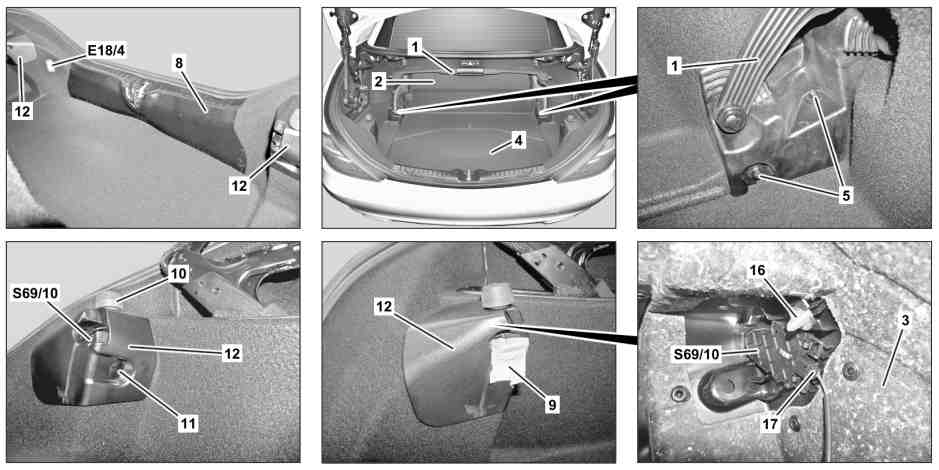
P68.30-3563-09
1 Trunk partition
2 Center trim
3 Side luggage compartment lining
4 Spare tire well cover
5 Nuts
8 Rear center section paneling
17 Electrical connector
E18/4 Right luggage compartment lamp
S69/10 Trunk partition "closed" limit switch
9 Adhesive tape strips
10 Rubber pad
11 Expansion clip
12 Support
16 Clip
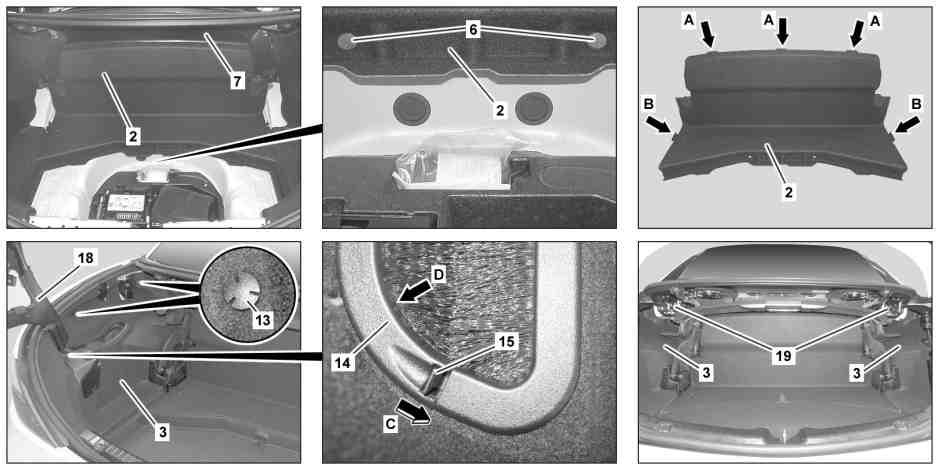
P68.30-3564-09
2 Center trim
3 Side luggage compartment lining
6 Expansion clip
15 Lug
18 Tubular frame
19 Vario roof main bearing
7 Cover
13 Expansion clip
14 Brush frame
| Remove/install | ||
1 | Open trunk partition (1) | Vario roof must be closed. | |
2 | Unscrew nuts (5) and remove trunk partition (1) from trunk | ||
3 | Remove spare tire well (4) from trunk | ||
4 | Remove expansion clips (6) | Clip remover | |
5 | Lift center paneling (2) and pull out of cover (7) toward rear | It is not necessary to remove the center paneling (2) to remove the side luggage compartment lining (3) | |
Installation: Ensure that lugs (arrows A) are seated correctly in cover (7) and lugs (arrows B) are seated correctly below side luggage compartment lining (3) | |||
6 | Remove rear center section paneling (8) | ||
7 | Fix trunk partition closed limit switch (S69/10) in "closed" position with adhesive strips (9) | ||
Danger! | Risk of injury caused by fingers being pinched or crushed when removing, installing or aligning hoods, doors, trunk lids, liftgates or sliding roof | Keep body parts and limbs well clear of moving parts. | |
8 | Positioning trunk lid to assembly position | ||
Support | |||
9 | Unclip right trunk lamp (E18/4) and lay toward inside through side luggage compartment lining (3) with electrical line connected | Only when removing right side luggage compartment lining (3). | |
10 | Remove expansion clip (10) and rubber bumper (11) from left and right mount (12). | ||
11 | Remove expansion clip (13) on left and right side luggage compartment lining (3) | Clip remover | |
12 | Open brush frame (14) on left or right side luggage compartment lining (3). For this purpose release lug (15) in direction of arrow and simultaneously press outer section (arrow D) of brush frame (14) downward. | Carefully open brush frame (14), otherwise lug (15) can break off. Installation: Lug (15) should arrest audibly. | |
13 | Unclip clips (16) on left and right side luggage compartment lining (3) from mount (12) | ||
14 | Disconnect electrical connector (17) from trunk partition "closed" limit switch (S69/10) | Only when removing left side luggage compartment lining (3). | |
15 | Detach left and right side luggage compartment lining (3) all the away around, extract from tubular frame (18) and remove | Installation: Ensure that side luggage compartment lining (3) is seated correctly in trunk seal and adjacent paneling. Particularly carefully position side luggage compartment lining (3) in area of main Vario roof (19). | |
16 | Install in the reverse order |


452 589 01 63 00
Snap-release tool
Support
170 589 04 63 00
Powiązane dokumenty
- ar8850p500001v
- as0000z001101a Niebezpieczeństwo zranienia przez zakleszczenie lub zmiażdżenie palców podczas demontażu, montażu i prac regulacyjnych przy pokrywach, drzwiach i oknie dachowym.