P68.30-3661-09
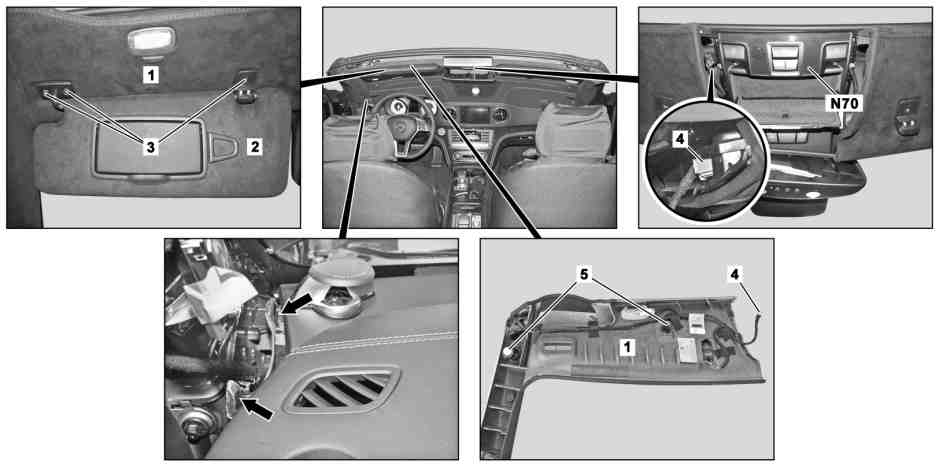
Shown on A-pillar paneling on left side of vehicle |
1 | A-pillar cover | 3 | Screw | 5 | Clip | ||
2 | Sun visor | 4 | Electrical connector | N70 | Overhead control panel control unit |
| Information on preventing damage to electronic components due to electrostatic discharge | ||
| Remove/install | ||
1 | Open Vario roof | ||
2 | Switch off ignition and remove transmitter key (A8/1) or KEYLESS-GO start/stop button (S2/3) from electronic ignition lock control unit (N73) | KEYLESS-GO start/stop button (S2/3) only with code (889) KEYLESS-GO. | |
3 | Unscrew bolts (3) and remove sun visor (2) | ||
4 | Remove A-pillar paneling (1) in area of sun visor bolted connections | Guide assembly wedge to clips (5) and unclip A-pillar paneling (1). | |
Mounting wedge | |||
5 | Disconnect electrical connector (4) from overhead control panel control unit (N70) | ||
6 | Remove A-pillar paneling (1) | Installation: Ensure that A-pillar paneling (1) is seated correctly in area of instrument panel (arrows). | |
7 | Install in the reverse order |

110 589 03 59 00
Mounting wedge
Powiązane dokumenty
- ah5400p000101a Wskazówki dotyczące zapobiegania uszkodzeniom elementów elektronicznych na skutek rozładowania potencjału elektrostatycznego