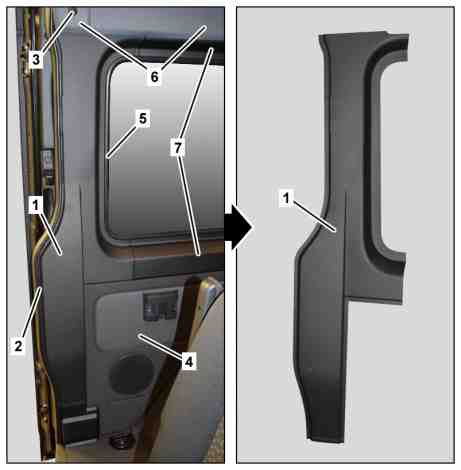
Shown on model 907.7 with code V21 (Luxury interior trim) with code EL9 (2-way speaker system, front and rear) |
1 | C-pillar paneling |
2 | Frame seal |
3 | Expansion rivet |
4 | Side wall lining |
5 | Edge guard |
6 | Roof linings |
7 | Window frame linings |
D68.30-A002-82
Topical note | Notes on carrying out repair work in the vehicle interior | ||
| Remove/install | ||
1 | Use emergency key to set rotary switch on sliding door to "MAN" position. | Model 907.6/7 | |
This deactivates the sliding door electric drive. | |||
2 | Full open relevant sliding door. | ||
3 | Unfasten sealing frame (2) in area of C-pillar trim (1). | ||
4 | Remove expansion rivet (3) and unfasten roof linings (6) in area of C-pillar trim (1). | Clip remover | |
5 | Unfasten side wall trim (4) in area of C-pillar trim (1). | Model 907.6/7 | |
6 | Unfasten edge guard (5) in area of C-pillar trim (1). | ||
7 | Slightly lift C-pillar trim (1) from C-pillar in area of sliding door cutout and pry off. | Installation: Ensure that the window frame linings (7) overlap the C-pillar trim (1). | |
The C-pillar trim (1) is bonded to the C-pillar with adhesive strips. | |||
Long wedge | |||
8 | Remove residual adhesive from C-pillar. | Cleaner | |
9 | Remove residual adhesive from C-pillar trim (1). | When reusing the C-pillar trim (1). | |
Cleaner | |||
10 | Attach new adhesive strips to C-pillar trim (1). | When reusing the C-pillar trim (1). | |
| |||
Double-sided tape with polyethylene foam support, Scotch-Mount 9528 | |||
11 | Install in the reverse order |


115 589 03 59 00
Long wedge
452 589 01 63 00
Clip remover
Powiązane dokumenty
- ah6800n000101s Wskazówki dotyczące wykonywania prac naprawczych we wnętrzu pojazdu
- ar6830d1209tsr