Additional information can be found in the superordinate service document.
The safety information in the superordinate service document must be observed.
The following steps are shown on the left side of the vehicle and must be performed analogously on vehicles with damage on the right side of the vehicle.
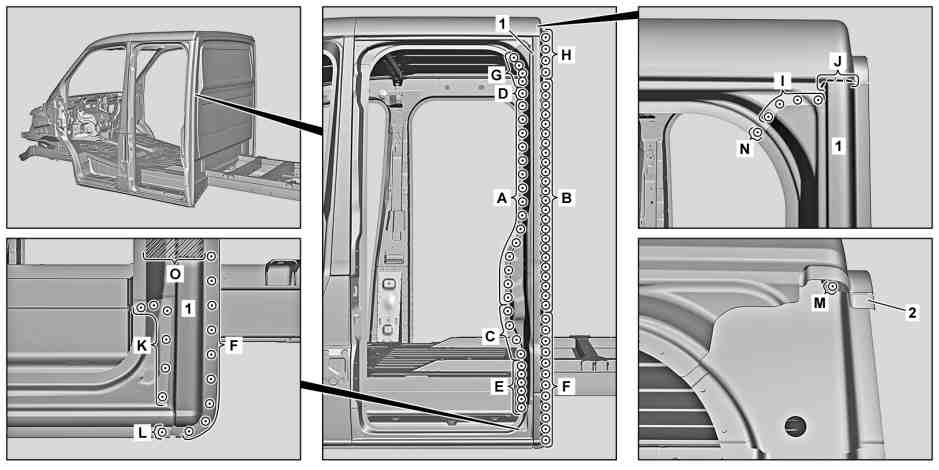
D63.20-1530-09
1 | Mark separating point on C-pillar paneling (1), as shown (area J). |
2 | Disconnect C-pillar paneling (1) at separating point (area J). |
Do not cut too deeply. |
Commercially available devices/tools |
3 | Expose spot welds on C-pillar paneling (1) (areas A, B, C, D, E, F, G, H, I, K, L, and N). |
Commercially available devices/tools |
4 | Cut off spot welds on C-pillar paneling (1) (areas A, B, C, D, E, F, G, H, I, K, L, and N). |
Commercially available devices/tools |
If C-pillar inner section is replaced: |
|
Cut off spot welds through 2 panel thicknesses (areas B, C, and D). |
5 | Heat C-pillar paneling (1) in hatched area (area O). |
6 | Remove damaged C-pillar paneling (1). |
7 | Expose spot weld on C-pillar paneling (1) (area M). |
Commercially available devices/tools |
8 | Cut off spot weld on C-pillar paneling (1) (area M). |
Commercially available devices/tools |
9 | Remove remaining piece of C-pillar paneling (2). |

10 | Grind mating surfaces down to bare metal in cross-hatched areas and around holes. |
Sand down spot weld flanges to bare metal on both sides. |
Commercially available devices/tools |
11 | Remove shavings and milling chips. |
Commercially available devices/tools |
12 | Zinc dust paint to insides of spot weld flanges. |
D63.20-1531-06