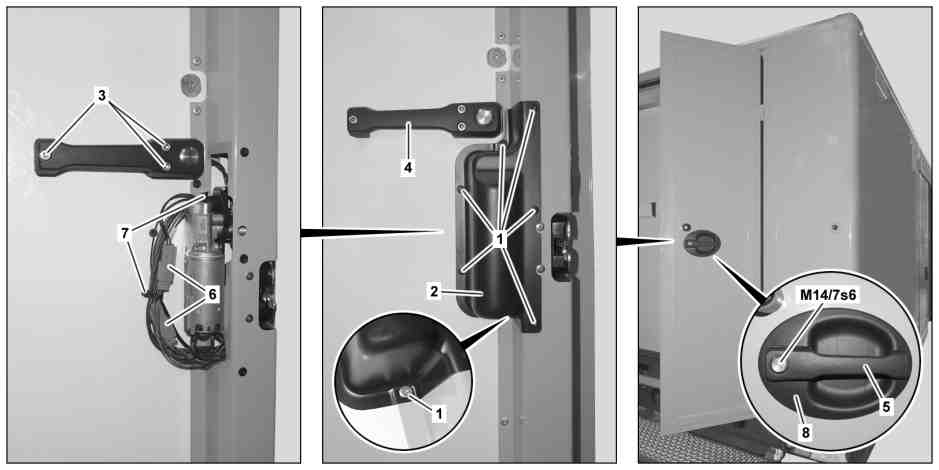
D72.20-1219-09
1 | Bolts | 4 | Inner door handle | 7 | Cable tie | ||
2 | Cover | 5 | Outer door handle | 8 | External door handle recess | ||
3 | Bolts | 6 | Electrical connectors | M14/7s6 | Rear-end door CL [ZV] outside door operation button |

9 | Fuse |
10 | Locking clip finger |
11 | Seal |
12 | Screwdriver |
D72.20-1224-05
| Remove | ||
Warning | Risk of poisoning caused by inhaling vapors or swallowing adhesive. Risk of injury caused by adhesive coming into contact with skin and eyes | Wear respiratory protection, protective gloves and safety glasses. Pour adhesive into suitable and appropriately marked containers only. | |
Topical note | Notes on gluing | ||
1 | Remove screw/bolts (1) | ||
2 | Remove cover (2) | ||
3 | Expose wiring harness | Separate the cable tie (7). | |
4 | Unscrew the screws (3) and hang the inner door handle (4) to one side | ||
5 | Lift the outer door handle (5) slightly and disconnect the relevant electrical connector (6) | ||
6 | Unpin the contacts from the electrical connector (6) | Pull out the orange retainer (9), press the retainer finger (10) down with the screwdriver (12), counterhold the seal (11) and pull out the contact. | |
7 | Remove the outer door handle (5) and pull the electrical line out of the rear-end door | ||
8 | Unscrew the union nut and push the door operation button of the rear-end door outer central lock (M14/7s6) out of the outer door handle (5) | Only when replacing the rear door central locking external door operation button (M14/7s6) or the external door handle (5). | |
9 | Disconnect the outer door handle recess (8) from the rear-end door with a suitable blade | ||
| Install | ||
10 | Press the door operation button of the rear-end door outer central lock (M14/7s6) into the outer door handle (5) and tighten the union nut | Only when replacing the rear door central locking external door operation button (M14/7s6) or the external door handle (5). | |
Check the seal of the door operation button of the rear-end door outer central lock (M14/7s6), and replace it if necessary. | |||
11 | Prepare the outer door handle recess (8) for installation | ||
Körasolv WL cleaner, 1 l | |||
Primer Körabond HG 81, 1l | |||
Körapop 235 sealing adhesive, broom yellow; 310 ml | |||
12 | Position the outer door handle recess (8) | ||
13 | Route the electrical line of the door operation button of the rear-end door outer central lock (M14/7s6) through the opening of the outer door handle recess (8) to the electrical connector (6) | ||
14 | Attach the outer door handle (5) | ||
15 | Tighten bolts (3) | Secure bolts (3). | |
Thread locking agent, Loctite 243 (10 ml) | |||
16 | Pin the contacts into the electrical connector (6) and connect the electrical connector (6) | Insert the contacts until they engage in the electrical connector (6) and engage the orange retainer (9). | |
17 | Secure the wiring harness in place | Replace cable tie (7). | |
18 | Place (2) in position and tighten the screws (1) |
Repair materials |
Number | Designation | Order number |
BR00.45-Z-1054-07A | Primer Körabond HG 81, 1l | Saxas Nutzfahrzeuge Werdau AG |
BR00.45-Z-1071-04A | Körasolv WL cleaner, 1 l | Saxas Nutzfahrzeuge Werdau AG |
BR00.45-Z-1103-01A | Körapop 235 sealing adhesive, broom yellow; 310 ml | Saxas Nutzfahrzeuge Werdau AG |
BR00.45-Z-1133-02A | Thread locking agent, Loctite 243 (10 ml) | A 613 989 09 71 09 |
Referenced documents
- ah6310n900001d Notes on gluing
- ar7220d242002b Prepare exterior door handle recess for installation
- as0000z001601a Risk of poisoning caused by inhaling vapors or swallowing adhesive. Risk of injury caused by adhesive coming into contact with skin and eyes