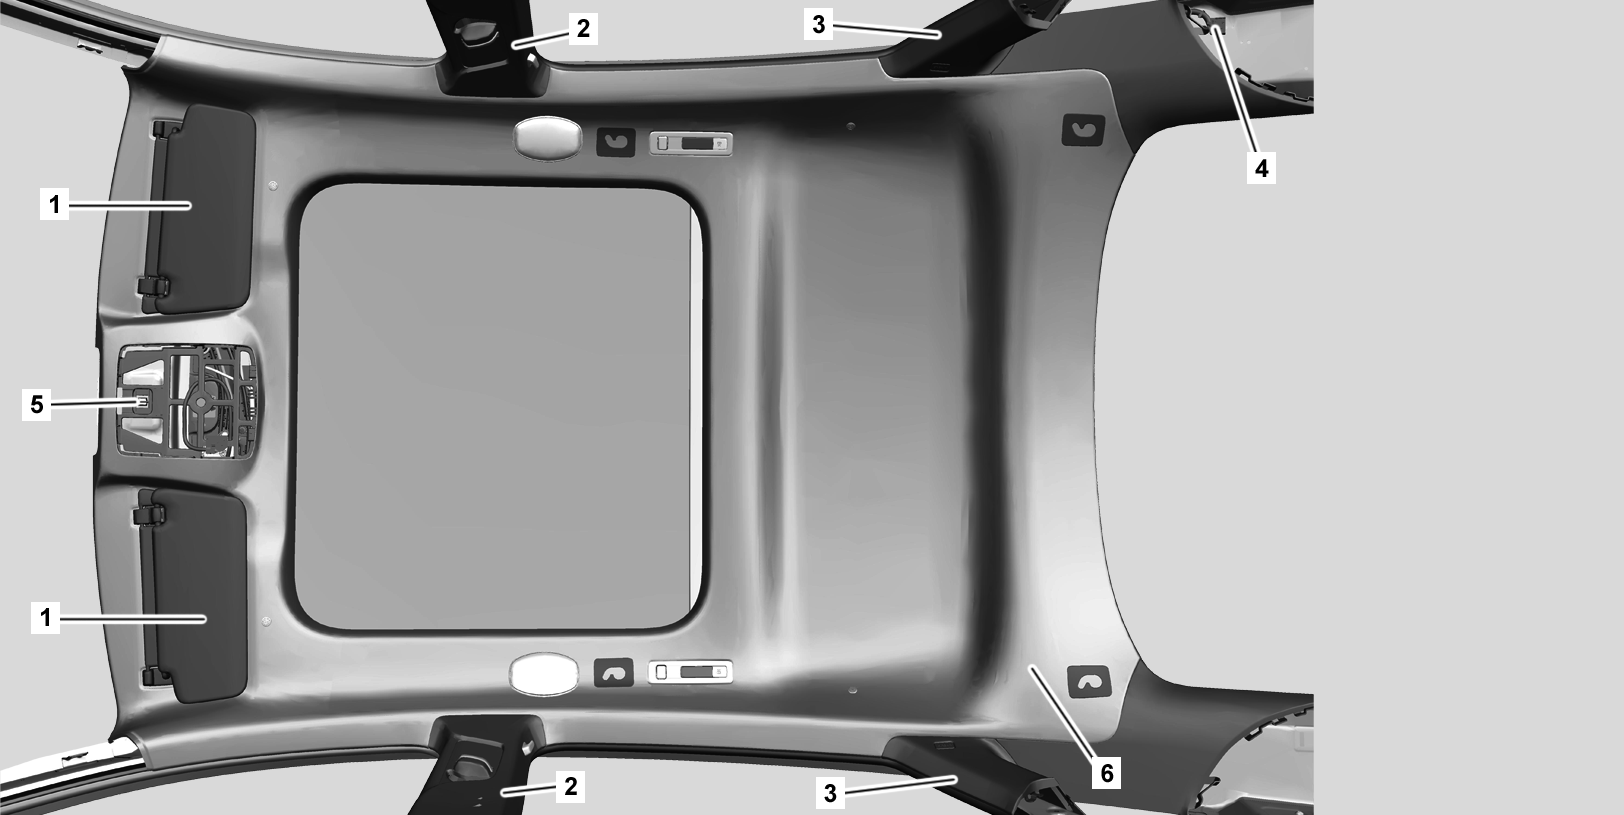
P68.30-A025-09
Shown with code 811 (Advanced Sound System), with code U40 (safety net for luggage compartment cover) and with code 413 (panoramic sliding sunroof) |
1 | Sun visor | 4 | Electrical connector | |
2 | B-pillar paneling | 5 | Frame | |
3 | C-pillar paneling | 6 | Headliner |
Warning | Risk of injury caused by fingers being jammed or pinched when removing, installing or aligning hoods, doors, trunk lid/rear-end door or sliding roof. | No parts of the body or limbs should be within the operating area when the components are moving. | |
Caution | Risk of injury caused by scraping or cutting body parts on sharp vehicle parts | Always wear protective gloves when working on or near sharp and non-deburred vehicle parts. | |
Topical note | Information on preventing damage to electronic components due to electrostatic discharge | ||
Notes on HANDS-FREE ACCESS | |||
Notes on safety-relevant components | |||
| Remove/install | ||
1 | Remove windshield. | ||
2 | Open liftgate and remove rear shelf. | ||
3 | Remove luggage security in the load compartment. | Model 167.3 | |
4 | Completely open roller sunblind on panoramic sliding sunroof. | Model 167.3 | |
5 | Remove overhead control panel control unit. | ||
6 | Remove sun visors (1). | ||
7 | Remove B-pillar trims (2) at the top. | ||
Do not remove door sills, trims on the seat frame, and or seat belt end fittings. The B-pillar trims (2) remain in the vehicle interior. | |||
8 | Remove C-pillar trims (3). | ||
9 | Release edge guard from the door cutouts and from the liftgate opening in the working area. | ||
10 | Fold forward rear seat backrests. | ||
11 | Fully lower front seats and move to foremost position, move backrests of front seats towards rear. | ||
12 | Release and disconnect electrical connector (4) at left D-pillar. | ||
13 | Release lock of frame (5) and detach from body. | ||
14 | Release roof lining (6) at panoramic sliding sunroof frame. | Model 167.3 | |
15 | Release roof lining (6) from roof and lower. | Helper required. | |
Roof lining (6) is fixed in place on roof in rear area with two magnets. | |||
16 | Remove roof lining (6) forwards through opening of removed windshield from vehicle. | | |
Helper required. | |||
17 | Check that all dampings at roof lining (6) are correctly seated and check for condition. | Model 167.3 | |
If the insulation is not seated correctly or is damaged, | |||
| |||
replace or fasten the insulation. | |||
18 | Install in the reverse order. |
Referenced documents
- ah0000z001901a Notes on safety-relevant components
- ah5400p000101a Information on preventing damage to electronic components due to electrostatic discharge
- ah8061p000101a Notes on HANDS-FREE ACCESS
- ar6710p1700me Remove, install windshield
- ar6830p4490mec Remove/install trim at C-pillar
- ar6830p4700me Remove/install paneling on B-pillar
- ar6860p5480me Remove/install sun visor
- ar8220p1000me Remove/install overhead control panel control unit
- as0000z001101a Risk of injury caused by fingers being jammed or pinched when removing, installing or aligning hoods, doors, trunk lid/rear-end door or sliding roof.
- as0000z001701a Risk of injury caused by scraping or cutting body parts on sharp vehicle parts