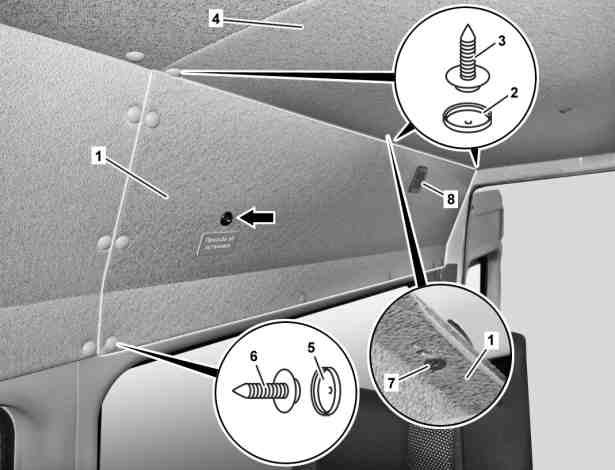
Shown on right side of vehicle |
1 | Side headliner |
2 | Cap |
3 | Screw |
4 | Upper headliner |
5 | Cap |
6 | Screw |
7 | Screw |
8 | Vent grille |
D68.30-2449-06
| Notes on carrying out repair work in the vehicle interior | ||
| Remove/install | ||
1 | Unclip caps (2) from bolts (3) on upper headliner (4) | The number of bolts (3) is dependent on the vehicle version. | |
2 | Remove screws/bolts (3) | ||
3 | Unclip caps (5) on bolts (6) from side headliner (1) | The number of bolts (6) is dependent on the vehicle version. | |
4 | Remove screw/bolts (6) | ||
5 | Unscrew bolt (7) | For this purpose pull down upper headliner (4) until bolt (7) is accessible. | |
6 | Lower side headliner (1) until electrical connector on stop signal switch (arrow) is accessible | When removing right side headliner (1). | |
Helper required to hold side headliner (1). | |||
7 | Disconnect electrical connector from stop signal switch (arrow) | When removing right side headliner (1). | |
Helper required to hold side headliner (1). | |||
8 | Remove side headliner (1) with aid of helper and remove from vehicle | ||
9 | Remove stop signal switch (arrow) | When replacing right side headliner (1). | |
10 | Remove vent grille (8) | When replacing side headliner (1). | |
11 | Install in the reverse order |
Referenced documents
- ah6800n000101s Notes on carrying out repair work in the vehicle interior