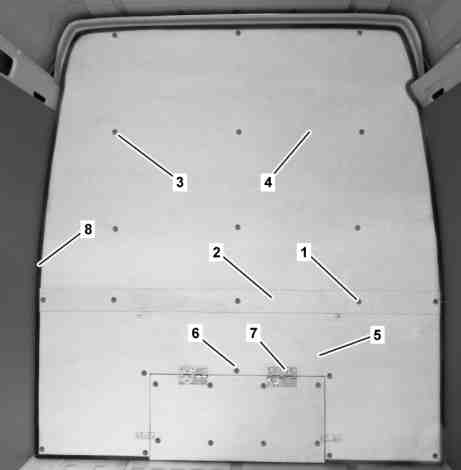
1 | Screw |
2 | Cover |
3 | Screw |
4 | Cover |
5 | Cover |
6 | Screw |
7 | Hinge |
8 | Edge guard |
D68.30-2476-12
Danger ! | Risk of poisoning caused by inhaling vapors or swallowing adhesive. Risk of injury caused by adhesive coming into contact with skin and eyes | Wear respiratory protection, protective gloves and safety glasses. Pour adhesive into suitable and appropriately marked containers only. | |
Danger ! | Risk of injury caused by fingers being jammed or pinched when removing, installing or aligning hoods, doors, trunk lid/rear-end door or sliding roof. | No parts of the body or limbs should be within the operating area when the components are moving. | |
| Remove | ||
1 | Remove upper paneling passenger compartment from partition wall | When removing paneling (4). | |
2 | Remove entire paneling in passenger compartment from partition wall | When removing paneling (5). | |
3 | Unscrew bolts (1) and remove paneling (2) | ||
4 | Unscrew bolts (3) and remove paneling (4) | When removing paneling (4). | |
5 | Unscrew bolts on hinges (7) from lower paneling (5) and remove partition wall flap | When removing paneling (5). | |
6 | Unscrew bolts (6) and remove paneling (5) | When removing paneling (5). | |
7 | Cut paneling (4) or paneling (5) out of passenger compartment with knife | Paneling (4) or paneling (5) is bonded to the partition wall. Helper required. | |
8 | Cut back remaining adhesive bead and remove loose adhesive material | ||
| Install | ||
9 | Cut open cartridge tip and uniformly apply adhesive material to partition wall with compressed air gun | Apply adhesive bead up to a height of approx. 5 m to 7 mm. | |
BETAMATE 1100N, 310 ml cartridge | |||
10 | Install paneling (4) or paneling (5) on partition wall | Helper required. | |
11 | Firmly tighten paneling (4) or paneling (5) with bolts (3) or bolts (6) | Ensure that the edge guard (8) is properly seated. | |
12 | Install partition wall flap | If paneling (5) has been removed. | |
13 | Firmly tighten paneling (2) with bolts (1) | Ensure that the edge guard (8) is properly seated. | |
14 | Install entire paneling in passenger compartment | If paneling (5) has been removed. | |
15 | Install upper paneling in passenger compartment | If paneling (4) has been removed. | |
Referenced documents
- ar6830d1401fa Remove/install front paneling at partition wall
- as0000z001101a Risk of injury caused by fingers being jammed or pinched when removing, installing or aligning hoods, doors, trunk lid/rear-end door or sliding roof.
- as0000z001601a Risk of poisoning caused by inhaling vapors or swallowing adhesive. Risk of injury caused by adhesive coming into contact with skin and eyes